Reading and Writing Data to File
The Application Builder provides several built-in methods for reading and writing different types of files: text files, CSV-files, Excel® files (requires LiveLink™ for Excel®), and binary files. These file methods are listed in the table “File Methods” on page 101.
Note that easy-to-use user-interface-based techniques for reading and writing to file are available in the Form editor of the Application Builder. It is recommended that you consider those techniques first before using the programming-based ways described in this section. For more information, see the book Introduction to Application Builder and “GUI Command Methods” on page 127. There, you can also find information on the various file schemes used in the Application Builder for reading and writing files when running applications in a web browser.
Reading and Writing Text and Spreadsheet Files Overview
The following built-in methods are available for reading and writing text files:
In addition, you can use the low-level methods available in the class CsReader to read text files line by line or character by character. See the next section, “Processing Text Files using the CsReader and CsWriter Classes” on page 182, for more information.
If you have a LiveLink™ for Excel® license, then the following methods are available for reading and writing Microsoft Excel Workbook files:
Introduction to Reading Files with A CSV-File Example
Assume that you want to automate a certain thermal analysis of a circuit board by creating an application that reads in data from a spreadsheet. Further assume that information about the circuit board components is given by a proprietary format in a spreadsheet with columns for component type, heat dissipation, locations, and sizes. Assume that such a file looks like:
B,0,0,0,-1.57,350,200,1.57
B,3,30,10,0,40,10,2
C,1,100,30,0,3,10,
C,1,110,30,0,3,10,
B,4,30,30,0,40,10,2
...
C,1,200,30,0,3,10,
B,10,100,150,0,10,20,30
B,10,130,150,0,10,20,30
B,10,160,150,0,10,20,30
Each row of the spreadsheet represents a different component. The first column can contain a letter, either B or C, denoting that the component can be modeled as either a Block or a Cylinder primitive. The next column is the total heat dissipation within the component (measured in watts). The next three columns represent the location of the component in the global Cartesian coordinate system (measured in millimeters). Lastly, if the row contains a block component, there are three more columns that denote the width, depth, and height of the block. If the row contains a cylinder component, then there are two more columns that contain the radius and height information, respectively.
For the example shown above, the first row of the spreadsheet represents the circuit board itself, which is 1.57 mm thick and 350 mm-by-200 mm. It is offset from the origin by 1.57 mm in the z direction and does not dissipate any heat.
You can write the data in the spreadsheet out to a comma-delimited text file, also known as a CSV-file. The user interface of the application used to read the data is shown in the figure below.
The Settings window for the File Import form object is shown in the figure below.
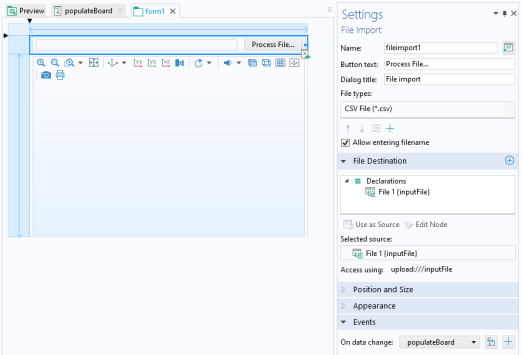
In the Settings window, CSV File (*.csv) is added to the File types list. When browsing for the file, this setting will filter out any file that is not a CSV-file.
There is also a File Declaration called File 1, which is referenced by the file scheme syntax upload:///inputFile in the method populateBoard, which is used to read and process the data. The method is called as an event shown at the bottom of the Settings window of the File Import form object in the Events section.
Note that if you would like to open a file browser from a button or a menu item, instead of using a File Import object, you can create a method that calls the built-in method importFile; for example
importFile("file1");
assuming there is a file declaration file1.
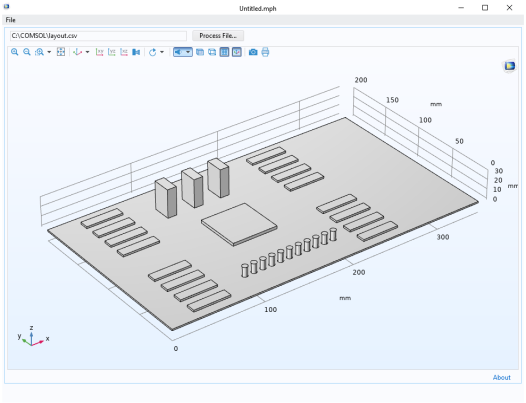
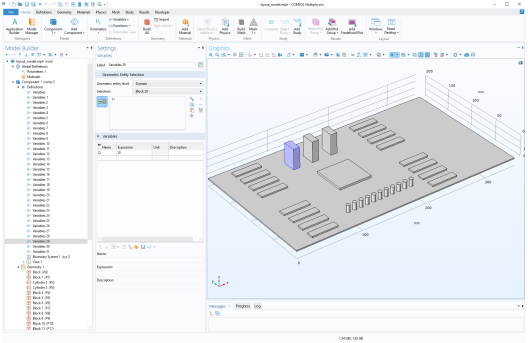
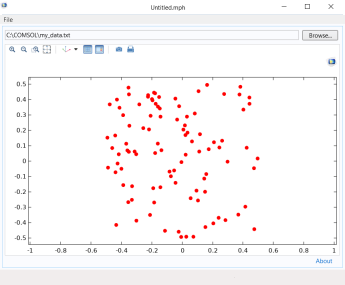
The method populateBoard is listed below.
String[][] D = readCSVFile("upload:///inputFile");
model.geom("geom1").feature().clear();
for (int k = 0; k < D.length; k++) {
  if (D[k][0].equals("B")) { // Read in a block
    model.geom("geom1").create("P"+k, "Block").set("pos", new       String[]{D[k][2], D[k][3], D[k][4]});
    model.geom("geom1").feature("P"+k).set("size", new String[]{D[k][5],       D[k][6], D[k][7]});
  }
  else if (D[k][0].equals("C")) { // Read in a cylinder
    model.geom("geom1").create("P"+k, "Cylinder").set("pos", new       String[]{D[k][2], D[k][3], D[k][4]});
    model.geom("geom1").feature("P"+k).set("r", D[k][5]);
    model.geom("geom1").feature("P"+k).set("h", D[k][6]);
  }
  model.geom("geom1").feature("P"+k).set("selresult", "on");
  model.variable().remove("var"+k);
  model.variable().create("var"+k).model("comp1");
  model.variable("var"+k).selection().named("geom1_P"+k+"_dom");
  model.variable("var"+k).set("Q", D[k][1]);
}
model.geom("geom1").run();
zoomExtents("/form1/graphics1");
Comments
In the first line, the data read from the CSV-file is stored in the 2D array D. The rest of the code parses this array and populates the various parts of a model object. The application allows you to save the result as an MPH-file with variables defined for the heat sources and geometry objects defined for the components, as shown in the figures below.
You can download the MPH-file for this app from:
https://www.comsol.com/model/using-text-files-to-automate-model-preprocessing-46721
Reading Excel Files
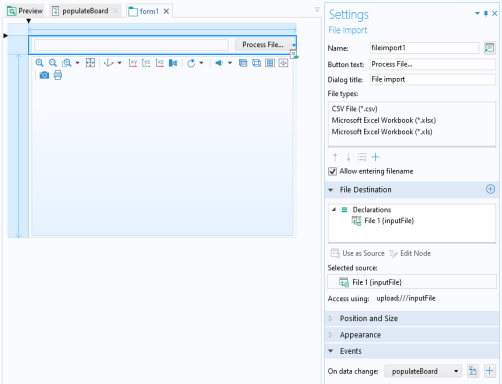
The application described above can easily be extended to also read Microsoft Excel® Workbook files. Note that this requires LiveLink™ for Excel®. In the Settings window for the File Import form object, you can add Microsoft Excel Workbook (*.xlsx) and Microsoft Excel Workbook (*.xls) to the File types section, as shown in the figure below.
The next step is to add a few lines of code in the beginning of the method populateBoard, as shown below.
String file_name = getFilePath("upload:///inputFile");
if (file_name.endsWith(".xls") || file_name.endsWith(".xlsx"))
  D = readExcelFile("upload:///inputFile");
else if (file_name.endsWith(".csv"))
  D = readCSVFile("upload:///inputFile");
else
  error("Unknown file type.");
Comments
The 2D array D can be defined as a global array in the Declarations node in the application tree. Alternatively, it can be declared as an array that is local to the method by adding the line
String[][] D = null;
before the if statement. Which option to choose depends on how you would like to use the 2D array data after having read the file.
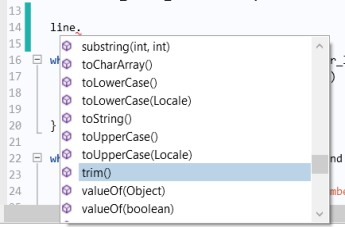
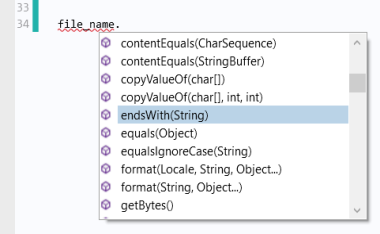
The method getFilePath returns the full path and name of the uploaded file. The if statements control which method is used to read the file based on its file extension. The file extension is retrieved with the Java® method endsWith(), which belongs to the String class. Note that you can see which methods are available for a string by typing the name of the string followed by a period and Ctrl+Space, as shown in the figure below.
Writing CSV-Files
You can write to a CSV-file using four different call syntaxes for the method writeCSVFile, depending on if the contents are strings or doubles and whether you would like to overwrite an already existing file or appending to its contents.
In the case above, the contents are a mix of numbers and characters, so the 2D array storing the information needs to be a string array.
Assume that we would like to move one of the components, say, the second to last one, in the file listed above. We would like to change the corresponding line in the file from
B,10,130,150,0,10,20,30
to
B,10,130,140,0,10,20,30
This corresponds to a change in the y-coordinate of one of the blocks from 150 to 140.
The following code shows how to make this change and then write data on this format, assuming that the array D has been declared as a global variable in the Declarations node, as described above.
int[] sz = matrixSize(D);
D[sz[0]-2][3] = "140.0";
writeCSVFile("temp:///my_layout.csv", D);
fileSaveAs("temp:///my_layout.csv");
Comments
The first line stores the size of the 2D array (or matrix) D in a 1-by-2 array (or vector) sz. The second line sets the string value of the y-coordinate of the block of the second-to-last row in D.
The line
writeCSVFile("temp:///my_layout.csv", D);
writes the data to a file my_layout.csv in a temporary folder whose location is determined by the Preferences of either COMSOL Multiphysics or COMSOL Server, depending on which software is used to run the application. For example, in a typical Windows® installation of COMSOL Multiphysics, the location will be similar to
C:\Users\paul\AppData\Local\Temp\
where the username is paul.
Writing Files in General
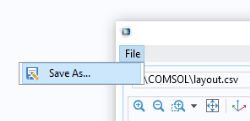
Note that as a first step in the example above, the file is written to a temporary file using the writeCSVFile method. This step is done automatically by the application. In the second step, the method fileSaveAs opens a file browser and lets the user of the application choose the file location; for example, a folder on the computer’s local file system or to a network folder. This extra step is needed in order for the application to function in a web browser. Due to the security settings of a typical web browser, the application is not permitted to automatically save a file to an arbitrary location. Instead, the application is allowed to save to a few specific locations, including the temp folder, whose location is specified in the Preferences settings. The other locations are the user and common folders, also specified in the Preferences settings. For more information, see the Introduction to Application Builder.
Writing Excel Files
If you have licensed LiveLink™ for Excel®, then you can write to a Microsoft Excel Workbook file in a way that is similar to that of a CSV-file, with the exception that the append option is not available. The following code, corresponding to the previous CSV-file example, shows how to write to an Excel file.
int[] sz = matrixSize(D);
D[sz[0]-2][3] = "140.0";
writeExcelFile("temp:///my_layout.xlsx", D);
fileSaveAs("temp:///my_layout.xlsx");
Reading Matrix Files
Reading files with numerical data in matrix format is easiest when using the readMatrixFromFile method. This method assumes that the file has the spreadsheet format, as available in the model tree Export node. The example below shows a file on the spreadsheet format.
% Model:             my_model.mph
% Version:            COMSOL 6.0.0.278
% Date:               Nov 1 2020, 8:00
% Dimension:          1
% Nodes:              5
% Expressions:        1
% Description:        Line graph
% x                   y
1.2 -0.45
1.11 -0.3
1.0440468877558806 -0.38655264416650392
1.041666666666667 -0.49166666666666667
1.02 -0.15
 
The first few lines with comments start with the character % and are ignored by the readMatrixFromFile method. You can optionally omit such lines and just have the numerical part of a file read by readMatrixFromFile. Assume that this file is uploaded to an application using a File Import form object and a File declaration file1. The following code can then be used to read the data into a double array p.
double p[][] = readMatrixFromFile("upload:///file1”);
The code below shows how to both import and visualize these points in an application that, in addition to a File Import form object and a File declaration file, has a form form1 and a graphics object graphics1.
double p[][] = readMatrixFromFile("upload:///file1");
double pt[][] = transpose(p);
 
String pgTag = model.result().uniquetag("pg");
ResultFeature pg = model.result().create(pgTag, 2);
ResultFeature plot = pg.create("pt1", "PointData");
 
plot.set("pointdata", pt);
plot.run();
 
useGraphics(model.result(pgTag), "form1/graphics1");
 
Reading files on the spreadsheet format as a string array can be done with the method readStringMatrixFromFile. Also, in this case, the comment lines will be ignored. The code below shows how you can replace the first few lines in the above example using readStringMatrixFromFile instead of readMatrixFromFile.
 
String p[][] = readStringMatrixFromFile("upload:///file1");
double pt[][] = transpose(toDouble(p));
The method readStringMatrixFromFile is most useful when parts of the read file contains text.
Writing Matrix Files
To write numerical matrix data to file, you can use the method writeFile. Assume that you want to write a matrix of random 2D coordinate values to a file on the spreadsheet format; for example:
-0.3604014719437022 0.06964952539192892
-0.043869911848460674 -0.14152948348300798
0.08279441507358754 0.3101282179426158
...
0.4419748551931647 0.4139106589169702
0.15830016844077643 -0.08445989494858042
0.38236182707603905 0.4837445802317204
The code below shows how to do this.
int N = 100;
double[][] p = new double[N][2];
for (int k = 0; k < N; k++) {
  p[k][0] = Math.random()-0.5;
  p[k][1] = Math.random()-0.5;
}
writeFile("temp:///my_data.txt", p);
fileSaveAs("temp:///my_data.txt");
The resulting file can now be read back in and plotted by using the code of the previous example. The result, in an application, may look like the figure below.
Note that you can append data to an already existing file by providing an additional Boolean input argument; for example:
writeFile("temp:///my_data.txt", p,true);
fileSaveAs("temp:///my_data.txt");
If you would like to export a matrix with a mix of numeric and text data, you can use the writeFile method with a string array instead of a double array. The syntax for this case is otherwise identical to that of the double array shown in the example above.
Reading a Text File to a String
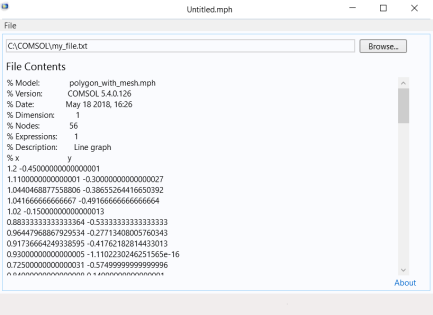
For reading text files into a string, you can use the method readFile. A straightforward use of 
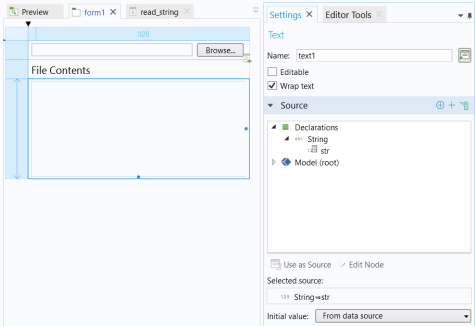
readFile is for previewing a text file; for example, before importing and parsing it, as illustrated by the example application in the figure below.
This application has two form objects: a File Import form object referencing a File declaration file1 and a Text form object referencing a string str declared in the Declarations node as a global variable.
The File Import form object has an Event that calls the method read_string upon data change.
This method has one line of code, as shown below.
str = readFile("upload:///file1");
Since the Text object is referencing the global string str, the contents of the file are displayed in the Text object immediately after import.
Parsing of smaller text files can be done with readFile in combination with the many text processing methods available in the String class. However, it is often more efficient to use methods in the CsReader class, as described in the section “Processing Text Files using the CsReader and CsWriter Classes” on page 182, especially for larger text files. The reason is that when using the readFile method, the entire file is read into a string with all its contents kept in memory; whereas when using the CsReader class methods, only small portions of the file are kept in memory at any given time.
If you would like to parse smaller text files using readFile, then the built-in “String Methods” on page 150 are useful. The example code below illustrates using the built-in methods findIn, substring, split, as well as the regular Java® methods System.getProperty and String.startsWith. The example parses the header of a text file containing polygon information to retrieve information about the number of points of each polygon in the main body of the file (not shown) as well as the number of properties (for example, color or material property). The header portion of the file may look like the example below.
Demo file for string parsing
Created on May 1st 2018
begin_header
number_of_points 4
number_of_properties 4
end_header
The code for parsing the header is listed below. It stores the number of points and properties in the variables n_of_points and n_of_properties, respectively. To keep things simple, no error handling is done. For example, the code assumes that there is exactly one instance of begin_header and end_header.
int n_of_points = 0;
int n_of_properties = 0;
 
String fileContents = readFile("upload:///file1");
String eol = System.getProperty("line.separator"); // find the system end of line
 
int headerBeginIndex = findIn(fileContents, "begin_header");
int headerEndIndex = findIn(fileContents, "end_header");
 
String headerContents = substring(fileContents, headerBeginIndex,   headerEndIndex-headerBeginIndex); // Convert to string array by splitting at   each line.
String[] headerContentsArr = split(headerContents, eol);
int ix = 1;
String[] headerRowArr = new String[2];
do {
  // Split each line at space.
  headerRowArr = split(headerContentsArr[ix], " ");
  if (headerRowArr.length == 2) {
    if (headerRowArr[0].trim().equalsIgnoreCase("number_of_points"))
          n_of_points = toInt(headerRowArr[1]);
    if (headerRowArr[0].trim().equalsIgnoreCase("number_of_properties"))
          n_of_properties = toInt(headerRowArr[1]);
  }
  ix++;
} while (ix < headerContentsArr.length);
The Java® String class has many methods for text processing. See the online Java® documentation for more information.
Writing a String to a Text File
The following example shows how to use the method writeFile to write a string to file.
String contents = "# Created by me\r\n"
  +"# Version 1.0 of this file format \r\n"
  +"# Body follows\r\n"
  +"0 1 \r\n"
  +"2 3\r\n"
  +"4 5\r\n";
 
writeFile("temp:///my_data.txt", contents);
fileSaveAs("temp:///my_data.txt");
The use of the file scheme syntax temp:/// is described above in the earlier examples of this section. The end-of-line characters of this example are for Windows®; see also “Special Characters” on page 11.
To append additional data to the same file, for example:
String contents_2 = "6 7\r\n"
  +"8 9\r\n"
  +"10 11\r\n";
use an additional Boolean input argument, which appends data when set to true:
writeFile("temp:///my_data.txt", contents_2, true);
fileSaveAs("temp:///my_data.txt");
Processing Text Files using the CsReader and CsWriter Classes
The most efficient and flexible way to read and write to a text file is to use the methods in the CsReader and CsWriter classes, respectively. However, using the methods of these classes is more complicated than using any of the built-in methods described above.
The CsReader class inherits all public methods of the abstract Java® class Reader. In a similar way, the CsWriter class inherits all public methods of the abstract Java® class Writer. This means that when using these classes, you get access to a large number of methods for processing text files. These methods are not documented here, but you can find a lot of information with regards to using these methods online as well as in books on Java® programming. In addition, you can see which methods are available by using code-completion Ctrl+Space.
Reading Text Files using the CsReader Class
The example code below shows how to parse the text file header of the earlier example for reading strings using the built-in method readFile. The header may look like:
Demo file for string parsing
Created on May 1st 2018
begin_header
number_of_points 4
number_of_properties 4
end_header
and the corresponding code is listed below (compare with the example “Reading a Text File to a String” on page 179).
int n_of_points = 0;
int n_of_properties = 0;
int max_header_length = 100;
 
CsReader reader = openFileStreamReader("upload:///file1");
 
String line; // Each line in the file
String[] lineArr; // The contents of each line in an array
int li = 0; // Line counter
 
boolean begin_header_found = false;
boolean end_header_found = false;
 
while (!begin_header_found && li < max_header_length && ((line = reader.readLine()) != null)) {
  if (line.trim().startsWith("begin_header"))
    begin_header_found = true;
  li++;
}
 
while (begin_header_found && !end_header_found && li < max_header_length && ((line = reader.readLine()) != null)) {
  lineArr = split(line, " ");
  if (lineArr[0].trim().equalsIgnoreCase("number_of_points"))
    n_of_points = toInt(lineArr[1]);
  if (lineArr[0].trim().equalsIgnoreCase("number_of_properties"))
    n_of_properties = toInt(lineArr[1]);
  if (line.trim().startsWith("end_header"))
    end_header_found = true;
  li++;
}
if (!begin_header_found || !end_header_found)
  error("File does not have the right format.");
Comments
The line
CsReader reader = openFileStreamReader("upload:///file1");
opens a Java® character stream and assigns it to the object reader belonging to the class CsReader.
The while loop condition contains the statement
(line = reader.readLine()) != null)
which is reading a line from the character stream and storing the result in the string line. A line is considered to be terminated by one of the characters carriage return \r, line feed \n, or the composite \r\n. If there are no more lines to read, then null is returned.
For more information on the string methods used in this and earlier examples, including findIn, substring, and split, see the section “Writing a String to a Text File” on page 181.
Note that you can see which additional methods are available for the reader object by using Ctrl+Space, as shown in the figure below.
By using Ctrl+Space following a string, you can see the many additional methods available for strings, including the trim method used in the example above:
Writing Text Files using the CsWriter Class
The example of the section “Reading Matrix Files” on page 177 uses an example on the spreadsheet data format. This section contains an example that writes a file on the sectionwise format, the other primary format in COMSOL Multiphysics for saving postprocessing data. Data on the sectionwise format can, for example, be read into an Interpolation Curve geometry primitive. A file on the sectionwise format may look like this:
% Version: COMSOL 6.0.0.278
% Date: Nov 1 2020, 8:00
% Description: Interpolation curve
% Coordinates
-1.1 -0.8
1.2 -0.9
0.9 1.3
-0.8 1.05
% Elements (segments)
1 2
2 3
3 4
The first few lines with comments start with the character % and are ignored when imported as an Interpolation Curve. The first section containing data starts on the line after % Coordinates. The second section containing data starts on the line after % Elements (segments). Note that the strings Coordinates and Elements (segments) are not necessary but each section containing data will be assumed to start after each block of comments, regardless of what comes after the character %. There may be additional blocks of data when, for example, exporting Contour plot data.
The following example code uses a CsWriter stream to write interpolation curve data to a text file. A template point set p is copied in a circular pattern for a given radius R and number of copies n_of_copies.
CsWriter writer = openFileStreamWriter("temp:///my_curve.txt");
 
int n_of_copies = 10;
double[][] p = {{-1.2, -0.9}, {0.9, -1.1}, {1.3, 0.8}, {-0.9, 1.0}}; // template
int template_length = p.length;
double R = 10;
double px, py;
double pi = Math.PI;
String line;
int i1, i2;
 
String header = "% Version:\tCOMSOL 6.0.0.278\r\n"
  +"% Date:\tMay 5 2018, 8 : 00\r\n"
  +"% Description:\tInterpolation curve\r\n"
  +"% Coordinates:\r\n";
 
writer.append(header);
 
for (int j = 0; j < n_of_copies; j++) {
  for (int i = 0; i < template_length; i++) {
    px = p[i][0];
    py = p[i][1];
    px = px+R*Math.cos(2*pi*j/n_of_copies);
    py = py+R*Math.sin(2*pi*j/n_of_copies);
    line = toString(px)+"\t"+toString(py)+"\r\n";
    writer.append(line);
  }
}
 
writer.append("% Elements (segments):\r\n");
 
for (int j = 0; j < n_of_copies; j++) {
  for (int i = 0; i < template_length; i++) {
    i1 = i+1;
    i2 = (i+1)%template_length+1;
    i1 = i1+j*template_length;
    i2 = i2+j*template_length;
    line = toString(i1)+"\t"+toString(i2)+"\r\n";
  writer.append(line);
  }
}
writer.flush();
writer.close();
 
fileSaveAs("temp:///my_curve.txt");
Comments
The line
CsWriter writer = openFileStreamWriter("temp:///my_curve.txt");
opens a Java® character stream and assigns it to the object writer belonging to the class CsWriter.
The line
writer.append(header);
appends the contents of the string header to the (empty) file my_curve.txt.
The line
writer.flush();
writes the contents of the character stream buffer to file and empties the buffer but does not close the stream permanently. At this point, you can still write more data to the stream.
The line
writer.close();
closes the stream permanently. If you wish to write additional data to the file, you have to open the stream again and append additional data.
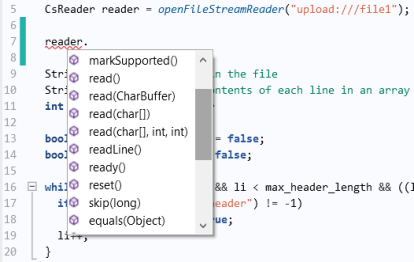
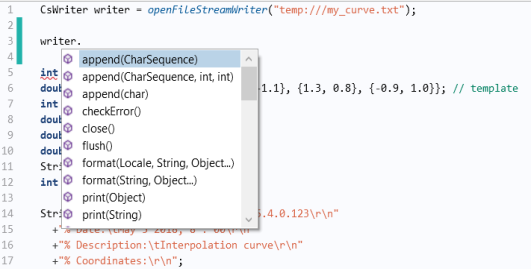
Just as described above for the reader object, you can see which additional methods are available for the writer object by using Ctrl+Space, as shown in the figure below.
You can import the resulting interpolation data as an Interpolation Curve by selecting the Sectionwise option for Data format. This can be done for a 2D geometry object or for a Work Plane in 3D. The figure below shows the data imported to a 2D model.
Writing Binary Files
You write data to a binary file by using the methods of the class CsBinaryWriter in a way that is somewhat similar to that of writing text using CsWriter. However, instead of writing strings and characters, you are writing bytes. To see how many bytes each data type requires, see the table in the section “Primitive Data Types” on page 8.
The example code below writes random 3D point data to a binary file. Each point coordinate is stored as a double and takes 8 bytes to store. The first 4 bytes of the file stores the number of points in the file as an int.
To conveniently convert between the regular data types, such as double, int, and byte arrays, the Java® library method java.nio.ByteBuffer is needed. This method is not part of the standard methods available in the Method Editor and you need to use the fully qualified Java® class name java.nio.ByteBuffer, as shown in the example code below.
byte[] bytes8 = new byte[8];
byte[] bytes4 = new byte[4];
CsBinaryWriter bwriter = openBinaryFileStreamWriter("temp:///my_binary_file.dat");
int N = 1000;
java.nio.ByteBuffer.wrap(bytes4).putInt(N);
bwriter.write(bytes4);
 
double p[][] = new double[N][3];
for (int k = 0; k < N; k++) {
  p[k][0] = Math.random();
  java.nio.ByteBuffer.wrap(bytes8).putDouble(p[k][0]);
  bwriter.write(bytes8);
  p[k][1] = Math.random();
  java.nio.ByteBuffer.wrap(bytes8).putDouble(p[k][1]);
  bwriter.write(bytes8);
  p[k][2] = Math.random();
  java.nio.ByteBuffer.wrap(bytes8).putDouble(p[k][2]);
  bwriter.write(bytes8);
  bwriter.flush();
}
bwriter.close();
fileSaveAs("temp:///my_binary_file.dat");
Comments
The first two lines declare byte arrays of size 8 and 4, respectively
The line
CsBinaryWriter bwriter = openBinaryFileStreamWriter("temp:///my_binary_file.dat");
opens a Java® byte stream.
The line
int N = 1000; // The number of points
denotes the number of points written to file.
The line
ByteBuffer.wrap(bytes4).putInt(N);
uses the imported ByteBuffer method to convert the integer N to a byte array bytes4 of length 4.
The line
bwriter.write(bytes4);
writes the value of N to file.
The for-loop creates N points and writes each x-, y-, and z-coordinate as doubles using a byte array bytes8 of length 8.
The line
bwriter.flush();
empties the byte buffer and the last two lines
bwriter.close();
fileSaveAs("temp:///my_binary_file.dat");
close the byte stream and display a file browser to the user to select a location to save the binary file.
Reading Binary Files
Based on the data format of the previous example, the code below reads a corresponding binary file and plots the points as 3D point data.
byte[] bytes8 = new byte[8];
byte[] bytes4 = new byte[4];
CsBinaryReader breader = openBinaryFileStreamReader("upload:///file1");
 
breader.read(bytes4);
int N = java.nio.ByteBuffer.wrap(bytes4).getInt();
 
double p[][] = new double[N][3];
 
for (int k = 0; k < N; k++) {
  breader.read(bytes8);
  p[k][0] = java.nio.ByteBuffer.wrap(bytes8).getDouble();
  breader.read(bytes8);
  p[k][1] = java.nio.ByteBuffer.wrap(bytes8).getDouble();
  breader.read(bytes8);
  p[k][2] = java.nio.ByteBuffer.wrap(bytes8).getDouble();
}
breader.close();
 
double pt[][] = transpose(p);
 
String pgTag = model.result().uniquetag("pg");
ResultFeature pg = model.result().create(pgTag, 3);
ResultFeature plot = pg.create("pt1", "PointData");
 
plot.set("pointdata", pt);
plot.run();
 
useGraphics(model.result(pgTag), "form1/graphics1");
Comments
The line
CsBinaryReader breader = openBinaryFileStreamReader("upload:///file1");
opens a Java® byte stream based on a File declaration file1, typically referenced in a File Browser form object, as in the earlier examples on reading text files.
The two lines
breader.read(bytes4);
int N = ByteBuffer.wrap(bytes4).getInt();
read the first 4 bytes and convert them to an int N.
The following for-loop reads chunks of 8 bytes into the byte array bytes8, converts them and stores the results in a 2D double array p.
The line
breader.close();
closes the byte stream.
The last section of the example code plots the data and is similar to the example in “Reading Matrix Files” on page 177.
Additional Comments on Reading and Writing Binary Formats
When processing binary files, there are two formats in which bytes can be stored: little endian and big endian, respectively. By default, Java® uses the big endian format. For example, the line
p[k][2] = ByteBuffer.wrap(bytes8).getDouble();
is the same as
p[k][2] = ByteBuffer.wrap(bytes8).order(ByteOrder.BIG_ENDIAN).getDouble();
In case the format you are reading is on the little endian format, the corresponding line should be
p[k][2] = ByteBuffer.wrap(bytes8).order(ByteOrder.LITTLE _ENDIAN).getDouble();