|
|
|

|
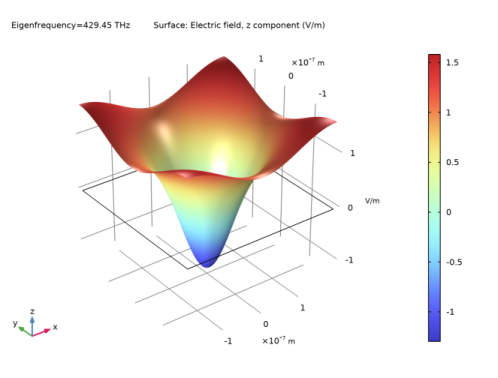
1
|
|
2
|
In the Select Physics tree, select Optics>Wave Optics>Electromagnetic Waves, Frequency Domain (ewfd).
|
|
3
|
Click Add.
|
|
4
|
Click
|
|
5
|
|
6
|
Click
|
|
1
|
|
2
|
|
1
|
In the Model Builder window, under Component 1 (comp1) right-click Definitions and choose Variables.
|
|
2
|
|
1
|
|
2
|
|
3
|
|
4
|
|
1
|
|
2
|
|
3
|
|
4
|
|
5
|
|
1
|
|
2
|
|
3
|
In the tree, select Built-in>Air.
|
|
4
|
|
5
|
|
1
|
|
2
|
|
3
|
|
4
|
|
5
|
Locate the Units section. In the table, enter the following settings:
|
|
6
|
|
1
|
In the Model Builder window, under Component 1 (comp1) click Electromagnetic Waves, Frequency Domain (ewfd).
|
|
2
|
|
3
|
|
1
|
|
2
|
|
4
|
|
5
|
|
6
|
|
1
|
|
3
|
|
4
|
|
5
|
|
1
|
|
3
|
|
4
|
|
5
|
|
1
|
|
2
|
|
3
|
|
1
|
|
1
|
|
3
|
|
4
|
|
1
|
|
3
|
|
4
|
|
1
|
|
2
|
|
1
|
|
2
|
|
3
|
|
5
|
|
1
|
|
2
|
|
3
|
|
4
|
|
5
|
|
1
|
|
2
|
|
3
|
|
1
|
|
1
|
|
2
|
|
3
|
|
4
|
|
5
|
|
6
|
|
7
|
|
1
|
In the Model Builder window, under Component 1 (comp1)>Global ODEs and DAEs (ge) click Global Equations 1.
|
|
2
|
|
4
|
|
5
|
|
6
|
Click
|
|
7
|
|
8
|
Click OK.
|
|
9
|
|
10
|
|
11
|
In the Source term quantity table, enter the following settings:
|
|
1
|
In the Model Builder window, under Component 1 (comp1) click Electromagnetic Waves, Frequency Domain 2 (ewfd2).
|
|
2
|
In the Settings window for Electromagnetic Waves, Frequency Domain, click to expand the Equation section.
|
|
3
|
|
4
|
|
5
|
Locate the Components section. From the Electric field components solved for list, choose Out-of-plane vector.
|
|
1
|
In the Model Builder window, under Component 1 (comp1)>Electromagnetic Waves, Frequency Domain 2 (ewfd2) click Initial Values 1.
|
|
2
|
|
3
|
|
1
|
|
3
|
|
4
|
|
5
|
|
1
|
|
3
|
|
4
|
|
5
|
|
1
|
|
3
|
|
4
|
From the n list, choose User defined. In the associated text field, type n_GaAs(freq1). Notice that it must be the frequency freq1 that is used here.
|
|
5
|
|
1
|
|
2
|
|
1
|
|
2
|
|
kg²·m²/(s6·A²)
|
|
1
|
|
2
|
|
3
|
Find the Studies subsection. In the Select Study tree, select Preset Studies for Some Physics Interfaces>Stationary.
|
|
4
|
|
5
|
|
1
|
|
2
|
|
3
|
Click to expand the Values of Dependent Variables section. Find the Initial values of variables solved for subsection. From the Settings list, choose User controlled.
|
|
4
|
|
5
|
|
6
|
|
7
|
|
8
|
Click
|
|
9
|
|
10
|
Click
|
|
11
|
|
12
|
|
13
|
|
14
|
Click Replace.
|
|
1
|
|
2
|
In the Model Builder window, expand the Solution 2 (sol2) node, then click Compile Equations: Stationary.
|
|
3
|
|
4
|
|
1
|
|
2
|
In the Show More Options dialog box, in the tree, select the check box for the node Physics>Advanced Physics Options.
|
|
3
|
Click OK.
|
|
4
|
In the Model Builder window, under Component 1 (comp1)>Global ODEs and DAEs (ge) click Global Equations 1.
|
|
5
|
|
6
|
From the Value type when using splitting of complex variables list, choose Real, as the frequency freq1 has no imaginary part.
|
|
1
|
|
2
|
|
3
|
Click
|
|
4
|
|
5
|
Click
|
|
6
|
|
7
|
|
8
|
|
9
|
Click Replace.
|
|
1
|
In the Model Builder window, expand the Study 2>Solver Configurations>Solution 2 (sol2)>Stationary Solver 1 node, then click Parametric 1.
|
|
2
|
|
3
|
Select the Tuning of step size check box, to make sure the solver takes small enough steps when starting the sweep.
|
|
4
|
|
5
|
|
6
|
|
7
|
From the Predictor list, choose Constant. This makes the solver first try with the solution found for the previously calculated k value. This is preferred, as even though the states can be degenerate, the field solutions are orthogonal. Thus, the solver is forced to follow the right band.
|
|
8
|
|
1
|
|
2
|
|
3
|
|
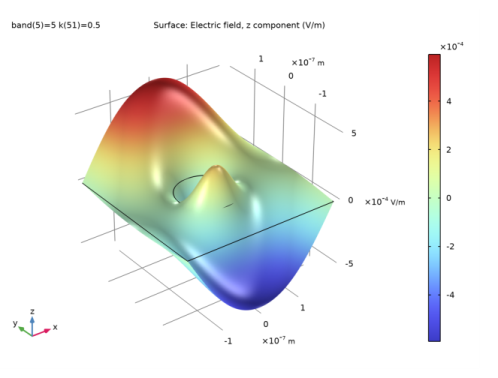
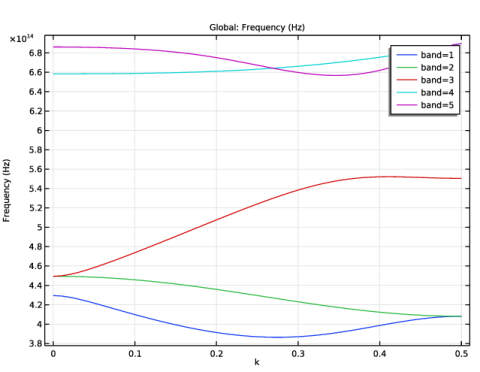
1
|
|
1
|
In the Model Builder window, expand the Results>Datasets node, then click Study 2/Parametric Solutions 1 (sol3).
|
|
2
|
|
3
|
|
1
|
|
2
|
|
3
|
|
1
|
|
2
|
|
3
|
|
1
|
|
2
|
|
3
|