PDF

Hanging Cable
Introduction
A cable is a structural member that has stiffness only in its tangential direction, but virtually no bending stiffness. When supported only at its two ends, it deflects under gravitational load. An idealized hanging cable can be analyzed analytically and forms a deflection curve known as a catenary (derived from the Latin word catena for chain). In COMSOL Multiphysics, hanging cables, chains, or strings can be modeled with the Truss interface.
Model Definition
The example consists of a cable carrying two street lamps. The model setup, the global coordinate system and relevant properties are indicated in Figure 1. The cable has an initial length L, and it is supported at two points spaced by a length d < L apart from each other. Three load cases are analyzed:
1
2
3
Figure 1: Cable carrying two lamps. The gravitational acceleration is parallel to the direction, and the wind is parallel to the direction.
The lamps are assumed to be spherical in shape and mounted at distances 0.3L and 0.8L along the cable’s initial length. The wind vector is assumed to point in the positive y direction, and the forces acting on the lamps and the cable are estimated as
where cD is the drag coefficient, ρ the air density, and A the reference area for the drag.
The cable is made of steel (see Table 1), and behaves linear elastically.
An analytical solution can be derived for the first load case (a cable with gravitational load only). The cable setup and relevant properties are indicated in Figure 2. To the right, a free-body diagram is shown for the cable section between points A and B.
Figure 2: Deformed cable under its self-weight. A free-body diagram for the cable segment between points A and B is shown to the right.
As before, the cable has an initial length L, and its support points are spaced by a distance d apart from each other. The analytical treatment assumes that the stiffness in tangential direction is high, and any cable elongation is negligible; that is, the length of the deformed cable is still equal to the original length L.
The analytical treatment of a hanging cable is a classical problem of calculus of variations. The derivation of the catenary can be found in many text books. Typically, the curve is derived as a constrained variation problem, by constructing a functional that incorporates the potential energy of the system plus a constraint equation (the arc length of the deflected cable is L) with a Lagrange multiplier. The application of the Euler–Lagrange equations then lead to a differential equation which when solved yields the catenary curve.
From a mechanical perspective, the catenary can also be derived by simply formulating the equilibrium equations using a free-body diagram in a deformed configuration, as shown on the right in Figure 2. Choosing point A to be the lowest deflection point simplifies the analysis. Force balance in the x and y directions yield
and
where N is the tangential force at point B, FA the tangential force at point A (only acting in the horizontal direction). The variable W is the weight given as μgs, where μ is the mass per length, g the gravitational acceleration, and s is the arc length of the cable segment. Rearranging and dividing the equations yields
.
Here, we have also used that tan() is the slope of the curve dy/dx. Differentiation with respect to x yields a 2nd-order nonlinear differential equation for the deflection y(x):
In the last step, the constant FA/(μg) was replaced by a different constant, a. The general solution for this differential equation is
where the constants c1 and c2 can be found from the boundary and symmetry conditions. This leads to the final expression for the catenary:
.
The expression contains the unknown parameter a, which can be found by using the constraint that the length of the catenary must equal L:
This equation can be only be solved numerically for a. Note that the solution does not depend on any material properties. Cables of equal lengths and uniform density take on the same deformed shape, independently of their respective weights.
Results and Discussion
The computed and analytical solutions agree very well when considering the first load case (cable deforming under its own weight); see Figure 3.
Figure 3: Cable sag due to self-weight (load case 1). Comparison of the analytical and the solution computed using the Truss interface.
Figure 4 shows the vertical sag (w) for all three load cases, as well as the deflection magnitude (in the y and z directions) for the last load case which includes the wind load in the y direction. The lamps are hung asymmetrically, leading to the nonsymmetric deflection curves. The cable is stiff in its axial direction and does not exhibit any significant elongation. With gravity and wind loads acting on the lamps, the maximum cable deflection, or sag, decreases.
Figure 4: Vertical and total cable sag for the three load cases.
The distribution of the axial forces are compared in Figure 5.
Figure 5: Axial force along the cable for the three load cases.
Notes About the COMSOL Implementation
The analytic expression for the catenary includes a scaling factor a. As shown above, its value is expressed in terms of a transcendental function; that is, no closed-form solution exists. However, the value for a can be easily obtained numerically. To do so in COMSOL Multiphysics, a Global ODEs and DAEs interface is added to the model.
Most cable problems are geometrically nonlinear. A wire which is not in tension is numerically unstable. Physically, it wrinkles in an unpredictable manner. In order to start the analysis in this case, an initial stress is added by giving an approximate expression for the expected deflection using the Initial Values feature.
Analyzing this type of problem poses some numerical challenges. In a cable which is not pretensioned, the strains will typically be very small. Still the force balance is computed from the stress in each element, a stress that is proportional to the strain. The strains are computed as derivatives of the displacements, which typically are large. The numerics will thus contain computing a small difference between two large numbers. This is the reason why it is recommended to use linear element shape functions for this type of analysis.
More information and tips about the modeling of cables can be found in the section Modeling with Truss Elements in the Structural Mechanics Module User’s Guide.
Application Library path: Structural_Mechanics_Module/Verification_Examples/hanging_cable
Modeling Instructions
From the File menu, choose New.
New
In the New window, click  Model Wizard.
Model Wizard
1
In the Model Wizard window, click  3D.
2
In the Select Physics tree, select Structural Mechanics>Truss (truss).
3
Click Add.
4
Click  Study.
5
In the Select Study tree, select General Studies>Stationary.
6
Global Definitions
Parameters 1
1
In the Model Builder window, under Global Definitions click Parameters 1.
2
In the Settings window for Parameters, locate the Parameters section.
3
To easily activate or deactivate gravity or wind loads, add two load groups.
Lamp Weight
1
Right-click Global Definitions>Parameters 1 and choose Load Group.
2
In the Settings window for Load Group, type Lamp Weight in the Label text field.
Wind Load
1
In the Model Builder window, right-click Load and Constraint Groups and choose Load Group.
2
In the Settings window for Load Group, type Wind Load in the Label text field.
Geometry 1
Polygon 1 (pol1)
1
In the Model Builder window, expand the Component 1 (comp1)>Geometry 1 node.
2
Right-click Geometry 1 and choose More Primitives>Polygon.
3
In the Settings window for Polygon, locate the Coordinates section.
4
Partition Edges 1 (pare1)
1
In the Geometry toolbar, click  Booleans and Partitions and choose Partition Edges.
2
On the object pol1, select Edge 1 only.
3
In the Settings window for Partition Edges, locate the Positions section.
4
5
Click  Build All Objects.
Add Material
1
In the Home toolbar, click  Add Material to open the Add Material window.
2
Go to the Add Material window.
3
In the tree, select Built-in>Structural steel.
4
Right-click and choose Add to Component 1 (comp1).
5
In the Home toolbar, click  Add Material to close the Add Material window.
Truss (truss)
Cross-Section Data 1
1
In the Settings window for Cross-Section Data, locate the Cross-Section Data section.
2
In the A text field, type pi*(D_cable/2)^2.
Prescribed Displacement 1
1
In the Model Builder window, right-click Truss (truss) and choose Prescribed Displacement.
2
3
In the Settings window for Prescribed Displacement, locate the Prescribed Displacement section.
4
Select the Prescribed in x direction check box.
5
In the u0x text field, type -sign(X)*u_support.
6
Select the Prescribed in y direction check box.
7
Select the Prescribed in z direction check box.
Gravity 1
1
In the Physics toolbar, click  Edges and choose Gravity.
2
In the Settings window for Gravity, locate the Edge Selection section.
3
From the Selection list, choose All edges.
Edge Load: Wind on Cable
1
In the Physics toolbar, click  Edges and choose Edge Load.
2
In the Settings window for Edge Load, type Edge Load: Wind on Cable in the Label text field.
3
Locate the Edge Selection section. From the Selection list, choose All edges.
4
Locate the Force section. From the Load type list, choose Total force.
5
Specify the Ftot vector as
6
In the Physics toolbar, click  Load Group and choose Wind Load.
Point Load: Wind on Lamps
1
In the Physics toolbar, click  Points and choose Point Load.
2
In the Settings window for Point Load, type Point Load: Wind on Lamps in the Label text field.
3
4
Locate the Force section. Specify the FP vector as
5
In the Physics toolbar, click  Load Group and choose Wind Load.
Point Mass: Lamps
1
In the Physics toolbar, click  Points and choose Point Mass.
2
In the Settings window for Point Mass, type Point Mass: Lamps in the Label text field.
3
The lamp mass can be included in load group 1 by conditionally activating the mass using the load group’s weight factor.
4
Locate the Point Mass section. In the m text field, type if(group.lg1, group.lg1*m_lamp, 0).
Initial Values 1
1
In the Model Builder window, click Initial Values 1.
2
In the Settings window for Initial Values, locate the Initial Values section.
3
Specify the u vector as
A cable which is not in tension is not numerically stable. To improve solver convergence an initial guess is provided in terms of a parabolic function.
Mesh 1
Edge 1
1
In the Mesh toolbar, click  Boundary and choose Edge.
2
In the Settings window for Edge, locate the Edge Selection section.
3
From the Selection list, choose All edges.
Size
1
In the Model Builder window, click Size.
2
In the Settings window for Size, locate the Element Size section.
3
Click the Custom button.
4
Locate the Element Size Parameters section. In the Maximum element size text field, type L_cable/60.
5
In the Minimum element size text field, type L_cable/60.
6
Click  Build All.
Global Definitions
Analytic 1 (an1)
1
In the Home toolbar, click  Functions and choose Global>Analytic.
2
In the Settings window for Analytic, type y_catenary in the Function name text field.
3
Locate the Definition section. In the Expression text field, type a*(cosh(X/a) - cosh(0.5*d_support/a)).
4
In the Arguments text field, type X, a, d_support.
5
Locate the Units section. In the Function text field, type m.
6
The analytic solution, y_catenary, takes the parameter a as an input. Its value can be obtained from a transcendental function which can be easily solved for with a Global ODEs and DAEs interface.
Add Component
In the Model Builder window, right-click the root node and choose Add Component>0D.
Add Physics
1
In the Home toolbar, click  Add Physics to open the Add Physics window.
2
Go to the Add Physics window.
3
In the tree, select Mathematics>ODE and DAE Interfaces>Global ODEs and DAEs (ge).
4
Click Add to Component 2 in the window toolbar.
5
In the Home toolbar, click  Add Physics to close the Add Physics window.
Global ODEs and DAEs (ge)
Global Equations 1
1
In the Model Builder window, under Component 2 (comp2)>Global ODEs and DAEs (ge) click Global Equations 1.
2
In the Settings window for Global Equations, locate the Global Equations section.
3
4
Locate the Units section. Click  Select Dependent Variable Quantity.
5
In the Physical Quantity dialog box, type length in the text field.
6
Click  Filter.
7
In the tree, select General>Length (m).
8
9
In the Settings window for Global Equations, locate the Units section.
10
Click  Select Source Term Quantity.
11
In the Physical Quantity dialog box, select General>Length (m) in the tree.
12
Study 1
Step 1: Stationary
1
In the Model Builder window, under Study 1 click Step 1: Stationary.
2
In the Settings window for Stationary, locate the Study Settings section.
3
Select the Include geometric nonlinearity check box.
4
Click to expand the Study Extensions section. Select the Define load cases check box.
5
Click  Add three times.
6
Solution 1 (sol1)
1
In the Study toolbar, click  Show Default Solver.
2
In the Model Builder window, expand the Solution 1 (sol1) node, then click Stationary Solver 1.
3
In the Settings window for Stationary Solver, locate the General section.
4
In the Relative tolerance text field, type 1e-6.
5
In the Model Builder window, expand the Study 1>Solver Configurations>Solution 1 (sol1)>Stationary Solver 1 node, then click Fully Coupled 1.
6
In the Settings window for Fully Coupled, click to expand the Method and Termination section.
7
From the Nonlinear method list, choose Constant (Newton).
8
In the Maximum number of iterations text field, type 250.
9
In the Study toolbar, click  Compute.
Results
Line 1
1
In the Model Builder window, expand the Results>Force (truss) node, then click Line 1.
2
In the Settings window for Line, locate the Coloring and Style section.
3
In the Radius scale factor text field, type 10.
Line 1
1
In the Model Builder window, expand the Results>Stress (truss) node, then click Line 1.
2
In the Settings window for Line, locate the Coloring and Style section.
3
In the Radius scale factor text field, type 10.
Displacement
1
In the Home toolbar, click  Add Plot Group and choose 1D Plot Group.
2
In the Settings window for 1D Plot Group, type Displacement in the Label text field.
3
Click to expand the Title section. From the Title type list, choose None.
4
Locate the Axis section. Select the Preserve aspect ratio check box.
5
Locate the Legend section. From the Position list, choose Upper middle.
Line Graph 1
1
Right-click Displacement and choose Line Graph.
2
In the Settings window for Line Graph, locate the Selection section.
3
From the Selection list, choose All edges.
4
Locate the y-Axis Data section. In the Expression text field, type w.
5
Locate the x-Axis Data section. From the Parameter list, choose Expression.
6
In the Expression text field, type X+u.
7
Click to expand the Legends section. Select the Show legends check box.
8
From the Legends list, choose Manual.
9
10
Click to expand the Coloring and Style section. Find the Line style subsection. From the Line list, choose Cycle.
11
In the Width text field, type 2.
Line Graph 2
1
Right-click Line Graph 1 and choose Duplicate.
2
In the Settings window for Line Graph, locate the Data section.
3
From the Dataset list, choose Study 1/Solution 1 (sol1).
4
From the Parameter selection (Load case) list, choose Last.
5
Locate the y-Axis Data section. In the Expression text field, type -sqrt(v^2+w^2).
6
Locate the Legends section. In the table, enter the following settings:
7
In the Displacement toolbar, click  Plot.
Force
1
In the Home toolbar, click  Add Plot Group and choose 1D Plot Group.
2
In the Settings window for 1D Plot Group, type Force in the Label text field.
3
Locate the Legend section. From the Position list, choose Upper middle.
Line Graph 1
1
Right-click Force and choose Line Graph.
2
In the Settings window for Line Graph, locate the Selection section.
3
From the Selection list, choose All edges.
4
Locate the y-Axis Data section. In the Expression text field, type truss.Nxl.
5
Locate the x-Axis Data section. From the Parameter list, choose Expression.
6
In the Expression text field, type X+u.
7
Locate the Coloring and Style section. Find the Line style subsection. From the Line list, choose Cycle.
8
In the Width text field, type 2.
9
Locate the Legends section. Select the Show legends check box.
10
Click to expand the Quality section. From the Resolution list, choose No refinement.
11
In the Force toolbar, click  Plot.
Analytic vs. Computed Solution
1
In the Home toolbar, click  Add Plot Group and choose 1D Plot Group.
2
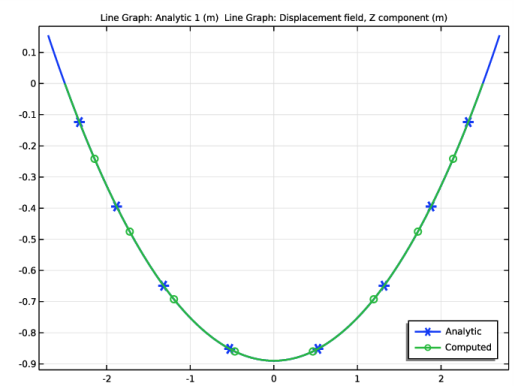
In the Settings window for 1D Plot Group, type Analytic vs. Computed Solution in the Label text field.
3
Locate the Data section. From the Parameter selection (Load case) list, choose First.
4
Locate the Legend section. From the Position list, choose Lower right.
Line Graph 1
1
Right-click Analytic vs. Computed Solution and choose Line Graph.
2
In the Settings window for Line Graph, locate the Selection section.
3
From the Selection list, choose All edges.
4
Locate the y-Axis Data section. In the Expression text field, type y_catenary(X, comp2.a, d_support).
5
Locate the x-Axis Data section. From the Parameter list, choose Expression.
6
In the Expression text field, type X.
7
Locate the Coloring and Style section. In the Width text field, type 2.
8
Find the Line markers subsection. From the Marker list, choose Cycle.
9
Locate the Legends section. Select the Show legends check box.
10
From the Legends list, choose Manual.
11
Line Graph 2
1
Right-click Line Graph 1 and choose Duplicate.
2
In the Settings window for Line Graph, locate the y-Axis Data section.
3
In the Expression text field, type w.
4
Locate the x-Axis Data section. In the Expression text field, type X+u.
5
Locate the Legends section. In the table, enter the following settings:
6
In the Analytic vs. Computed Solution toolbar, click  Plot.
Maximum Sag
1
In the Results toolbar, click  Evaluation Group.
2
In the Settings window for Evaluation Group, type Maximum Sag in the Label text field.
Line Maximum 1
1
Right-click Maximum Sag and choose Maximum>Line Maximum.
2
In the Settings window for Line Maximum, locate the Selection section.
3
From the Selection list, choose All edges.
4
Locate the Expressions section. In the table, enter the following settings:
Line Maximum 2
1
In the Model Builder window, right-click Maximum Sag and choose Maximum>Line Maximum.
2
In the Settings window for Line Maximum, locate the Data section.
3
From the Dataset list, choose Study 1/Solution 1 (sol1).
4
From the Parameter selection (Load case) list, choose First.
5
Locate the Selection section. From the Selection list, choose All edges.
6
Locate the Expressions section. In the table, enter the following settings:
7
In the Maximum Sag toolbar, click  Evaluate.