PDF

Water Hammer
Introduction
When a valve is closed rapidly in a pipe network it gives rise to a hydraulic transient - a pressure wave - known as a water hammer. The propagation of these hydraulic transients can in extreme cases cause failures of pipe systems due to the created overpressures (see Ref. 1). This is a model of a simple verification pipe system consisting of a reservoir, a pipe, and a valve (see Ref. 2). In this model, the valve is closed instantaneously.
Model Definition
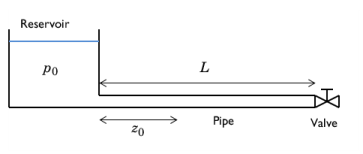
The model consists of a reservoir connected to a pipe of length L = 20 m with an inner radius R = 398.5 mm. A valve is located at the other end of the pipe. The model is sketched in the figure below.
Figure 1: Pipe system with reservoir and valve.
The pipe is made of steel with Young’s modulus E = 210 GPa and wall thickness w = 8 mm. At a distance z0 = 11.15 m from the reservoir there is a pressure sensor measurement point. The reservoir acts as a constant pressure source with p0 = 1 atm. As an initial condition, the valve is open and water is flowing steadily at a flow rate of Q0 = 0.5 m3/s. At time t = 0 s the valve is closed instantaneously, thereby initiating the water hammer.
As a result of the compressibility of the water and the elastic behavior of the pipe, a sharp pressure pulse is generated traveling upstream of the valve. The water hammer wave speed c is given by the expression
where cs is the isentropic speed of sound in the bulk fluid (1481 m/s for water), while the second term is caused by the elasticity of the pipe walls. The water density is ρ, and βA is the pipe cross-sectional compressibility, and the resulting effective wave speed is 1037 m/s.
The instantaneous closure of the valve results in a water hammer pulse of amplitude P given by Joukowsky’s fundamental equation (see Ref. 1)
(1)
where u0 is the average fluid velocity before valve closure.
Notes About the COMSOL Implementation
Because the valve is assumed to close instantaneously, the generated water hammer pulse has a step function like shape. This must be resolved numerically and it thus requires a well-posed numerical scheme to correctly solve the problem.
The length of the pipe is meshed with N elements giving a mesh size dx = L/N. For the transient solver to be well behaved, changes of the pressure during a time step dt cannot move fully across a mesh element. That is, the distance traversed by the pressure signal during dt, that distance being cdt, must be smaller than the typical mesh size dx. This is captured by imposing the following CFL number condition
(2)
meaning that changes during the time dt maximally move 10% of the mesh length dx. The upshot is that the resolution of space (via the mesh resolution) and time (via the solver time step) are interdependent, and thus cannot be changed independently: increasing the mesh resolution requires decreasing the time stepping.
Even when satisfying the CFL condition of Equation 2, the numerical solution close to the region of the instantaneously changing pressure will exhibit spurious and nonphysical oscillations known as Gibbs oscillations. These are due to the inherent mathematical difficulty of resolving a discontinuously changing function by a finite number of mesh elements; it is similar to the oscillations observed around discontinuities when using a truncated Fourier series to approximate the underlying function. The oscillations can be restricted by adding some amount of high frequency damping in the generalized-α time dependent solver. This is done in the model and described below in the instructions.
Results and Discussion
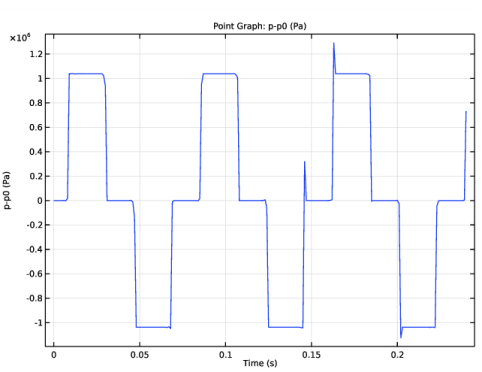
The excess pressure history, p  p0, as measured at the pressure sensor located at z0 is shown in Figure 2. The curves correspond very well to the results obtained in the verification model of Ref. 2 (visual comparison) and thus verify the water hammer model. Notice the numerically-induced high-frequency oscillations around the discontinuities in the pressure (the abrupt changes). As described in Notes About the COMSOL Implementation these are numerical artifacts with no physical meaning which should be ignored when evaluating the results in this and the following figures. The ripples can be reduced by increasing the mesh resolution parameter N. This in turn decreases the time step dt prescribed by Equation 2 and results in longer computational times.
Figure 2: Excess pressure history measured at the pressure sensor.
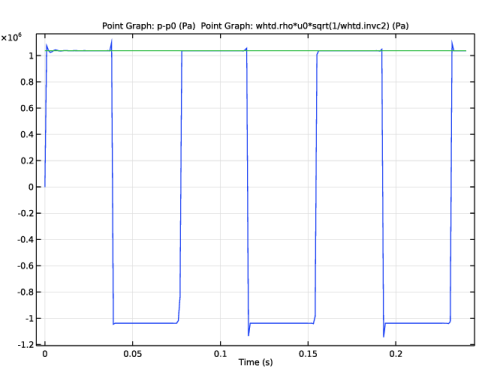
The excess pressure at the valve is plotted by the blue line in Figure 3 together with the water hammer amplitude predicted by Equation 1 (green line). The amplitude of the excess water hammer pressure match perfectly with the theoretical prediction for the positive oscillations. This is not surprising as the theory of Joukowsky is based in lossless sudden closure of a valve.
Figure 3: Excess pressure at the valve (blue line) and predicted water hammer amplitude (green line).
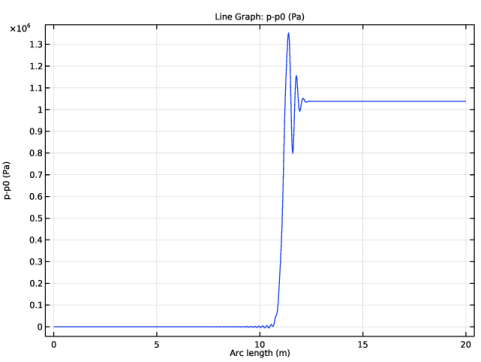
The final plot shown in Figure 4 illustrates the pressure distribution along the pipe at time t = 0.24 s.
Figure 4: Excess pressure distribution along the pipe for t = 0.24 s.
References
1. M.S. Ghidaoui, M. Zhao, D.A. McInnis, and D.H. Axworthy, “A Review of Water Hammer Theory and Practice,” Applied Mechanics Reviews, ASME, 2005.
2. A.S. Tijsseling, “Exact Solution of Linear Hyperbolic Four-Equation Systems in Axial Liquid-Pipe Vibration,” J. Fluids and Structures, vol. 18, pp 179–196, 2003.
Application Library path: Pipe_Flow_Module/Verification_Examples/water_hammer_verification
Modeling Instructions
From the File menu, choose New.
New
In the New window, click  Model Wizard.
Model Wizard
1
In the Model Wizard window, click  3D.
2
In the Select Physics tree, select Fluid Flow>Single-Phase Flow>Water Hammer (whtd).
3
Click Add.
4
Click  Study.
5
In the Select Study tree, select General Studies>Time Dependent.
6
Global Definitions
Load the parameters for the model. The list of parameters includes the pipe properties, the initial flow values, and the mesh and time step parameters.
Parameters 1
1
In the Model Builder window, under Global Definitions click Parameters 1.
2
In the Settings window for Parameters, locate the Parameters section.
3
Click  Load from File.
4
Geometry 1
Polygon 1 (pol1)
1
In the Geometry toolbar, click  More Primitives and choose Polygon.
2
In the Settings window for Polygon, locate the Coordinates section.
3
4
Click  Build All Objects.
The geometry should look like the figure below.
Add Material
1
In the Home toolbar, click  Add Material to open the Add Material window.
2
Go to the Add Material window.
3
In the tree, select Built-in>Water, liquid.
4
Click Add to Component in the window toolbar.
5
In the Home toolbar, click  Add Material to close the Add Material window.
Water Hammer (whtd)
Fluid Properties 1
All the fluid properties are selected automatically and the material parameters are retrieved from the water material just added. Proceed to set up the properties of the pipe (shape and material) and disable any flow resistance models.
Pipe Properties 1
1
In the Model Builder window, click Pipe Properties 1.
2
In the Settings window for Pipe Properties, locate the Pipe Shape section.
3
4
In the di text field, type 2*R.
5
Locate the Pipe Model section. From the E list, choose User defined. In the associated text field, type E.
6
In the Δw text field, type w.
7
Locate the Flow Resistance section. From the Friction model list, choose User defined.
Initial Values 1
1
In the Model Builder window, click Initial Values 1.
2
In the Settings window for Initial Values, locate the Initial Values section.
3
In the p text field, type p0.
4
In the u text field, type u0.
Pressure 1
1
In the Physics toolbar, click  Points and choose Pressure.
2
3
In the Settings window for Pressure, locate the Pressure section.
4
In the pin text field, type p0.
Next build the mesh and set the mesh size to L/N, where N is a value defined in the parameters.
Mesh 1
Edge 1
1
In the Mesh toolbar, click  Boundary and choose Edge.
2
Click in the Graphics window and then press Ctrl+A to select both edges.
Size
1
In the Model Builder window, click Size.
2
In the Settings window for Size, locate the Element Size section.
3
Click the Custom button.
4
Locate the Element Size Parameters section. In the Maximum element size text field, type L/N.
5
In the Minimum element size text field, type 1[mm].
6
Click  Build All.
Study 1
Step 1: Time Dependent
1
In the Model Builder window, under Study 1 click Step 1: Time Dependent.
2
In the Settings window for Time Dependent, locate the Study Settings section.
3
In the Output times text field, type range(0,1e-3,0.24).
Before solving the model, generate the default solver sequence in order to set the maximal time step to the desired value dt, Equation 2. Note that the solving process may take a couple of minutes.
Solution 1 (sol1)
1
In the Study toolbar, click  Show Default Solver.
2
In the Model Builder window, expand the Solution 1 (sol1) node, then click Time-Dependent Solver 1.
3
In the Settings window for Time-Dependent Solver, click to expand the Time Stepping section.
4
From the Steps taken by solver list, choose Manual.
5
In the Time step text field, type dt.
6
In the Amplification for high frequency text field, type 0.2.
Changing the alpha parameter to a lower value will result in more damping of the unwanted high-frequency Gibbs oscillations in the solution.
An alternative solver strategy can be to switch to the BDF solver of order one and use a very small manual time step, for example, setting the CFL number to 0.01. Notice that this solver is very diffusive and will smooth the shock but it will avoid the oscillations.
7
In the Study toolbar, click  Compute.
Results
Acoustic Pressure (whtd)
The pressure along the pipe at time t = 0.24 s looks as in the figure below.
1D Plot Group 3
In the Home toolbar, click  Add Plot Group and choose 1D Plot Group.
Point Graph 1
1
Right-click 1D Plot Group 3 and choose Point Graph.
2
3
In the Settings window for Point Graph, locate the y-Axis Data section.
4
In the Expression text field, type p-p0.
5
In the 1D Plot Group 3 toolbar, click  Plot.
Measurement point
1
In the Model Builder window, right-click 1D Plot Group 3 and choose Rename.
2
In the Rename 1D Plot Group dialog box, type Measurement point in the New label text field.
3
The excess pressure history, p p0, measured at the probe point z0 is depicted in Figure 3.
1D Plot Group 4
In the Home toolbar, click  Add Plot Group and choose 1D Plot Group.
Point Graph 1
1
Right-click 1D Plot Group 4 and choose Point Graph.
2
3
In the Settings window for Point Graph, locate the y-Axis Data section.
4
In the Expression text field, type p-p0.
Point Graph 2
1
Right-click Point Graph 1 and choose Duplicate.
2
In the Settings window for Point Graph, locate the y-Axis Data section.
3
In the Expression text field, type whtd.rho*u0*sqrt(1/whtd.invc2).
4
In the 1D Plot Group 4 toolbar, click  Plot.
Valve
1
In the Model Builder window, right-click 1D Plot Group 4 and choose Rename.
2
In the Rename 1D Plot Group dialog box, type Valve in the New label text field.
3
Figure 3 shows the excess pressure p p0 at the valve together with the pressure rise predicted by Joukowsky’s equation, see Equation 1.
1D Plot Group 5
In the Home toolbar, click  Add Plot Group and choose 1D Plot Group.
Line Graph 1
1
Right-click 1D Plot Group 5 and choose Line Graph.
2
Click in the Graphics window and then press Ctrl+A to select both edges.
3
In the Settings window for Line Graph, locate the y-Axis Data section.
4
In the Expression text field, type p-p0.
Pressure profile
1
In the Model Builder window, click 1D Plot Group 5.
2
In the Settings window for 1D Plot Group, locate the Data section.
3
From the Time selection list, choose Last.
4
In the 1D Plot Group 5 toolbar, click  Plot.
5
Right-click 1D Plot Group 5 and choose Rename.
6
In the Rename 1D Plot Group dialog box, type Pressure profile in the New label text field.
7
The excess pressure p p0 along the pipe at t = 0.24 s is depicted in Figure 4. The numerically induced ripples on the pressure profile can be reduced by increasing the mesh resolution parameter N. Increasing this parameter will reduce the time step dt according to Equation 2 and thus increase the total computational time.