PDF

Sheet Metal Forming
Introduction
In sheet metal forming processes, the springback phenomena caused by the material elastic recovery behavior makes the formed part partially return to its original shape during the release of the forming load.
It is important to predict the springback accurately as the final deformed shape differs slightly from the shape given by the die at full forming load.
This model is a NAFEMS validation problem of sheet metal forming based on experimental data, see Ref. 1. The problem involves several nonlinearities such as boundary nonlinearity (contact), material nonlinearity (elastoplastic material) and geometric nonlinearity. Both 2D plane strain and 3D shell assumption are considered.
The target results consist in the forming angle, the angle after release, and the punch forces as function of the punch displacement.
Model Definition
The geometry consists of an assembly with three parts: the punch, the die, and a 1 mm metal sheet. Due to the symmetry, only one half of the geometry is represented for the 2D assumption and one quarter for the 3D one. Figure 1 shows the geometry used for the 3D problem, while Figure 2 shows the section cut used with the 2D plane strain problem.
Figure 1: Model geometry: the punch at the top, the thin sheet in the middle, and the die at the bottom.
Figure 2: Section cut of the model geometry used for the 2D assumption.
The plane strain assumption is valid here, as the out-of-plane thickness of the sheet is large. Since the thickness of the plate is small compared to the curvature of the tool, moderate strains are expected even though the displacements and rotations are large.
The blank material used in the experiments is a 6111-T4 Aluminum alloy, having an isotropic Young’s modulus of 70.5·103 MPa and a Poisson’s ratio of 0.342. The yield stress of the material is 194 MPa and an Hollomon hardening function is used to represent the elastoplastic behavior. The Hollomon hardening function is a two-coefficient function described by
Here K is 550.4 MPa and n is 0.223.
To improve the accuracy of the contact condition and forces, the augmented Lagrangian contact method is used. Friction between the thin sheet and the tools is defined using a Coulomb friction coefficient of 0.1342.
Experimental data for the forming angle and the angle after release are available, see Table 1.
Data of the punch force are also available; these are stored in the text file sheet_metal_forming.txt available in the Nonlinear Structural Material Module’s Application Library folder.
Results and Discussion
Figure 3 shows the residual stress distribution and deformed shape after the release for the problem including friction.
Figure 3: Von Mises stress and deformed shape after release for the 2D plane strain.
In Figure 4 you can see that the maximum value of the plastic strain is about 2%, which validates the small strain assumption.
Figure 4: Equivalent plastic strain at maximum punch deflection.
Figure 5 and Figure 6 show the von Mises stress in the sheet computed with a 3D shell assumption. Notice the stress distribution along the y-direction that cannot be evaluated with the 2D plane strain assumption.
Figure 5: Von Mises stress and deformed shape at forming for the 3D shell problem.
Figure 6: Von Mises stress and deformed shape after release for the 3D shell problem.


The computed angle at the maximum punch displacement and after release are listed in Table 2.These values are in good agreement with the experimental data and the numerical results discussed in Ref. 1.
Figure 7 shows the punch forces versus the punch displacement. One can clearly notice the effect of friction in the applied load. Furthermore, the blank remains in contact with the tools much longer when friction forces are included.
Figure 7: Punch force vs. punch displacement.
In the model without friction the computed forces in the forming process have two peaks. The forces keep on increasing to get the blank within the die; when the blank is sufficiently deformed, it requires a lower force to push down the blank in die. Just before the punch reaches the forming shape, the blank touches the bottom of the die and the force increases significantly to finish the forming step. In the release step, the punch forces keep decreasing with the punch going back to its original position.
When friction is added, the applied load history differs significantly. First of all, it requires higher loads to get the blank into the die. Secondly, only one peak is observed during the forming step, since the blank never touches the bottom of the die. During the release step, a maximum is also observed, which is explained by the friction force.
Figure 8 shows the position of the blank in the die for the frictionless problem. On the left side, the punch goes into the die (from top to bottom); this consists in the forming stage. On the right side, you can see the release stage when the punch is removed from the die (from top to bottom).
Figure 8: Deformed shape of the blank in the die (without friction)
Figure 9 shows the position of the blank in the die for the problem including friction. On the left side the punch goes into the die (from top to bottom). On the right side you can see the release stage when the punch is removed from the die (from top to bottom).
Figure 9: Deformed shape of the blank in the die (including friction)
Notes About the COMSOL Implementation
In the benchmark problem as described in Ref. 1, the plastic hardening is represented with the Hollomon law. Hollomon hardening is a good representation of material hardening for large strains. In the small strain region, however, the computed stress is negative. To ensure the continuity between the elastic and the hardening material behavior, you use the tangent of the Hollomon curve to match no stress hardening at zero equivalent plastic strain.
Figure 10 shows the difference between the Hollomon hardening with the parameters provided in the model description and the hardening function including the smoothed transition used to implement the numerical model.
Figure 10: Hollomon hardening with smooth transition (blue) and without (dashed red).
Due to the combination of contact with friction, the elastoplastic material model, and geometric nonlinearity, the model requires manual contact and solver settings to obtain good convergence. Furthermore, the blank becomes unstable in the tool for certain deformation. To circumvent numerical problems, follow the suggestions below:
Reference
1. A.W.A. Konter, Advanced Finite Element Contact Benchmarks, NAFEMS, 2006.
Application Library path: Nonlinear_Structural_Materials_Module/Plasticity/sheet_metal_forming
Modeling Instructions
From the File menu, choose New.
New
In the New window, click  Model Wizard.
Model Wizard
1
In the Model Wizard window, click  2D.
2
In the Select Physics tree, select Structural Mechanics>Solid Mechanics (solid).
3
Click Add.
4
Click  Study.
5
In the Select Study tree, select General Studies>Stationary.
6
Global Definitions
Load all model parameters from a file containing parameters for the geometry and some material properties.
Parameters 1
1
In the Model Builder window, under Global Definitions click Parameters 1.
2
In the Settings window for Parameters, locate the Parameters section.
3
Click  Load from File.
4
Part 1
1
In the Model Builder window, right-click Global Definitions and choose Geometry Parts>2D Part.
"Now build a 2D section of the model geometry, starting with the blank geometry.
Rectangle 1 (r1)
1
In the Geometry toolbar, click  Rectangle.
2
In the Settings window for Rectangle, locate the Size and Shape section.
3
In the Width text field, type L.
4
In the Height text field, type th.
Add an extra domain to get better mesh control in the blank.
5
Click to expand the Layers section. In the table, enter the following settings:
6
Select the Layers to the left check box.
7
Clear the Layers on bottom check box.
8
Click  Build Selected.
Continue with the punch geometry.
Circle 1 (c1)
1
In the Geometry toolbar, click  Circle.
2
In the Settings window for Circle, locate the Size and Shape section.
3
In the Radius text field, type R1.
4
In the Sector angle text field, type 90.
5
Locate the Position section. In the y text field, type R1+th.
6
Locate the Rotation Angle section. In the Rotation text field, type -90.
7
Click to expand the Layers section. In the table, enter the following settings:
8
Click  Build Selected.
Finally, draw the die geometry.
Circle 2 (c2)
1
In the Geometry toolbar, click  Circle.
2
In the Settings window for Circle, locate the Size and Shape section.
3
In the Radius text field, type R2+th.
4
In the Sector angle text field, type 90.
5
Locate the Position section. In the y text field, type -R3.
6
Locate the Rotation Angle section. In the Rotation text field, type -90.
7
Locate the Layers section. In the table, enter the following settings:
8
Click  Build Selected.
Circle 3 (c3)
1
In the Geometry toolbar, click  Circle.
2
In the Settings window for Circle, locate the Size and Shape section.
3
In the Radius text field, type R3.
4
In the Sector angle text field, type 90.
5
Locate the Position section. In the x text field, type R2+R3.
6
In the y text field, type -R3.
7
Locate the Rotation Angle section. In the Rotation text field, type 90.
8
Locate the Layers section. In the table, enter the following settings:
9
Click  Build Selected.
Rectangle 2 (r2)
1
In the Geometry toolbar, click  Rectangle.
2
In the Settings window for Rectangle, locate the Size and Shape section.
3
In the Width text field, type 1[cm].
4
In the Height text field, type th.
5
Locate the Position section. In the x text field, type R2+R3.
6
In the y text field, type -th.
7
Click  Build Selected.
Delete Entities 1 (del1)
1
In the Model Builder window, right-click Part 1 and choose Delete Entities.
2
In the Settings window for Delete Entities, locate the Entities or Objects to Delete section.
3
From the Geometric entity level list, choose Domain.
4
On the object c1, select Domain 1 only.
5
On the object c2, select Domain 1 only.
6
On the object c3, select Domain 1 only.
7
Click  Build Selected.
Union 1 (uni1)
1
In the Geometry toolbar, click  Booleans and Partitions and choose Union.
2
Select the objects del1(2), del1(3), and r2 only.
Geometry 1
Part Instance 1 (pi1)
1
In the Geometry toolbar, click  Parts and choose Part 1.
2
In the Settings window for Part Instance, click  Build Selected.
Form Union (fin)
1
In the Model Builder window, under Component 1 (comp1)>Geometry 1 click Form Union (fin).
2
In the Settings window for Form Union/Assembly, locate the Form Union/Assembly section.
3
From the Action list, choose Form an assembly.
4
Clear the Create pairs check box.
5
Click  Build Selected.
Definitions
You can now add contact pairs to define on which boundary you expect the contact to happen.
Contact Pair 1 (p1)
1
In the Definitions toolbar, click  Pairs and choose Contact Pair.
2
3
In the Settings window for Pair, locate the Destination Boundaries section.
4
Click to select the  Activate Selection toggle button.
5
Contact Pair 2 (p2)
1
In the Definitions toolbar, click  Pairs and choose Contact Pair.
2
3
In the Settings window for Pair, locate the Destination Boundaries section.
4
Click to select the  Activate Selection toggle button.
5
Global Definitions
To define the punch displacement for the loading and the unloading stages, use an interpolation function that makes the displacement a function of a monotonic parameter.
Interpolation 1 (int1)
1
In the Definitions toolbar, click  Interpolation.
2
In the Settings window for Interpolation, locate the Definition section.
3
In the Function name text field, type punch.
4
5
Locate the Units section. In the Function table, enter the following settings:
6
In the Argument table, enter the following settings:
Add Material
1
In the Home toolbar, click  Add Material to open the Add Material window.
2
Go to the Add Material window.
3
In the tree, select Built-in>Structural steel.
4
Right-click and choose Add to Global Materials.
5
In the Home toolbar, click  Add Material to close the Add Material window.
Global Definitions
Material 2 (mat2)
In the Model Builder window, under Global Definitions right-click Materials and choose Blank Material.
Materials
Material Link 1 (matlnk1)
In the Model Builder window, under Component 1 (comp1) right-click Materials and choose More Materials>Material Link.
Material Link 2 (matlnk2)
1
Right-click Materials and choose More Materials>Material Link.
2
3
In the Settings window for Material Link, locate the Link Settings section.
4
From the Material list, choose Material 2 (mat2).
Global Definitions
Material 2 (mat2)
1
In the Model Builder window, under Global Definitions>Materials click Material 2 (mat2).
2
In the Settings window for Material, locate the Material Contents section.
3
4
Click to expand the Material Properties section. In the Material properties tree, select Solid Mechanics>Elastoplastic Material>Elastoplastic Material Model>Initial yield stress (sigmags).
5
Click  Add to Material.
6
Locate the Material Contents section. In the table, enter the following settings:
Use a piecewise constant function to define the hardening function with a smooth transition. At small equivalent plastic strain (lower than 3%) use a linear function; at higher values, use the Hollomon hardening function.
Piecewise 1 (pw1)
1
In the Model Builder window, expand the Material 2 (mat2) node.
2
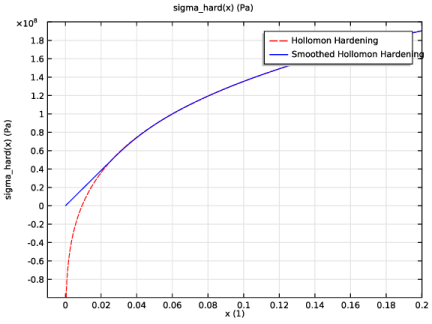
Right-click Global Definitions>Materials>Material 2 (mat2)>Elastoplastic material model (ElastoplasticModel) and choose Functions>Piecewise.
3
In the Settings window for Piecewise, type sigma_hard in the Function name text field.
4
Locate the Definition section. From the Extrapolation list, choose None.
5
From the Smoothing list, choose Continuous first derivative.
6
Find the Intervals subsection. In the table, enter the following settings:
7
Locate the Units section. In the Arguments text field, type 1.
8
In the Function text field, type Pa.
9
Locate the Definition section. From the Extrapolation list, choose Nearest function.
Material 2 (mat2)
1
In the Model Builder window, under Global Definitions>Materials>Material 2 (mat2) click Elastoplastic material model (ElastoplasticModel).
2
In the Settings window for Elastoplastic Material Model, locate the Model Inputs section.
3
Click  Select Quantity.
4
In the Physical Quantity dialog box, type plastic strain in the text field.
5
Click  Filter.
6
In the tree, select Solid Mechanics>Equivalent plastic strain (1).
7
8
In the Model Builder window, click Material 2 (mat2).
9
In the Settings window for Material, locate the Material Contents section.
10
Solid Mechanics (solid)
1
In the Model Builder window, under Component 1 (comp1) click Solid Mechanics (solid).
2
In the Settings window for Solid Mechanics, locate the Thickness section.
3
In the d text field, type w_sheet.
Linear Elastic Material 1
In the Model Builder window, under Component 1 (comp1)>Solid Mechanics (solid) click Linear Elastic Material 1.
Plasticity 1
1
In the Physics toolbar, click  Attributes and choose Plasticity.
2
3
In the Settings window for Plasticity, locate the Plasticity Model section.
4
Find the Isotropic hardening model subsection. From the list, choose Hardening function.
Symmetry 1
1
In the Physics toolbar, click  Boundaries and choose Symmetry.
2
Fixed Constraint 1
1
In the Physics toolbar, click  Boundaries and choose Fixed Constraint.
2
Prescribed Displacement 1
1
In the Physics toolbar, click  Boundaries and choose Prescribed Displacement.
2
3
In the Settings window for Prescribed Displacement, locate the Prescribed Displacement section.
4
Select the Prescribed in x direction check box.
5
Select the Prescribed in y direction check box.
6
In the u0y text field, type punch(para).
For such a problem (using continuation parameter), a constant penalty factor is preferred. Set it with a lower value than the default to improve the stability.
Contact 1
1
In the Model Builder window, click Contact 1.
2
In the Settings window for Contact, locate the Contact Method section.
3
From the Formulation list, choose Augmented Lagrangian.
4
Locate the Contact Pressure Penalty Factor section. From the Penalty factor control list, choose Manual tuning.
5
In the fp text field, type 0.1.
6
From the Use relaxation list, choose Never.
7
Locate the Initial Value section. In the Tn text field, type 1e4.
Contact 1a
1
In the Physics toolbar, click  Pairs and choose Contact.
2
In the Settings window for Contact, locate the Pair Selection section.
3
Under Pairs, click  Add.
4
In the Add dialog box, select Contact Pair 2 (p2) in the Pairs list.
5
6
In the Settings window for Contact, locate the Contact Method section.
7
From the Formulation list, choose Augmented Lagrangian.
8
Locate the Contact Pressure Penalty Factor section. From the Penalty factor control list, choose Manual tuning.
9
In the fp text field, type 5e-2.
10
From the Use relaxation list, choose Never.
11
Locate the Initial Value section. In the Tn text field, type 1e4.
Mesh 1
Mapped 1
In the Mesh toolbar, click  Mapped.
Distribution 1
1
Right-click Mapped 1 and choose Distribution.
2
3
In the Settings window for Distribution, locate the Distribution section.
4
In the Number of elements text field, type 50.
Distribution 2-5
1
2
Click  Build All.
Definitions
The blank deformation angle is the slope of the line between the points (4e-2, 0) and (5e-2,0). Use integration coupling variables to evaluate the spatial coordinates at these points.
Integration 1 (intop1)
1
In the Definitions toolbar, click  Nonlocal Couplings and choose Integration.
2
In the Settings window for Integration, locate the Source Selection section.
3
From the Geometric entity level list, choose Point.
4
Integration 2 (intop2)
1
In the Definitions toolbar, click  Nonlocal Couplings and choose Integration.
2
In the Settings window for Integration, locate the Source Selection section.
3
From the Geometric entity level list, choose Point.
4
Variables 1
1
In the Definitions toolbar, click  Local Variables.
2
In the Settings window for Variables, locate the Variables section.
3
Frictionless
1
In the Model Builder window, click Study 1.
2
In the Settings window for Study, type Frictionless in the Label text field.
Step 1: Stationary
1
In the Model Builder window, under Frictionless click Step 1: Stationary.
2
In the Settings window for Stationary, click to expand the Results While Solving section.
3
Select the Plot check box.
Set up an auxiliary continuation sweep for the para parameter.
4
Click to expand the Study Extensions section. Select the Auxiliary sweep check box.
5
6
Solution 1 (sol1)
1
In the Study toolbar, click  Show Default Solver.
2
In the Model Builder window, expand the Solution 1 (sol1) node.
3
In the Model Builder window, expand the Frictionless>Solver Configurations>Solution 1 (sol1)>Dependent Variables 1 node, then click Displacement field (comp1.u).
4
In the Settings window for Field, locate the Scaling section.
5
In the Scale text field, type 1e-2.
6
In the Model Builder window, expand the Frictionless>Solver Configurations>Solution 1 (sol1)>Stationary Solver 1 node, then click Parametric 1.
7
In the Settings window for Parametric, click to expand the Continuation section.
8
Select the Tuning of step size check box.
9
In the Initial step size text field, type 1e-4.
10
In the Minimum step size text field, type 1e-4.
11
In the Maximum step size text field, type 5e-3.
Add a nonlocal integration coupling to evaluate the punch force.
Definitions
Integration 3 (intop3)
1
In the Definitions toolbar, click  Nonlocal Couplings and choose Integration.
2
In the Settings window for Integration, locate the Source Selection section.
3
From the Geometric entity level list, choose Boundary.
4
5
Locate the Advanced section. From the Method list, choose Summation over nodes.
Frictionless
Solution 1 (sol1)
1
Right-click Parametric 1 and choose Stop Condition.
2
In the Settings window for Stop Condition, locate the Stop Expressions section.
3
4
5
6
7
Locate the Output at Stop section. From the Add solution list, choose Step after stop.
8
Clear the Add warning check box.
9
Click  Compute.
Results
Stress (Frictionless)
The default plot shows the von Mises stress, equivalent plastic strain, and contact pressure after the release. For better clarity, disable the equivalent plastic strain, which will be plotted separately.
1
In the Settings window for 2D Plot Group, type Stress (Frictionless) in the Label text field.
2
Locate the Plot Settings section. From the Frame list, choose Spatial  (x, y, z).
3
In the Stress (Frictionless) toolbar, click  Plot.
Deformation 1
1
In the Model Builder window, expand the Equivalent Plastic Strain (solid) node.
2
Right-click Contour 1 and choose Deformation.
3
In the Settings window for Deformation, locate the Scale section.
4
Select the Scale factor check box.
5
6
In the Equivalent Plastic Strain (solid) toolbar, click  Plot.
Evaluate the forming angle and the angle after release.
The instruction below shows how to evaluate the forming angle and the angle after release.
Deformation Angle (Frictionless)
1
In the Model Builder window, expand the Results>Datasets node.
2
Right-click Results>Derived Values and choose Global Evaluation.
3
In the Settings window for Global Evaluation, type Deformation Angle (Frictionless) in the Label text field.
4
Locate the Data section. From the Parameter selection (para) list, choose From list.
5
In the Parameter values (para) list, choose 1 and 1.295.
6
Click Replace Expression in the upper-right corner of the Expressions section. From the menu, choose Component 1 (comp1)>Definitions>Variables>angle - Blank deformation angle - rad.
7
Locate the Expressions section. In the table, enter the following settings:
8
Click  Evaluate.
Deformation Angle (Frictionless)
1
In the Model Builder window, expand the Results>Tables node, then click Table 1.
2
In the Settings window for Table, type Deformation Angle (Frictionless) in the Label text field.
Now plot the punch forces versus the punch displacement as in Figure 7.
Punch Force vs. Displacement
1
In the Results toolbar, click  1D Plot Group.
2
In the Settings window for 1D Plot Group, type Punch Force vs. Displacement in the Label text field.
3
Locate the Data section. From the Dataset list, choose None.
4
Click to expand the Title section. From the Title type list, choose None.
5
Locate the Plot Settings section. Select the x-axis label check box.
6
In the associated text field, type Punch displacement (mm).
7
Select the y-axis label check box.
8
9
Locate the Legend section. From the Position list, choose Upper left.
Global 1
1
Right-click Punch Force vs. Displacement and choose Global.
2
In the Settings window for Global, locate the Data section.
3
From the Dataset list, choose Frictionless/Solution 1 (sol1).
4
Locate the y-Axis Data section. In the table, enter the following settings:
5
Locate the x-Axis Data section. From the Parameter list, choose Expression.
6
In the Expression text field, type -punch(para).
7
From the Unit list, choose mm.
8
Click to expand the Legends section. From the Legends list, choose Manual.
9
10
In the Punch Force vs. Displacement toolbar, click  Plot.
Now include friction in the problem.
Solid Mechanics (solid)
Contact 1
In the Model Builder window, under Component 1 (comp1)>Solid Mechanics (solid) click Contact 1.
Friction 1
1
In the Physics toolbar, click  Attributes and choose Friction.
2
In the Settings window for Friction, locate the Friction Parameters section.
3
In the μ text field, type 0.1348.
4
Locate the Initial Value section. From the Previous contact state list, choose In contact.
Contact 1a
In the Model Builder window, under Component 1 (comp1)>Solid Mechanics (solid) click Contact 1a.
Friction 1
1
In the Physics toolbar, click  Attributes and choose Friction.
2
In the Settings window for Friction, locate the Friction Parameters section.
3
In the μ text field, type 0.1348.
4
Locate the Initial Value section. From the Previous contact state list, choose In contact.
Add Study
1
In the Home toolbar, click  Add Study to open the Add Study window.
2
Go to the Add Study window.
3
Find the Studies subsection. In the Select Study tree, select General Studies>Stationary.
4
Click Add Study in the window toolbar.
5
In the Home toolbar, click  Add Study to close the Add Study window.
Friction
1
In the Model Builder window, click Study 2.
2
In the Settings window for Study, type Friction in the Label text field.
Step 1: Stationary
1
In the Model Builder window, under Friction click Step 1: Stationary.
2
In the Settings window for Stationary, locate the Results While Solving section.
3
Select the Plot check box.
4
From the Plot group list, choose Default.
5
Locate the Study Extensions section. Select the Auxiliary sweep check box.
6
7
Solution 2 (sol2)
1
In the Study toolbar, click  Show Default Solver.
2
In the Model Builder window, expand the Solution 2 (sol2) node.
3
In the Model Builder window, expand the Friction>Solver Configurations>Solution 2 (sol2)>Dependent Variables 1 node, then click Displacement field (comp1.u).
4
In the Settings window for Field, locate the Scaling section.
5
In the Scale text field, type 1e-2.
6
In the Model Builder window, expand the Friction>Solver Configurations>Solution 2 (sol2)>Stationary Solver 1 node, then click Parametric 1.
7
In the Settings window for Parametric, locate the Continuation section.
8
Select the Tuning of step size check box.
9
In the Initial step size text field, type 1e-4.
10
In the Minimum step size text field, type 1e-4.
11
In the Maximum step size text field, type 5e-3.
12
Right-click Friction>Solver Configurations>Solution 2 (sol2)>Stationary Solver 1>Parametric 1 and choose Stop Condition.
13
In the Settings window for Stop Condition, locate the Stop Expressions section.
14
15
16
17
18
Locate the Output at Stop section. From the Add solution list, choose Step after stop.
19
Clear the Add warning check box.
20
In the Model Builder window, expand the Friction>Solver Configurations>Solution 2 (sol2)>Stationary Solver 1>Segregated 1 node, then click Solid Mechanics.
21
In the Settings window for Segregated Step, click to expand the Method and Termination section.
22
In the Initial damping factor text field, type 0.1.
23
Click  Compute.
Results
Stress (Friction)
1
In the Settings window for 2D Plot Group, type Stress (Friction) in the Label text field.
2
Locate the Plot Settings section. From the Frame list, choose Spatial  (x, y, z).
3
In the Stress (Friction) toolbar, click  Plot.
Deformation 1
1
In the Model Builder window, expand the Equivalent Plastic Strain (solid) 1 node.
2
Right-click Contour 1 and choose Deformation.
3
In the Settings window for Deformation, locate the Scale section.
4
Select the Scale factor check box.
5
Equivalent Plastic Strain (solid) 1
1
In the Model Builder window, under Results click Equivalent Plastic Strain (solid) 1.
2
In the Equivalent Plastic Strain (solid) 1 toolbar, click  Plot.
You can now evaluate the angle at the forming and after-release stages.
Deformation Angle (Friction)
1
In the Model Builder window, right-click Deformation Angle (Frictionless) and choose Duplicate.
2
In the Settings window for Global Evaluation, type Deformation Angle (Friction) in the Label text field.
3
Locate the Data section. From the Dataset list, choose Friction/Solution 2 (sol2).
4
In the Parameter values (para) list, choose 1 and 1.4312.
5
Clicknext to  Evaluate, then choose New Table.
Deformation Angle (Friction)
1
In the Model Builder window, under Results>Tables click Table 2.
2
In the Settings window for Table, type Deformation Angle (Friction) in the Label text field.
Global 2
1
In the Model Builder window, under Results>Punch Force vs. Displacement right-click Global 1 and choose Duplicate.
2
In the Settings window for Global, locate the Data section.
3
From the Dataset list, choose Friction/Solution 2 (sol2).
4
Click to expand the Coloring and Style section. Find the Line style subsection. From the Line list, choose Dashed.
5
Locate the Legends section. In the table, enter the following settings:
6
In the Punch Force vs. Displacement toolbar, click  Plot.
Add a table in which to store the benchmark experimental data.
Punch Force (Experiment)
1
In the Results toolbar, click  Table.
2
In the Settings window for Table, type Punch Force (Experiment) in the Label text field.
3
Locate the Data section. Click Import.
4
Experiment
1
In the Model Builder window, right-click Punch Force vs. Displacement and choose Table Graph.
2
In the Settings window for Table Graph, type Experiment in the Label text field.
3
Locate the Data section. From the Table list, choose Punch Force (Experiment).
4
Locate the Coloring and Style section. Find the Line style subsection. From the Line list, choose None.
5
From the Color list, choose From theme.
6
Find the Line markers subsection. From the Marker list, choose Cycle.
7
From the Positioning list, choose In data points.
8
Click to expand the Legends section. Select the Show legends check box.
9
From the Legends list, choose Manual.
10
11
In the Punch Force vs. Displacement toolbar, click  Plot.
Friction is now included in the model. To compute the solution without friction in the first study again, you need to make sure that the friction nodes are disabled in the model for this specific study. This is convenient if you need to close the model and reopen it later.
Frictionless
Step 1: Stationary
1
In the Model Builder window, under Frictionless click Step 1: Stationary.
2
In the Settings window for Stationary, locate the Physics and Variables Selection section.
3
Select the Modify model configuration for study step check box.
4
In the tree, select Component 1 (Comp1)>Solid Mechanics (Solid)>Contact 1>Friction 1.
5
6
In the tree, select Component 1 (Comp1)>Solid Mechanics (Solid)>Contact 1a>Friction 1.
7
Add Component
In the Model Builder window, right-click the root node and choose Add Component>3D.
Geometry 2
Work Plane 1 (wp1)
1
In the Geometry toolbar, click  Work Plane.
2
In the Settings window for Work Plane, locate the Plane Definition section.
3
From the Plane list, choose xz-plane.
4
Locate the Unite Objects section. Clear the Unite objects check box.
Work Plane 1 (wp1)>Plane Geometry
In the Model Builder window, click Plane Geometry.
Work Plane 1 (wp1)>Part Instance 1 (pi1)
1
In the Work Plane toolbar, click  Parts and choose Part 1.
2
In the Settings window for Part Instance, click  Build Selected.
3
Click the  Zoom Extents button in the Graphics toolbar.
Extrude 1 (ext1)
1
In the Model Builder window, under Component 2 (comp2)>Geometry 2 right-click Work Plane 1 (wp1) and choose Extrude.
2
Select the object wp1.pi1(1) only.
3
In the Settings window for Extrude, locate the Distances section.
4
5
Select the Reverse direction check box.
6
Click  Build Selected.
Extrude 2 (ext2)
1
In the Geometry toolbar, click  Extrude.
2
In the Settings window for Extrude, locate the Distances section.
3
4
Select the Reverse direction check box.
5
Click  Build Selected.
Form Union (fin)
1
In the Model Builder window, under Component 2 (comp2)>Geometry 2 click Form Union (fin).
2
In the Settings window for Form Union/Assembly, locate the Form Union/Assembly section.
3
From the Action list, choose Form an assembly.
4
Clear the Create pairs check box.
Definitions (comp2)
Contact Pair 3 (p3)
1
In the Definitions toolbar, click  Pairs and choose Contact Pair.
2
3
In the Settings window for Pair, locate the Destination Boundaries section.
4
Click to select the  Activate Selection toggle button.
5
Contact Pair 4 (p4)
1
In the Definitions toolbar, click  Pairs and choose Contact Pair.
2
3
In the Settings window for Pair, locate the Destination Boundaries section.
4
Click to select the  Activate Selection toggle button.
5
Global Definitions
Material 3 (mat3)
1
In the Model Builder window, under Global Definitions>Materials right-click Material 2 (mat2) and choose Duplicate.
2
In the Settings window for Material, click to expand the Material Properties section.
3
In the Material properties tree, select Geometric Properties>Shell.
4
Click  Add to Material.
5
Locate the Material Contents section. In the table, enter the following settings:
m²·s4/kg²
Materials
Material Link 3 (matlnk3)
1
In the Model Builder window, under Component 2 (comp2) right-click Materials and choose More Materials>Material Link.
2
In the Settings window for Material Link, locate the Geometric Entity Selection section.
3
From the Geometric entity level list, choose Boundary.
4
Global Definitions
Material 3 (mat3)
In the Model Builder window, under Global Definitions>Materials right-click Material 3 (mat3) and choose Copy.
Materials
Material 3 (mat4)
1
In the Model Builder window, under Component 2 (comp2) right-click Materials and choose Paste Material.
2
In the Settings window for Material, locate the Geometric Entity Selection section.
3
From the Geometric entity level list, choose Boundary.
4
Add Physics
1
In the Home toolbar, click  Add Physics to open the Add Physics window.
2
Go to the Add Physics window.
3
In the tree, select Structural Mechanics>Shell (shell).
4
Find the Physics interfaces in study subsection. In the table, clear the Solve check boxes for Frictionless and Friction.
5
Click Add to Component 2 in the window toolbar.
6
In the Home toolbar, click  Add Physics to close the Add Physics window.
Shell (shell)
1
In the Settings window for Shell, locate the Boundary Selection section.
2
Click  Clear Selection.
3
Thickness and Offset 1
1
In the Model Builder window, under Component 2 (comp2)>Shell (shell) click Thickness and Offset 1.
2
In the Settings window for Thickness and Offset, locate the Thickness and Offset section.
3
In the d text field, type th.
4
From the Position list, choose Top surface on boundary.
Layered Linear Elastic Material 1
1
In the Physics toolbar, click  Boundaries and choose Layered Linear Elastic Material.
2
Materials
Material 3 (mat4)
1
In the Model Builder window, under Component 2 (comp2)>Materials click Material 3 (mat4).
2
In the Settings window for Material, locate the Orientation and Position section.
3
From the Coordinate system list, choose Boundary System 2 (sys2).
4
From the Position list, choose Top side on boundary.
Shell (shell)
Layered Linear Elastic Material 1
In the Model Builder window, under Component 2 (comp2)>Shell (shell) click Layered Linear Elastic Material 1.
Plasticity 1
1
In the Physics toolbar, click  Attributes and choose Plasticity.
2
3
In the Settings window for Plasticity, locate the Plasticity Model section.
4
Find the Isotropic hardening model subsection. From the list, choose Hardening function.
Prescribed Displacement/Rotation 1
1
In the Physics toolbar, click  Boundaries and choose Prescribed Displacement/Rotation.
2
3
In the Settings window for Prescribed Displacement/Rotation, locate the Prescribed Displacement section.
4
Select the Prescribed in x direction check box.
5
Select the Prescribed in y direction check box.
6
Select the Prescribed in z direction check box.
7
In the u0z text field, type punch(para).
Symmetry 1
1
In the Physics toolbar, click  Edges and choose Symmetry.
2
Contact 1
1
In the Model Builder window, click Contact 1.
2
In the Settings window for Contact, locate the Contact Surface section.
3
From the Contact surface, destination list, choose Bottom.
4
Locate the Contact Method section. From the Formulation list, choose Augmented Lagrangian.
5
Locate the Contact Pressure Penalty Factor section. From the Penalty factor control list, choose Manual tuning.
6
In the fp text field, type 0.1.
7
From the Use relaxation list, choose Never.
8
Locate the Initial Value section. In the Tn text field, type 1e4.
Friction 1
1
In the Physics toolbar, click  Attributes and choose Friction.
2
In the Settings window for Friction, locate the Friction Parameters section.
3
In the μ text field, type 0.1342.
4
Locate the Initial Value section. From the Previous contact state list, choose In contact.
Contact 1a
1
In the Physics toolbar, click  Pairs and choose Contact.
2
In the Settings window for Contact, locate the Pair Selection section.
3
Under Pairs, click  Add.
4
In the Add dialog box, select Contact Pair 4 (p4) in the Pairs list.
5
6
In the Settings window for Contact, locate the Contact Method section.
7
From the Formulation list, choose Augmented Lagrangian.
8
Locate the Contact Pressure Penalty Factor section. From the Penalty factor control list, choose Manual tuning.
9
In the fp text field, type 0.1.
10
From the Use relaxation list, choose Never.
11
Locate the Initial Value section. In the Tn text field, type 1e4.
Friction 1
1
In the Physics toolbar, click  Attributes and choose Friction.
2
In the Settings window for Friction, locate the Friction Parameters section.
3
In the μ text field, type 0.1342.
4
Locate the Initial Value section. From the Previous contact state list, choose In contact.
Mesh 2
Mapped 1
1
In the Mesh toolbar, click  Boundary and choose Mapped.
2
Distribution 1
1
Right-click Mapped 1 and choose Distribution.
2
3
In the Settings window for Distribution, locate the Distribution section.
4
In the Number of elements text field, type 1.
Distribution 2
1
In the Model Builder window, right-click Mapped 1 and choose Distribution.
2
3
In the Settings window for Distribution, locate the Distribution section.
4
In the Number of elements text field, type 50.
Distribution 3
1
Right-click Mapped 1 and choose Distribution.
2
3
In the Settings window for Distribution, locate the Distribution section.
4
In the Number of elements text field, type 20.
Distribution 4
1
Right-click Mapped 1 and choose Distribution.
2
3
In the Settings window for Distribution, locate the Distribution section.
4
In the Number of elements text field, type 25.
Distribution 5
1
Right-click Mapped 1 and choose Distribution.
2
3
In the Settings window for Distribution, locate the Distribution section.
4
From the Distribution type list, choose Fixed number of elements.
5
In the Number of elements text field, type 3.
6
Click  Build Selected.
Definitions (comp2)
Integration 4 (intop4)
1
In the Definitions toolbar, click  Nonlocal Couplings and choose Integration.
2
In the Settings window for Integration, locate the Source Selection section.
3
From the Geometric entity level list, choose Point.
4
Integration 5 (intop5)
1
In the Definitions toolbar, click  Nonlocal Couplings and choose Integration.
2
In the Settings window for Integration, locate the Source Selection section.
3
From the Geometric entity level list, choose Point.
4
Integration 6 (intop6)
1
In the Definitions toolbar, click  Nonlocal Couplings and choose Integration.
2
In the Settings window for Integration, locate the Source Selection section.
3
From the Geometric entity level list, choose Boundary.
4
5
Locate the Advanced section. From the Method list, choose Summation over nodes.
Variables 2
1
In the Model Builder window, right-click Definitions and choose Variables.
2
In the Settings window for Variables, locate the Variables section.
3
Add Study
1
In the Home toolbar, click  Add Study to open the Add Study window.
2
Go to the Add Study window.
3
Find the Studies subsection. In the Select Study tree, select General Studies>Stationary.
4
Find the Physics interfaces in study subsection. In the table, clear the Solve check box for Solid Mechanics (solid).
5
Click Add Study in the window toolbar.
6
In the Home toolbar, click  Add Study to close the Add Study window.
Study 3
Step 1: Stationary
1
In the Settings window for Stationary, locate the Study Extensions section.
2
Select the Auxiliary sweep check box.
3
4
5
In the Model Builder window, click Study 3.
6
In the Settings window for Study, type Friction (shell) in the Label text field.
Solution 3 (sol3)
1
In the Study toolbar, click  Show Default Solver.
2
In the Model Builder window, expand the Solution 3 (sol3) node.
3
In the Model Builder window, expand the Friction (shell)>Solver Configurations>Solution 3 (sol3)>Dependent Variables 1 node, then click Displacement field (comp2.u2).
4
In the Settings window for Field, locate the Scaling section.
5
In the Scale text field, type 1e-2.
6
In the Model Builder window, expand the Friction (shell)>Solver Configurations>Solution 3 (sol3)>Stationary Solver 1 node, then click Parametric 1.
7
In the Settings window for Parametric, locate the Continuation section.
8
Select the Tuning of step size check box.
9
In the Initial step size text field, type 1e-4.
10
In the Minimum step size text field, type 1e-4.
11
In the Maximum step size text field, type 5e-3.
12
From the Predictor list, choose Linear.
13
Right-click Friction (shell)>Solver Configurations>Solution 3 (sol3)>Stationary Solver 1>Parametric 1 and choose Stop Condition.
14
In the Settings window for Stop Condition, locate the Stop Expressions section.
15
16
17
18
19
Locate the Output at Stop section. From the Add solution list, choose Step after stop.
20
Clear the Add warning check box.
21
In the Model Builder window, expand the Friction (shell)>Solver Configurations>Solution 3 (sol3)>Stationary Solver 1>Segregated 1 node, then click Shell.
22
In the Settings window for Segregated Step, locate the Method and Termination section.
23
From the Nonlinear method list, choose Constant (Newton).
24
From the Termination technique list, choose Iterations or tolerance.
25
Click  Compute.
Results
Stress (shell)
1
In the Settings window for 3D Plot Group, locate the Plot Settings section.
2
From the Frame list, choose Spatial  (x, y, z).
Surface 1
1
In the Model Builder window, expand the Stress (shell) node.
2
Right-click Results>Stress (shell)>Surface 1 and choose Delete.
Stress (shell)
1
In the Model Builder window, under Results click Stress (shell).
2
In the Stress (shell) toolbar, click  Plot.
3
In the Model Builder window, click Stress (shell).
4
In the Settings window for 3D Plot Group, locate the Data section.
5
From the Dataset list, choose Friction (shell)/Solution 3 (4) (sol3).
6
From the Parameter value (para) list, choose 1.
Surface 2
1
In the Model Builder window, click Surface 2.
2
In the Settings window for Surface, locate the Data section.
3
From the Solution parameters list, choose From parent.
4
In the Stress (shell) toolbar, click  Plot.
Deformation 1
1
In the Model Builder window, expand the Equivalent Plastic Strain (shell) node.
2
Right-click Contour 1 and choose Deformation.
3
In the Settings window for Deformation, locate the Expression section.
4
In the x component text field, type shell.u.
5
In the y component text field, type shell.v.
6
In the z component text field, type shell.w.
7
Locate the Scale section. Select the Scale factor check box.
8
Equivalent Plastic Strain (shell)
1
In the Model Builder window, under Results click Equivalent Plastic Strain (shell).
2
In the Equivalent Plastic Strain (shell) toolbar, click  Plot.
Deformation angle (Shell)
1
In the Model Builder window, right-click Deformation Angle (Friction) and choose Duplicate.
2
In the Settings window for Global Evaluation, type Deformation angle (Shell) in the Label text field.
3
Locate the Data section. From the Dataset list, choose Friction (shell)/Solution 3 (4) (sol3).
4
Locate the Expressions section. In the table, enter the following settings:
5
Clicknext to  Evaluate, then choose New Table.
Global 3
1
In the Model Builder window, under Results>Punch Force vs. Displacement right-click Global 2 and choose Duplicate.
2
In the Settings window for Global, locate the Data section.
3
From the Dataset list, choose Friction (shell)/Solution 3 (4) (sol3).
4
Locate the y-Axis Data section. In the table, enter the following settings:
5
Locate the Coloring and Style section. Find the Line style subsection. From the Line list, choose Dash-dot.
6
Locate the Legends section. In the table, enter the following settings:
7
In the Punch Force vs. Displacement toolbar, click  Plot.