PDF

Flow Around an Inclined NACA 0012 Airfoil
Introduction
This example simulates the flow around an inclined NACA 0012 airfoil using the SST turbulence model and compares the results with the experimental lift data of Ladson (Ref. 1) and pressure data of Gregory and O’Reilly (Ref. 2). The SST model combines the near-wall capabilities of the k-ω model with the superior free-stream behavior of the k-ε model to enable accurate simulations of a wide variety of internal and external flow problems. See the theory for the SST turbulence model in the CFD Module User’s Guide for further information.
Model Definition
Consider the flow relative to a reference frame fixed on a NACA 0012 airfoil with chord-length c = 1.8 m. The temperature of the ambient air is 20 °C and the relative free-stream velocity is U = 50 m/s resulting in a Mach number of 0.15. The Reynolds number based on the chord length is roughly 6·106, so you can assume that the boundary layers are turbulent over practically the entire airfoil. The airfoil is inclined at an angle α to the oncoming stream,
To obtain a sharp trailing edge, the airfoil is slightly altered from its original shape (Ref. 3),
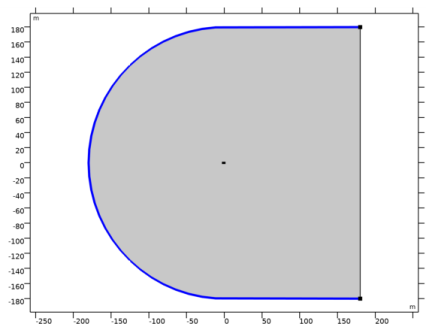
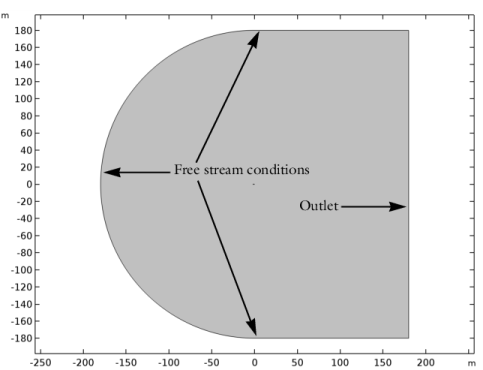
The upstream, top, and bottom edges of the computational domain are located 100 chord-lengths away from the trailing edge of the airfoil and the downstream edge is located 200 chord-lengths away. This is to minimize the effect of the applied boundary conditions.
Figure 1 shows the flow domain and the applied far-field boundary conditions,
Figure 1: Flow domain and far-field boundary conditions.
Ref. 4 provides far-field values for the turbulence variables,
where the free-stream value of the turbulence kinetic energy is given by
and L is the appropriate length of the computational domain. The current model applies the upper limit of the provided free-stream turbulence values,
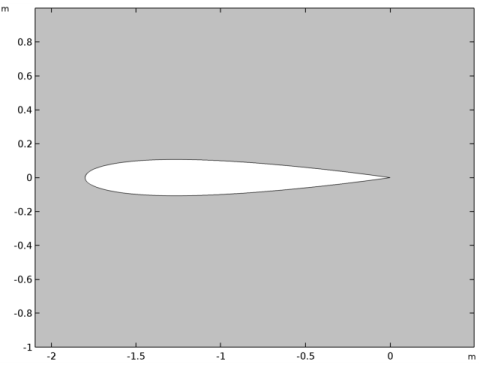
Figure 2 shows a close-up of the airfoil section. A no-slip condition is applied on the surface of the airfoil.
Figure 2: Close-up of the airfoil section.
The computations employ a structured mesh with a high size ratio between the outermost and wall-adjacent elements.
Potential Flow Solution
The simplest option when setting the initial velocity field is to use a constant velocity, which does not satisfy the wall boundary conditions. A more accurate and robust initial guess can be obtained solving the potential flow equation.
Assuming irrotational, inviscid flow, the velocity potential is defined as
The velocity potential must satisfy the continuity equation for incompressible flow, . The continuity equation can be expressed as a Laplace equation
which is the potential flow equation.
Once the velocity potential is computed, the pressure can be approximated using Bernoulli’s equation for steady flows:
Results and Discussion
The study performs a Parametric Sweep with the angle of attack α taking the values,
Figure 3 shows the velocity magnitude and the streamlines for the steady flow around the NACA 0012 profile at α = 14°.
Figure 3: Velocity magnitude and streamlines for the flow around a NACA 0012 airfoil.
A small separation bubble appears at the trailing edge for higher values of α, and the flow is unlikely to remain steady and two-dimensional hereon. Ref. 1 provides experimental data for the lift coefficient versus the angle of attack,
where the pressure coefficient is defined as,
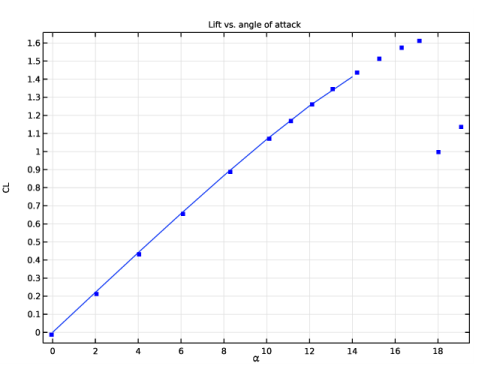
and c is the chord length. Note that the normal is directed outward from the flow domain (into the airfoil). Figure 4 shows computational and experimental results for the lift coefficient versus angle of attack.
Figure 4: Computational (solid) and experimental (dots) results for the lift coefficient vs. angle of attack.
No discernible discrepancy between the computational and experimental results occurs within the range of α values used in the computations. The experimental results continue through the parameter regime where the airfoil stalls. Figure 5 shows a comparison between the computed pressure coefficient at α = 10° and the experimental results in Ref. 2.
Figure 5: Computational (solid) and experimental (dots) results for the pressure coefficient along the airfoil.
Experimental data is only available on the low-pressure side of the airfoil. The agreement between the computational and experimental results is very good.
Notes About the COMSOL Implementation
The model uses the SST turbulence model together with a Parametric Sweep for the angle of attack to compute the different flows on a mapped mesh.
The initial values for the velocity components are obtained by solving a potential flow equation, which is set up using a PDE interface.
References
1. C.L. Ladson, “Effects of Independent Variation of Mach and Reynolds Numbers on the Low-Speed Aerodynamic Characteristics of the NACA 0012 Airfoil Section,” NASA TM 4074, 1988.
2. N. Gregory and C. L. O’Reilly, “Low-Speed Aerodynamic Characteristics of NACA 0012 Aerofoil Section, including the Effects of Upper-Surface Roughness Simulating Hoar Frost,” A.R.C., R. & M. no. 3726, 1970.
3. NASA Langley Research Center, Turbulence Modeling Resource, “2D NACA 0012 Airfoil Validation Case,” http://turbmodels.larc.nasa.gov/naca0012_val.html
4. F.R. Menter, “Two-Equation Eddy-Viscosity Models for Engineering Applications,” AIAA Journal, vol. 32, no. 8, pp. 1598–1605, 1994.
Application Library path: CFD_Module/Verification_Examples/naca0012_airfoil
Modeling Instructions
From the File menu, choose New.
New
In the New window, click  Model Wizard.
Model Wizard
1
In the Model Wizard window, click  2D.
2
In the Select Physics tree, select Mathematics>Classical PDEs>Laplace Equation (lpeq).
3
Click Add.
4
Click  Study.
5
In the Select Study tree, select General Studies>Stationary.
6
Laplace Equation (lpeq)
1
In the Model Builder window, under Component 1 (comp1) click Laplace Equation (lpeq).
2
In the Settings window for Laplace Equation, click to expand the Dependent Variables section.
3
In the Dependent variable text field, type phi.
Add Physics
1
In the Home toolbar, click  Add Physics to open the Add Physics window.
2
Go to the Add Physics window.
3
In the tree, select Fluid Flow>Single-Phase Flow>Turbulent Flow>Turbulent Flow, SST (spf).
4
Click Add to Component 1 in the window toolbar.
5
In the Home toolbar, click  Add Physics to close the Add Physics window.
Global Definitions
Parameters 1
1
In the Model Builder window, under Global Definitions click Parameters 1.
2
In the Settings window for Parameters, locate the Parameters section.
3
Geometry 1
Circle 1 (c1)
1
In the Geometry toolbar, click  Circle.
2
In the Settings window for Circle, locate the Size and Shape section.
3
In the Radius text field, type L.
4
In the Sector angle text field, type 90.
5
Locate the Rotation Angle section. In the Rotation text field, type 90.
Parametric Curve 1 (pc1)
1
In the Geometry toolbar, click  More Primitives and choose Parametric Curve.
2
In the Settings window for Parametric Curve, locate the Expressions section.
3
In the x text field, type c*s.
4
In the y text field, type c*0.594689181*(0.298222773*sqrt(s)-0.127125232*s-0.357907906*s^2+0.291984971*s^3-0.105174696*s^4).
5
Locate the Position section. In the x text field, type -c.
Union 1 (uni1)
1
In the Geometry toolbar, click  Booleans and Partitions and choose Union.
2
Click in the Graphics window and then press Ctrl+A to select both objects.
Delete Entities 1 (del1)
1
In the Model Builder window, right-click Geometry 1 and choose Delete Entities.
2
In the Settings window for Delete Entities, locate the Entities or Objects to Delete section.
3
From the Geometric entity level list, choose Domain.
4
On the object uni1, select Domain 2 only.
5
Click  Build All Objects.
6
Click  Build Selected.
Rectangle 1 (r1)
1
In the Geometry toolbar, click  Rectangle.
2
In the Settings window for Rectangle, locate the Size and Shape section.
3
In the Width text field, type L.
4
In the Height text field, type L.
5
Click  Build Selected.
6
Click the  Zoom Extents button in the Graphics toolbar.
Mirror 1 (mir1)
1
In the Geometry toolbar, click  Transforms and choose Mirror.
2
In the Settings window for Mirror, locate the Input section.
3
Select the Keep input objects check box.
4
Click in the Graphics window and then press Ctrl+A to select both objects.
5
Locate the Normal Vector to Line of Reflection section. In the x text field, type 0.
6
In the y text field, type 1.
7
Click  Build Selected.
8
Click the  Zoom Extents button in the Graphics toolbar.
Mesh Control Edges 1 (mce1)
1
In the Geometry toolbar, click  Virtual Operations and choose Mesh Control Edges.
2
On the object fin, select Boundaries 1, 2, 4, and 5 only.
3
In the Geometry toolbar, click  Build All.
Add Material
1
In the Home toolbar, click  Add Material to open the Add Material window.
2
Go to the Add Material window.
3
In the tree, select Liquids and Gases>Gases>Air.
4
Click Add to Component in the window toolbar.
5
In the Home toolbar, click  Add Material to close the Add Material window.
Laplace Equation (lpeq)
1
In the Model Builder window, under Component 1 (comp1) click Laplace Equation (lpeq).
2
In the Settings window for Laplace Equation, locate the Units section.
3
Click  Define Dependent Variable Unit.
4
In the Dependent variable quantity table, enter the following settings:
5
Click  Define Source Term Unit.
6
In the Source term quantity table, enter the following settings:
Dirichlet Boundary Condition 1
1
In the Physics toolbar, click  Boundaries and choose Dirichlet Boundary Condition.
2
In the Settings window for Dirichlet Boundary Condition, locate the Boundary Selection section.
3
Click  Paste Selection.
4
In the Paste Selection dialog box, type 2 in the Selection text field.
5
Flux/Source 1
1
In the Physics toolbar, click  Boundaries and choose Flux/Source.
2
In the Settings window for Flux/Source, locate the Boundary Selection section.
3
Click  Paste Selection.
4
In the Paste Selection dialog box, type 1 in the Selection text field.
5
6
In the Settings window for Flux/Source, locate the Boundary Flux/Source section.
7
In the g text field, type -nx*U_inf.
Turbulent Flow, SST (spf)
Since the density variation is not small, the flow cannot be regarded as incompressible. Therefore set the flow to be compressible.
1
In the Model Builder window, under Component 1 (comp1) click Turbulent Flow, SST (spf).
2
In the Settings window for Turbulent Flow, SST, locate the Physical Model section.
3
From the Compressibility list, choose Compressible flow (Ma<0.3).
4
Locate the Turbulence section. From the Wall treatment list, choose Low Re.
Fluid Properties 1
1
In the Model Builder window, under Component 1 (comp1)>Turbulent Flow, SST (spf) click Fluid Properties 1.
2
In the Settings window for Fluid Properties, locate the Distance Equation section.
3
From the lref list, choose Manual.
4
Inlet 1
1
In the Physics toolbar, click  Boundaries and choose Inlet.
2
It might be easier to select the correct boundary by using the Selection List window. To open this window, in the Home toolbar click Windows and choose Selection List. (If you are running the cross-platform desktop, you find Windows in the main menu.)
3
In the Settings window for Inlet, locate the Turbulence Conditions section.
4
Click the Specify turbulence variables button.
5
In the k0 text field, type k_inf.
6
In the ω0 text field, type om_inf.
7
Locate the Velocity section. Click the Velocity field button.
8
Specify the u0 vector as
Initial Values 1
1
In the Model Builder window, click Initial Values 1.
2
In the Settings window for Initial Values, locate the Initial Values section.
3
Specify the u vector as
4
In the p text field, type -spf.rho/2*(phix^2+phiy^2).
5
In the k text field, type k_inf.
6
In the om text field, type om_inf.
Open Boundary 1
1
In the Physics toolbar, click  Boundaries and choose Open Boundary.
2
3
In the Settings window for Open Boundary, locate the Turbulence Conditions section.
4
Click the Specify turbulence variables button.
5
In the k0 text field, type k_inf.
6
In the ω0 text field, type om_inf.
Mesh 1
Mapped 1
1
In the Mesh toolbar, click  Mapped.
2
In the Settings window for Mapped, locate the Domain Selection section.
3
From the Geometric entity level list, choose Domain.
4
5
Click to expand the Control Entities section. Clear the Smooth across removed control entities check box.
Distribution 1
1
Right-click Mapped 1 and choose Distribution.
2
3
In the Settings window for Distribution, locate the Distribution section.
4
From the Distribution type list, choose Predefined.
5
In the Number of elements text field, type 100.
6
In the Element ratio text field, type 15000000.
7
From the Growth rate list, choose Exponential.
8
Select the Reverse direction check box.
Distribution 2
1
In the Model Builder window, right-click Mapped 1 and choose Distribution.
2
3
In the Settings window for Distribution, locate the Distribution section.
4
From the Distribution type list, choose Predefined.
5
In the Number of elements text field, type 25.
6
In the Element ratio text field, type 25.
7
From the Growth rate list, choose Exponential.
Distribution 3
1
Right-click Mapped 1 and choose Distribution.
2
3
In the Settings window for Distribution, locate the Distribution section.
4
From the Distribution type list, choose Predefined.
5
In the Number of elements text field, type 25.
6
In the Element ratio text field, type 480000.
7
From the Growth rate list, choose Exponential.
8
Select the Reverse direction check box.
Distribution 4
1
Right-click Mapped 1 and choose Distribution.
2
3
In the Settings window for Distribution, locate the Distribution section.
4
In the Number of elements text field, type 100.
Mapped 2
1
In the Mesh toolbar, click  Mapped.
2
In the Settings window for Mapped, locate the Domain Selection section.
3
From the Geometric entity level list, choose Domain.
4
5
Locate the Control Entities section. Clear the Smooth across removed control entities check box.
Distribution 1
1
Right-click Mapped 2 and choose Distribution.
2
3
In the Settings window for Distribution, locate the Distribution section.
4
From the Distribution type list, choose Predefined.
5
In the Number of elements text field, type 100.
6
In the Element ratio text field, type 15000000.
7
From the Growth rate list, choose Exponential.
Distribution 2
1
In the Model Builder window, right-click Mapped 2 and choose Distribution.
2
3
In the Settings window for Distribution, locate the Distribution section.
4
From the Distribution type list, choose Predefined.
5
In the Number of elements text field, type 256.
6
In the Element ratio text field, type 256.
7
From the Growth rate list, choose Exponential.
8
Select the Symmetric distribution check box.
Mapped 3
1
In the Mesh toolbar, click  Mapped.
2
In the Settings window for Mapped, locate the Domain Selection section.
3
From the Geometric entity level list, choose Domain.
4
5
Locate the Control Entities section. Clear the Smooth across removed control entities check box.
Distribution 1
1
Right-click Mapped 3 and choose Distribution.
2
3
In the Settings window for Distribution, locate the Distribution section.
4
From the Distribution type list, choose Predefined.
5
In the Number of elements text field, type 100.
6
In the Element ratio text field, type 15000000.
7
From the Growth rate list, choose Exponential.
Distribution 2
1
In the Model Builder window, right-click Mapped 3 and choose Distribution.
2
3
In the Settings window for Distribution, locate the Distribution section.
4
From the Distribution type list, choose Predefined.
5
In the Number of elements text field, type 25.
6
In the Element ratio text field, type 25.
7
From the Growth rate list, choose Exponential.
8
Select the Reverse direction check box.
Distribution 3
1
Right-click Mapped 3 and choose Distribution.
2
3
In the Settings window for Distribution, locate the Distribution section.
4
In the Number of elements text field, type 100.
5
In the Model Builder window, right-click Mesh 1 and choose Build All.
Study 1
Step 1: Stationary
1
In the Model Builder window, under Study 1 click Step 1: Stationary.
2
In the Settings window for Stationary, locate the Physics and Variables Selection section.
3
In the table, clear the Solve for check box for Turbulent Flow, SST (spf).
4
In the Home toolbar, click  Compute.
Definitions
View 1
In the Model Builder window, expand the Component 1 (comp1)>Definitions node.
Axis
1
In the Model Builder window, expand the View 1 node, then click Axis.
2
In the Settings window for Axis, locate the Axis section.
3
In the x minimum text field, type -2.5.
4
In the x maximum text field, type 0.5.
5
In the y minimum text field, type -1.1.
6
In the y maximum text field, type 1.1.
7
Click  Update.
View 1
1
In the Model Builder window, click View 1.
2
In the Settings window for View, locate the View section.
3
Select the Lock axis check box.
Results
Potential Flow
1
In the Model Builder window, under Results click 2D Plot Group 1.
2
In the Settings window for 2D Plot Group, locate the Plot Settings section.
3
From the View list, choose View 1.
4
Right-click Results>2D Plot Group 1 and choose Rename.
5
In the Rename 2D Plot Group dialog box, type Potential Flow in the New label text field.
6
Surface 1
1
In the Model Builder window, expand the Potential Flow node, then click Surface 1.
2
In the Settings window for Surface, locate the Expression section.
3
In the Expression text field, type sqrt(phix^2+phiy^2).
Streamline 1
1
In the Model Builder window, right-click Potential Flow and choose Streamline.
2
In the Settings window for Streamline, locate the Expression section.
3
In the x component text field, type -phix.
4
In the y component text field, type -phiy.
5
Locate the Streamline Positioning section. From the Positioning list, choose Starting-point controlled.
6
From the Entry method list, choose Coordinates.
7
In the x text field, type 0.
8
In the y text field, type range(-2,0.025,2).
Potential Flow
1
In the Model Builder window, click Potential Flow.
2
In the Settings window for 2D Plot Group, click to expand the Title section.
3
From the Title type list, choose Manual.
4
In the Title text area, type Velocity magnitude and streamlines for potential-flow solution.
5
In the Potential Flow toolbar, click  Plot.
Add Study
1
In the Home toolbar, click  Add Study to open the Add Study window.
2
Go to the Add Study window.
3
Find the Studies subsection. In the Select Study tree, select Preset Studies for Selected Physics Interfaces>Turbulent Flow, SST>Stationary with Initialization.
4
Click Add Study in the window toolbar.
5
In the Home toolbar, click  Add Study to close the Add Study window.
Study 2
Step 1: Wall Distance Initialization
1
In the Settings window for Wall Distance Initialization, locate the Physics and Variables Selection section.
2
In the table, clear the Solve for check box for Laplace Equation (lpeq).
3
Click to expand the Values of Dependent Variables section. Find the Initial values of variables solved for subsection. From the Settings list, choose User controlled.
4
Find the Values of variables not solved for subsection. From the Settings list, choose User controlled.
5
From the Study list, choose Study 1, Stationary.
Step 2: Stationary
1
In the Model Builder window, click Step 2: Stationary.
2
In the Settings window for Stationary, locate the Physics and Variables Selection section.
3
In the table, clear the Solve for check box for Laplace Equation (lpeq).
4
Click to expand the Values of Dependent Variables section. Find the Initial values of variables solved for subsection. From the Settings list, choose User controlled.
5
From the Study list, choose Study 1, Stationary.
6
Click to expand the Study Extensions section. Select the Auxiliary sweep check box.
7
8
9
In the Home toolbar, click  Compute.
Results
Line Integration 1
1
In the Results toolbar, click  More Derived Values and choose Integration>Line Integration.
2
3
In the Settings window for Line Integration, locate the Expressions section.
4
5
Locate the Data section. From the Dataset list, choose Study 2/Solution 2 (sol2).
6
Click  Evaluate.
Table
1
Go to the Table window.
2
Click Table Graph in the window toolbar.
Results
Table 2
1
In the Results toolbar, click  Table.
2
In the Settings window for Table, locate the Data section.
3
Click Import.
4
Table Graph 2
1
In the Model Builder window, right-click 1D Plot Group 5 and choose Table Graph.
2
In the Settings window for Table Graph, locate the Data section.
3
From the Table list, choose Table 2.
4
Locate the Coloring and Style section. Find the Line style subsection. From the Line list, choose None.
5
From the Color list, choose Blue.
6
Find the Line markers subsection. From the Marker list, choose Point.
7
From the Positioning list, choose In data points.
1D Plot Group 5
1
In the Model Builder window, click 1D Plot Group 5.
2
In the Settings window for 1D Plot Group, click to expand the Title section.
3
From the Title type list, choose Manual.
4
In the Title text area, type Lift vs. angle of attack.
5
Locate the Plot Settings section. Select the x-axis label check box.
6
7
Select the y-axis label check box.
8
9
In the 1D Plot Group 5 toolbar, click  Plot.
Table 3
1
In the Results toolbar, click  Table.
2
In the Settings window for Table, locate the Data section.
3
Click Import.
4
Table
1
Go to the Table window.
2
Click Table Graph in the window toolbar.
Results
Table Graph 1
1
In the Model Builder window, under Results>1D Plot Group 6 click Table Graph 1.
2
In the Settings window for Table Graph, locate the Coloring and Style section.
3
Find the Line style subsection. From the Line list, choose None.
4
From the Color list, choose Blue.
5
Find the Line markers subsection. From the Marker list, choose Point.
6
From the Positioning list, choose In data points.
Line Graph 1
1
In the Model Builder window, right-click 1D Plot Group 6 and choose Line Graph.
2
In the Settings window for Line Graph, locate the Data section.
3
From the Dataset list, choose Study 2/Solution 2 (sol2).
4
From the Parameter selection (alpha) list, choose From list.
5
In the Parameter values (alpha) list, select 10.
6
Locate the Selection section. Click  Paste Selection.
7
In the Paste Selection dialog box, type 3 4 in the Selection text field.
8
9
In the Settings window for Line Graph, locate the y-Axis Data section.
10
In the Expression text field, type -p/(1/2*rho_inf*U_inf^2).
11
Locate the x-Axis Data section. From the Parameter list, choose Expression.
12
In the Expression text field, type (x+c)/c.
13
In the 1D Plot Group 6 toolbar, click  Plot.
1D Plot Group 6
1
In the Model Builder window, click 1D Plot Group 6.
2
In the Settings window for 1D Plot Group, locate the Title section.
3
From the Title type list, choose None.
4
Locate the Plot Settings section. Select the x-axis label check box.
5
6
Select the y-axis label check box.
7
8
In the 1D Plot Group 6 toolbar, click  Plot.
Velocity (spf)
1
In the Model Builder window, click Velocity (spf).
2
In the Settings window for 2D Plot Group, locate the Plot Settings section.
3
From the View list, choose View 1.
Streamline 1
Right-click Velocity (spf) and choose Streamline.
Streamline 1
1
In the Model Builder window, expand the Results>Velocity (spf) node, then click Streamline 1.
2
In the Settings window for Streamline, locate the Expression section.
3
In the x component text field, type u.
4
In the y component text field, type v.
5
Locate the Streamline Positioning section. From the Positioning list, choose Starting-point controlled.
6
From the Entry method list, choose Coordinates.
7
In the x text field, type 0.
8
In the y text field, type range(-2,0.025,2).
9
In the Velocity (spf) toolbar, click  Plot.