 ), you can specify the properties of a multilayer laminate. It is used when defining the properties of the following features:
), you can specify the properties of a multilayer laminate. It is used when defining the properties of the following features:| • | Layered Linear Elastic Material in the Shell interface (requires the Composite Materials Module). | 
| • | Thin Layer in the Heat Transfer in Solids interface. | 
| • | The most common place is under Global Definitions>Materials. When you reference a layered material from a physics interface, you do it indirectly through either a Layered Material Link or a Layered Material Link (Subnode) under Materials in the current component. | 
| • | It can also be a subnode under a Layered Material Stack node in a component. | 
 ) to add another table row. Use the Move up (
) to add another table row. Use the Move up ( ), Move down (
), Move down ( ), and Delete (
), and Delete ( ) buttons to organize the table as needed. To completely reset the table to its default state, you can use the Reset to Default button (
) buttons to organize the table as needed. To completely reset the table to its default state, you can use the Reset to Default button ( ).
).| • | Click the Blank Material (  ) button to add a new blank material under global materials. The material is referenced in current row of the Material column. | 
| • | Click the Add Material from Library (  ) button to add a new material under global materials from Material Libraries. The material is referenced in current row of the Material column. | 
| • | Click the Go to Material (  ) button to jump to the definition of the material selected on the current row. | 

 ) button. For the example above, the text file has the following contents:
) button. For the example above, the text file has the following contents: ) button. For complex laminates, it may be easier to start by creating the text file representation in a text editor, than to enter the data in the GUI.
) button. For complex laminates, it may be easier to start by creating the text file representation in a text editor, than to enter the data in the GUI.| When loading a file, the second column containing the material tag is ignored. The reason is that there is no way to ascertain that a material tag like ‘mat2’ would point to the same material in another context. You can even load a file where that column is absent. | 
 ) button. This will give a plot like the one shown in Figure 9-9.
) button. This will give a plot like the one shown in Figure 9-9.
 ) or Create Layer Cross Section Preview (
) or Create Layer Cross Section Preview ( ), which adds the preview plot as a new plot group under Results. By clicking the Layer Cross Section Preview (
), which adds the preview plot as a new plot group under Results. By clicking the Layer Cross Section Preview ( ) button, you get a preview plot of the single layer material, including the location of the reference surface. This plot looks similar to Figure 9-12, but there is only a single layer.
) button, you get a preview plot of the single layer material, including the location of the reference surface. This plot looks similar to Figure 9-12, but there is only a single layer. ) button. In Figure 9-10, an example of such a plot is shown. The x-axis corresponds to the principal laminate direction, and the stripes indicate the principal direction of each layer. You can also click the downward pointing arrow to choose Layer Stack Preview (
) button. In Figure 9-10, an example of such a plot is shown. The x-axis corresponds to the principal laminate direction, and the stripes indicate the principal direction of each layer. You can also click the downward pointing arrow to choose Layer Stack Preview ( ) or Create Layer Stack Preview (
) or Create Layer Stack Preview ( ), which adds the preview plot as a new plot group under Results. Click the Create Layer Stack Plot button (
), which adds the preview plot as a new plot group under Results. Click the Create Layer Stack Plot button ( ) to add the preview of the layer stack as a new plot group under Results.
) to add the preview of the layer stack as a new plot group under Results.
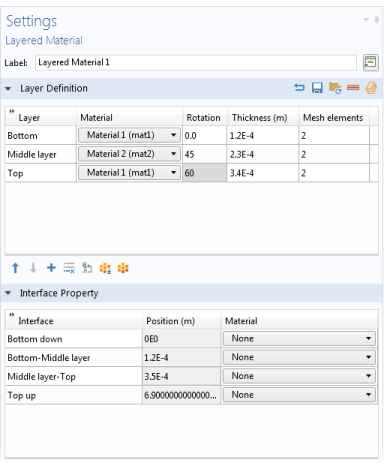
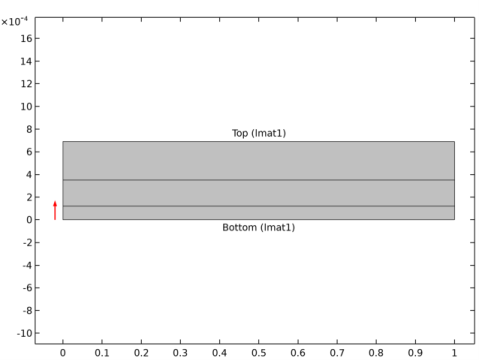
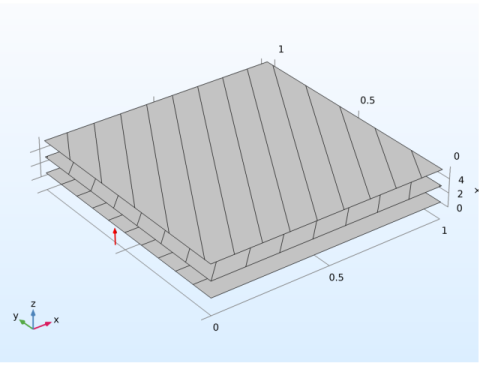
| • | In a layer stack preview plot, it controls the height of the stack in the z direction. For laminates with many layers, you may need to increase this value. | 
| • | In the layer cross section preview plot, it controls the height in the y direction. The width is always unity. |