You are viewing the documentation for an older COMSOL version. The latest version is available here.
PDF

Second Harmonic Generation in the Frequency Domain
Introduction
The emission spectra from different types of laser system cover a large part of the visible and near visible part of the electromagnetic spectrum. However, it is still more difficult to generate laser emission in the short-wavelength part of the spectrum than in the long-wavelength part. To circumvent this dilemma, it is common to use nonlinear frequency mixing to generate new wavelengths from the existing laser wavelengths. A common approach is to start with a Nd:YAG laser that emits at 1 064 nm wavelength and then frequency-double that wavelength to green at 532 nm. Given those two wavelengths, it is also possible to mix them, which results in the generation of light in ultraviolet (UV) at 355 nm — an effective frequency tripling of the original wavelength at 1 064 nm.
This model demonstrates how two frequency-domain interfaces can be coupled together to simulate the second harmonic generation process, where light from the fundamental wavelength (frequency) is injected in a nonlinear crystal that generates the second harmonic frequency, which is twice the fundamental frequency. The results are compared with analytical results obtained within the Slowly Varying Envelope Approximation (SVEA).
Model Definition
The geometry for the model is very simple, consisting only of a slender two-dimensional rectangle. The rectangle is many wavelengths long in the propagation direction, but consists of only one mesh element in the direction orthogonal to the propagation direction.
The first Electromagnetic Waves, Frequency Domain interface is defined for the fundamental frequency f1 and the second Electromagnetic Waves, Frequency Domain interface is defined for the second harmonic frequency 2f1.
The only incident wave is polarized in the y-direction and launched at the fundamental frequency using a Scattering Boundary Condition feature.
The two interfaces are coupled using a Polarization feature added to each of the interfaces. For the fundamental interface, the polarization is given by
(1)
and for the second harmonic interface the polarization is given by
(2),
where d is a nonlinear coefficient for the process, E1y is the y-component of the electric field at the fundamental frequency, and E2y is the y-component of the electric field at the second harmonic frequency. For more details regarding second harmonic generation, see for example Ref. 1.
The results from the simulation are compared with the analytical results obtained within the Slowly Varying Envelope Approximation (SVEA) (see Ref. 1). The analytical results for the photon flux density, assuming perfect phase matching, are for the fundamental wave
(3)
and for the second harmonic wave
(4),
where is the incident photon flux density for the fundamental wave, the constant ϒ is defined by
(5),
Z0 is the characteristic impedance of the medium, ω is the angular frequency, and is the incident intensity for the fundamental wave. As seen from Equation 3 and Equation 4, when x goes to infinity the photon flux density for the fundamental goes to zero, whereas the photon flux density for the second harmonic approaches half of the initial fundamental photon flux density. Since the photon energy for the second harmonic is twice that of the fundamental, the energy is conserved in the process.
Results and Discussion
Figure 1 shows the y-component of the electric field of the fundamental wave. As shown, the amplitude decreases when the wave propagates through the medium and energy is transferred to the second harmonic wave. Figure 2 shows the y-component of the electric field for the second harmonic wave. For this wave, the initial amplitude is zero. Upon propagation, the amplitude increases, as energy is transferred from the fundamental wave. Notice also that the wavelength for the second harmonic field is half that of the fundamental wave.
Figure 1: The electric field distribution of the fundamental wave (y-component).
Figure 2: The electric field distribution of the second harmonic wave (y-component).
Figure 3 shows a comparison of the fundamental and the second harmonic, confirming the conclusions drawn from the comparison of the two previous figures.
Figure 3: A comparison between the y-components of the electric fields for the fundamental and the second harmonic wave.
Finally, Figure 4 compares the results from the simulation with analytical results obtain by applying the Slowly Varying Envelope Approximation (SVEA) (see Equation 3 and Equation 4 in the Model Definition section above). As the energy for each photon in the second harmonic wave is twice that of the energy of the photons in the fundamental wave, the curves indicate that the energy is conserved in the second harmonic generation process.
Figure 4: The photon flux density (in units of photons per m2 and s) for the fundamental and the second harmonic wave. The diamonds represent the simulated results (blue diamonds representing the fundamental wave and green diamonds representing the second harmonic wave), whereas the red line represents the analytical result in Equation 3 and the cyan line represents the analytical results in Equation 4.
Notes About the COMSOL Implementation
The value for the nonlinear coefficient (d = 1×10-18 C/V2) in this proof of concept model is intentionally chosen to be unphysically large, to allow for a small simulation domain. More typical values for realistic nonlinear materials are of the order of d = 1×10-24–1×10‑21 C/V2.
As mentioned in Ref. 1, there exists different conventions for expressing the nonlinear coefficients in the series expansion of the polarization in terms of the electric field. In this model, the second order nonlinear coefficient follows the convention in Ref. 1.
Reference
1. B.E.A. Saleh and M.C. Teich, Fundamentals of Photonics, John Wiley & Sons, chap. 19, 1991.
Application Library path: Wave_Optics_Module/Verification_Examples/second_harmonic_generation_frequency_domain
Modeling Instructions
From the File menu, choose New.
New
In the New window, click  Model Wizard.
Model Wizard
1
In the Model Wizard window, click  2D.
2
In the Select Physics tree, select Optics>Wave Optics>Electromagnetic Waves, Frequency Domain (ewfd).
3
Click Add.
4
Click Add.
5
Click  Study.
6
In the Select Study tree, select General Studies>Frequency Domain.
7
Global Definitions
Start by importing the parameters from a file.
Parameters 1
1
In the Model Builder window, under Global Definitions click Parameters 1.
2
In the Settings window for Parameters, locate the Parameters section.
3
Click  Load from File.
4
Browse to the model’s Application Libraries folder and double-click the file second_harmonic_generation_frequency_domain_parameters.txt.
Geometry 1
Rectangle 1 (r1)
1
In the Geometry toolbar, click  Rectangle.
2
In the Settings window for Rectangle, locate the Size and Shape section.
3
In the Width text field, type sim_l.
4
In the Height text field, type sim_h.
5
Click to expand the Layers section. In the table, enter the following settings:
6
Select the Layers to the left check box.
7
Select the Layers to the right check box.
8
Clear the Layers on bottom check box.
Definitions
In the Model Builder window, expand the Component 1 (comp1)>Definitions node.
Axis
To get a more interesting aspect ratio for the graphics, set the View scale for the Axis to Automatic.
1
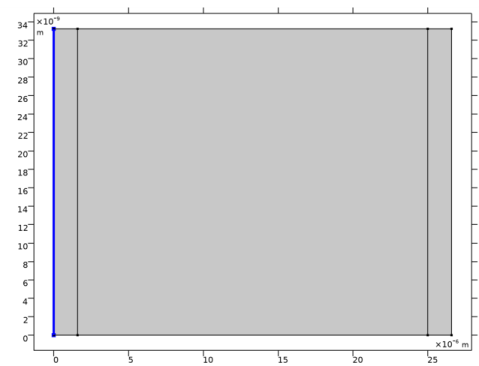
In the Model Builder window, expand the Component 1 (comp1)>Definitions>View 1 node, then click Axis.
2
In the Settings window for Axis, locate the Axis section.
3
From the View scale list, choose Automatic.
4
Click  Update.
5
Click the  Zoom Extents button in the Graphics toolbar.
Materials
Material 1 (mat1)
1
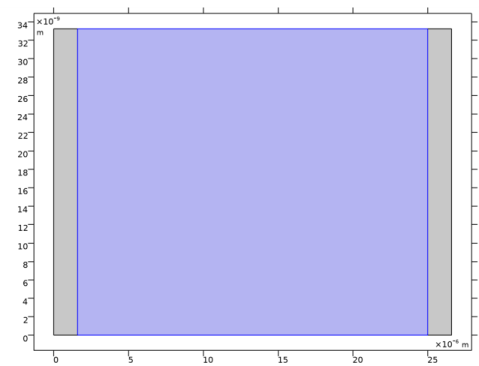
In the Model Builder window, under Component 1 (comp1) right-click Materials and choose Blank Material.
2
In the Settings window for Material, locate the Material Contents section.
3
Fundamental
1
In the Model Builder window, under Component 1 (comp1) click Electromagnetic Waves, Frequency Domain (ewfd).
2
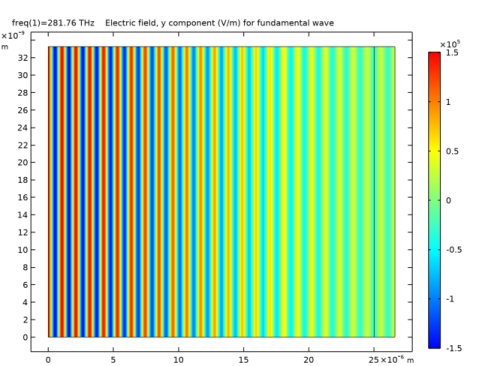
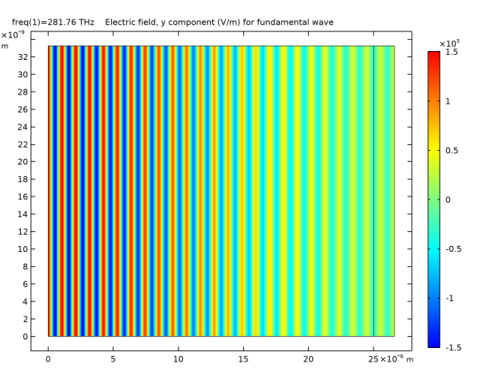
In the Settings window for Electromagnetic Waves, Frequency Domain, type Fundamental in the Label text field.
3
In the Name text field, type ewfd1, as we denote the fundamental wave with the number 1.
4
Locate the Components section. From the Electric field components solved for list, choose In-plane vector, as only the in-plane polarization will be included in the simulation.
Polarization 1
1
In the Physics toolbar, click  Domains and choose Polarization.
2
3
In the Settings window for Polarization, locate the Polarization section.
4
Specify the Pi vector as
Scattering Boundary Condition 1
1
In the Physics toolbar, click  Boundaries and choose Scattering Boundary Condition.
2
3
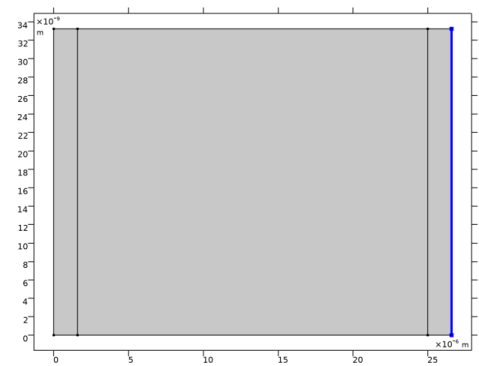
In the Settings window for Scattering Boundary Condition, locate the Scattering Boundary Condition section.
4
From the Incident field list, choose Wave given by E field.
5
Specify the E0 vector as
This is the input field, driving the nonlinear process.
Scattering Boundary Condition 2
1
In the Physics toolbar, click  Boundaries and choose Scattering Boundary Condition.
2
Second Harmonic
The second interface should use the second harmonic frequency. This will be set below in the Equation settings for the interface.
1
In the Model Builder window, under Component 1 (comp1) click Electromagnetic Waves, Frequency Domain 2 (ewfd2).
2
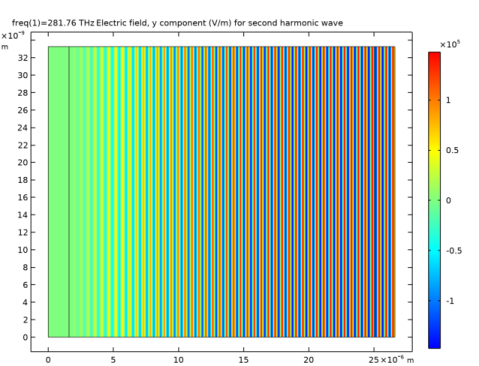
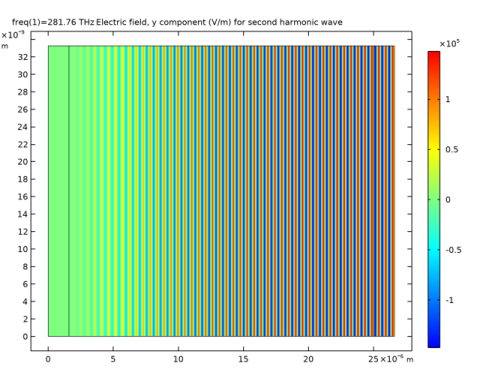
In the Settings window for Electromagnetic Waves, Frequency Domain, type Second Harmonic in the Label text field.
3
Locate the Components section. From the Electric field components solved for list, choose In-plane vector.
4
Click to expand the Equation section. From the Equation form list, choose Frequency domain.
5
From the Frequency list, choose User defined. In the f text field, type f2.
Polarization 1
1
In the Physics toolbar, click  Domains and choose Polarization.
2
3
In the Settings window for Polarization, locate the Polarization section.
4
Specify the Pi vector as
Scattering Boundary Condition 1
1
In the Physics toolbar, click  Boundaries and choose Scattering Boundary Condition.
2
Mesh 1
Mapped 1
1
In the Mesh toolbar, click  Mapped.
2
In the Model Builder window, under Mesh 1 click Size.
Size
1
In the Settings window for Size, locate the Element Size section.
2
Click the Custom button.
3
Locate the Element Size Parameters section. In the Maximum element size text field, type sim_h.
4
In the Minimum element size text field, type sim_h.
The settings above create a mapped mesh with only one element in the height direction.
Definitions
Variables 1
1
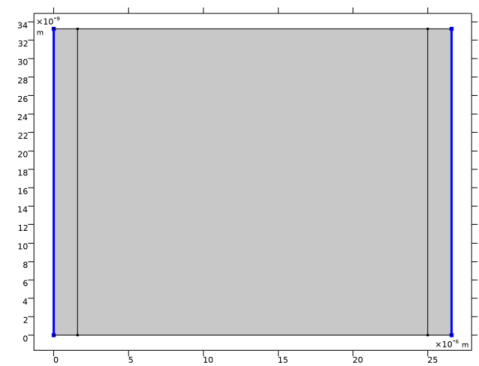
In the Model Builder window, under Component 1 (comp1) right-click Definitions and choose Variables.
2
In the Settings window for Variables, locate the Variables section.
3
This variable will be used when comparing the simulated results with the analytical results from the Slowly Varying Envelope Approximation (SVEA).
Study 1
Step 1: Frequency Domain
1
In the Model Builder window, under Study 1 click Step 1: Frequency Domain.
2
In the Settings window for Frequency Domain, locate the Study Settings section.
3
In the Frequencies text field, type f1.
4
In the Home toolbar, click  Compute.
Results
Fundamental
In the Settings window for 2D Plot Group, type Fundamental in the Label text field.
Surface 1
1
In the Model Builder window, expand the Fundamental node, then click Surface 1.
2
In the Settings window for Surface, locate the Expression section.
3
In the Expression text field, type ewfd1.Ey.
Fundamental
Before finishing the plot, update the plot title.
1
In the Model Builder window, click Fundamental.
2
In the Settings window for 2D Plot Group, click to expand the Title section.
3
From the Title type list, choose Manual.
4
In the Title text area, type Electric field, y component (V/m) for fundamental wave.
5
In the Fundamental toolbar, click  Plot.
Second Harmonic
1
In the Model Builder window, under Results click Electric Field (ewfd2).
2
In the Settings window for 2D Plot Group, type Second Harmonic in the Label text field.
Surface 1
1
In the Model Builder window, expand the Second Harmonic node, then click Surface 1.
2
In the Settings window for Surface, locate the Expression section.
3
In the Expression text field, type ewfd2.Ey.
Second Harmonic
Again, update the plot title.
1
In the Model Builder window, click Second Harmonic.
2
In the Settings window for 2D Plot Group, locate the Title section.
3
From the Title type list, choose Manual.
4
In the Title text area, type Electric field, y component (V/m) for second harmonic wave.
5
In the Second Harmonic toolbar, click  Plot.
Notice that the wavelength is half of that displayed in the Fundamental plot group for the fundamental wave.
Electric Fields
Now create a line graph showing the electric fields for the fundamental and the second harmonic waves.
1
In the Home toolbar, click  Add Plot Group and choose 1D Plot Group.
2
In the Settings window for 1D Plot Group, type Electric Fields in the Label text field.
Fundamental
1
Right-click Electric Fields and choose Line Graph.
2
In the Settings window for Line Graph, type Fundamental in the Label text field.
3
4
Locate the y-Axis Data section. In the Expression text field, type ewfd1.Ey.
5
Locate the x-Axis Data section. From the Parameter list, choose Expression.
6
In the Expression text field, type x.
7
Click to expand the Coloring and Style section. In the Width text field, type 2.
8
Click to expand the Legends section. Select the Show legends check box.
9
From the Legends list, choose Manual.
10
Second Harmonic
1
Right-click Fundamental and choose Duplicate.
2
In the Settings window for Line Graph, type Second Harmonic in the Label text field.
3
Locate the y-Axis Data section. In the Expression text field, type ewfd2.Ey.
4
Locate the Legends section. In the table, enter the following settings:
Electric Fields
1
In the Model Builder window, click Electric Fields.
2
In the Settings window for 1D Plot Group, click to expand the Title section.
3
From the Title type list, choose Manual.
4
In the Title text area, type Fundamental and Second Harmonic Electric Fields.
Photon Flux Density
1
In the Home toolbar, click  Add Plot Group and choose 1D Plot Group.
2
In the Settings window for 1D Plot Group, type Photon Flux Density in the Label text field.
Simulation Fundamental
1
Right-click Photon Flux Density and choose Line Graph.
2
In the Settings window for Line Graph, type Simulation Fundamental in the Label text field.
3
4
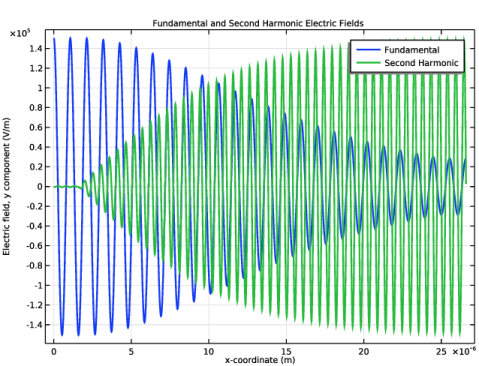
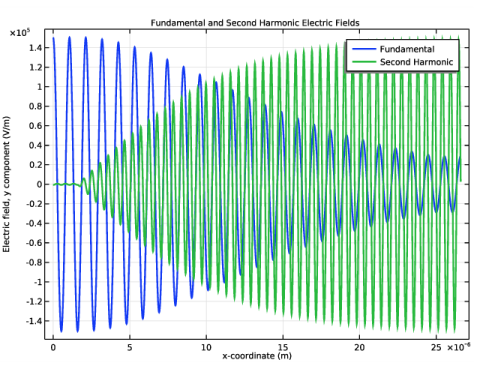
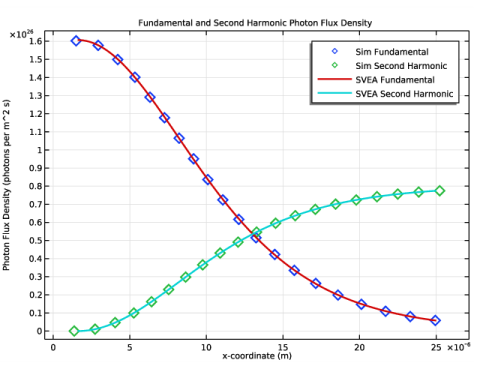
Locate the y-Axis Data section. In the Expression text field, type ewfd1.Ey*conj(ewfd1.Ey)/(2*Z0_const)/hbar_const/(2*pi*ewfd1.freq).
5
Locate the x-Axis Data section. From the Parameter list, choose Expression.
6
In the Expression text field, type x.
7
Locate the Coloring and Style section. Find the Line style subsection. From the Line list, choose None.
8
In the Width text field, type 5.
9
Find the Line markers subsection. From the Marker list, choose Diamond.
10
In the Number text field, type 20.
11
Locate the Legends section. Select the Show legends check box.
12
From the Legends list, choose Manual.
13
Simulation Second Harmonic
1
Right-click Simulation Fundamental and choose Duplicate.
2
In the Settings window for Line Graph, type Simulation Second Harmonic in the Label text field.
3
Locate the y-Axis Data section. In the Expression text field, type ewfd2.Ey*conj(ewfd2.Ey)/(2*Z0_const)/hbar_const/(2*pi*ewfd2.freq).
4
Locate the Legends section. In the table, enter the following settings:
Slowly Varying Envelope Approximation (SVEA) Fundamental
1
Right-click Simulation Second Harmonic and choose Duplicate.
2
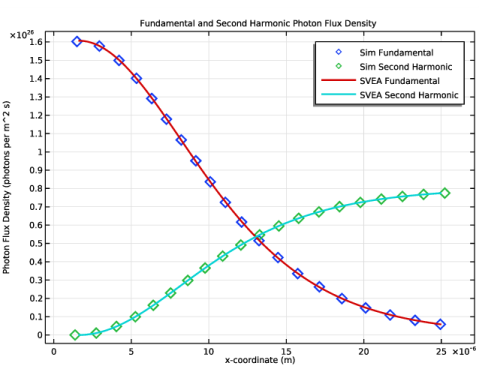
In the Settings window for Line Graph, type Slowly Varying Envelope Approximation (SVEA) Fundamental in the Label text field.
The analytic expression is only valid in the nonlinear domain. Thus, remove the selections for the edges surrounding the nonlinear domain.
3
Locate the Selection section. Select the  Activate Selection toggle button.
4
5
Click  Remove from Selection.
6
7
Locate the y-Axis Data section. In the Expression text field, type (sech(gamma*(x - offset)/2))^2*I1/hbar_const/(2*pi*ewfd1.freq).
8
Locate the Coloring and Style section. Find the Line style subsection. From the Line list, choose Solid.
9
In the Width text field, type 2.
10
Find the Line markers subsection. From the Marker list, choose None.
11
Locate the Legends section. In the table, enter the following settings:
Slowly Varying Envelope Approximation (SVEA) Second Harmonic
1
Right-click Slowly Varying Envelope Approximation (SVEA) Fundamental and choose Duplicate.
2
In the Settings window for Line Graph, type Slowly Varying Envelope Approximation (SVEA) Second Harmonic in the Label text field.
3
Locate the y-Axis Data section. In the Expression text field, type (tanh(gamma*(x - offset)/2))^2*I1/hbar_const/(2*pi*ewfd2.freq).
4
Locate the Legends section. In the table, enter the following settings:
Photon Flux Density
1
In the Model Builder window, click Photon Flux Density.
2
In the Settings window for 1D Plot Group, locate the Title section.
3
From the Title type list, choose Manual.
4
In the Title text area, type Fundamental and Second Harmonic Photon Flux Density.
5
Locate the Plot Settings section. Select the y-axis label check box.
6
In the associated text field, type Photon Flux Density (photons per m^2 s).