
|
|
|
|
|
|||
|
|
|||
|
|
|||
|
|
|||
|
|
|||
|
|
|||
|
|
|||
|
|
|||
|
|
|||
|
|
|||
|
|
|||
|
|
|||
|
|
|||
|
|
|||
|
|
|||
|
|
|||
|
|
|||
|
|
|||
|
|
|||
|
|
|||
|
|
|||
|
|
|||
|
1
|
|
2
|
|
3
|
Click Add.
|
|
4
|
Click
|
|
5
|
|
6
|
Click
|
|
1
|
|
2
|
|
1
|
|
2
|
|
3
|
|
4
|
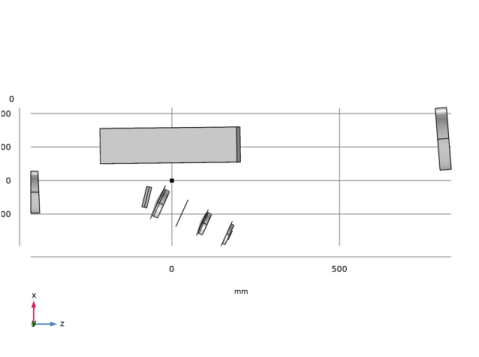
Browse to the model’s Application Libraries folder and double-click the file white_pupil_echelle_spectrograph_params.txt.
|
|
1
|
|
2
|
|
3
|
Find the Mesh frame coordinates subsection. From the Geometry shape function list, choose Cubic Lagrange. The ray tracing algorithm used by the Geometrical Optics interface computes the refracted ray direction based on a discretized geometry via the underlying finite element mesh. A cubic geometry shape order would usually introduce less discretization error compared to quadratic.
|
|
1
|
|
2
|
In the Settings window for Geometry, type White Pupil Échelle Spectrograph Geometry Sequence in the Label text field.
|
|
3
|
|
4
|
Browse to the model’s Application Libraries folder and double-click the file white_pupil_echelle_spectrograph_geom_sequence.mph.
|
|
5
|
|
6
|
In the Model Builder window, right-click White Pupil Échelle Spectrograph Geometry Sequence and choose Build All Objects.
|
|
7
|
|
1
|
|
2
|
|
3
|
|
4
|
|
5
|
|
6
|
|
7
|
|
8
|
|
9
|
|
10
|
|
11
|
|
12
|
|
13
|
|
1
|
|
2
|
|
3
|
|
1
|
|
2
|
|
3
|
|
1
|
|
2
|
|
3
|
|
1
|
|
2
|
|
3
|
|
1
|
|
2
|
|
3
|
|
1
|
|
2
|
|
3
|
From the Selection list, choose All Refracting. The refracting elements were selected when the geometry sequence was created.
|
|
4
|
Locate the Ray Release and Propagation section. From the Wavelength distribution of released rays list, choose Polychromatic, specify vacuum wavelength.
|
|
5
|
|
6
|
Select the Use geometry normals for ray-boundary interactions check box. In this simulation, the geometry normals are used to apply the boundary conditions on all refracting surfaces. This is appropriate for the highest accuracy ray traces in single-physics simulations, where the geometry is not deformed.
|
|
7
|
Locate the Material Properties of Exterior and Unmeshed Domains section. From the Optical dispersion model list, choose Absolute vacuum. In this simulation we assume that the spectrograph is entirely in vacuum.
|
|
8
|
|
9
|
|
10
|
|
1
|
In the Model Builder window, under Component 1 (comp1)>Geometrical Optics (gop) click Medium Properties 1.
|
|
2
|
|
3
|
|
1
|
|
2
|
|
3
|
From the Release reflected rays list, choose Never. In this tutorial stray light is not being traced, so reflected rays will not be produced at any refracting surfaces.
|
|
1
|
|
2
|
In the Settings window for Release from Point, type Release From Entrance Slit: m_max in the Label text field.
|
|
3
|
|
4
|
|
5
|
|
6
|
|
7
|
Specify the r vector as
|
|
8
|
In the α text field, type atan(NA). This is the half angle subtended by the numerical aperture (NA).
|
|
9
|
|
10
|
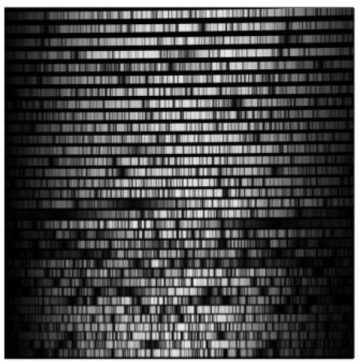
In the Values text field, type mlam/(m_max+0.499) mlam/(m_max+0.25) mlam/m_max mlam/(m_max-0.25) mlam/(m_max-0.499). These wavelengths are all found in order m_max. The release is duplicated below so that wavelengths from other orders can be more easily added. Because the grating feature uses relative order numbers, a ray trace over all wavelengths and order numbers can be performed in a single study.
|
|
1
|
|
2
|
In the Settings window for Release from Point, type Release From Entrance Slit: m_mid in the Label text field.
|
|
3
|
Locate the Vacuum Wavelength section. In the Values text field, type mlam/(m_mid+0.499) mlam/(m_mid+0.25) mlam/m_mid mlam/(m_mid-0.25) mlam/(m_mid-0.499).
|
|
1
|
|
2
|
In the Settings window for Release from Point, type Release From Entrance Slit: m_min in the Label text field.
|
|
3
|
Locate the Vacuum Wavelength section. In the Values text field, type mlam/(m_min+0.495) mlam/(m_min+0.25) mlam/m_min mlam/(m_min-0.25) mlam/(m_min-0.495).
|
|
1
|
|
2
|
|
3
|
|
1
|
|
2
|
|
3
|
Locate the Boundary Selection section. From the Selection list, choose Obstructions (Gratings and Mirrors).
|
|
4
|
|
1
|
|
2
|
|
3
|
|
4
|
|
1
|
|
2
|
|
3
|
Locate the Boundary Selection section. From the Selection list, choose Grating Surface (Échelle Grating).
|
|
4
|
Locate the Grating Orientation section. From the Direction of periodicity list, choose Parallel to reference edge.
|
|
5
|
|
7
|
Locate the Device Properties section. Select the Use relative order numbers check box. The absolute order number will be computed automatically such that the wavelengths are diffracted within the blaze envelope.
|
|
8
|
|
9
|
|
10
|
|
1
|
|
2
|
|
3
|
Locate the Boundary Selection section. From the Selection list, choose Grating Surface (Cross Dispersion Grating Entrance).
|
|
4
|
Locate the Grating Orientation section. From the Direction of periodicity list, choose Parallel to reference edge.
|
|
5
|
|
7
|
|
8
|
|
1
|
In the Model Builder window, expand the Cross Dispersion Grating node, then click Diffraction Order (m = 0).
|
|
2
|
|
3
|
|
1
|
|
2
|
|
3
|
|
1
|
|
2
|
|
3
|
|
4
|
|
1
|
|
2
|
|
3
|
|
4
|
|
5
|
In the Lengths text field, type 0 5000. This path length is sufficient for all rays to reach the image plane.
|
|
6
|
|
1
|
|
2
|
|
3
|
|
4
|
|
5
|
|
6
|
|
7
|
|
1
|
|
2
|
|
3
|
|
1
|
|
2
|
|
3
|
|
4
|
|
5
|
|
1
|
|
2
|
|
3
|
|
4
|
In the Logical expression for inclusion text field, type at(0,tan(gop.phic))>0.95*NA. This will cause only the marginal rays to be rendered.
|
|
1
|
|
2
|
|
3
|
|
4
|
|
5
|
|
6
|
|
1
|
|
2
|
|
3
|
|
4
|
|
5
|
|
6
|
|
7
|
|
8
|
|
1
|
|
2
|
|
3
|
|
5
|
Click to expand the Focal Plane Orientation section. From the Transverse direction list, choose User defined.
|
|
6
|
|
7
|
|
8
|
|
9
|
|
10
|
|
1
|
|
2
|
|
3
|
|
4
|
|
1
|
|
2
|
|
3
|
|
4
|
|
5
|
|
6
|
|
1
|
|
2
|
|
3
|
|
5
|
|
6
|
|
7
|
|
8
|
|
9
|
|
10
|
|
11
|
|
1
|
|
2
|
|
3
|
In the Expression text field, type at(0,tan(gop.phic)). This is the numerical aperture at which each ray is released.
|
|
4
|
|
5
|
|
1
|
|
2
|
Click
|
|
1
|
|
2
|
|
3
|
|
4
|
Browse to the model’s Application Libraries folder and double-click the file white_pupil_echelle_spectrograph_geom_sequence_params.txt.
|
|
1
|
In the Part Libraries window, select Ray Optics Module>3D>Mirrors>conic_mirror_off_axis_3d in the tree.
|
|
2
|
Click
|
|
3
|
In the Select Part Variant dialog box, select Specify clear aperture diameter and off axis distance in the Select part variant list.
|
|
4
|
Click OK.
|
|
1
|
In the Model Builder window, under Global Definitions right-click Geometry Parts and choose 3D Part.
|
|
2
|
|
3
|
|
1
|
|
2
|
|
3
|
|
4
|
|
5
|
|
6
|
|
7
|
|
1
|
|
2
|
|
3
|
Select the object blk1 only.
|
|
1
|
|
2
|
|
3
|
|
4
|
Select the object blk1 only.
|
|
1
|
|
2
|
|
3
|
|
4
|
On the object blk1, select Boundary 4 only.
|
|
1
|
|
2
|
|
3
|
|
4
|
|
5
|
|
6
|
Click OK.
|
|
7
|
|
8
|
Click
|
|
9
|
|
10
|
Click OK.
|
|
1
|
|
2
|
In the Settings window for Geometry, type White Pupil Échelle Geometry Sequence in the Label text field.
|
|
3
|
|
1
|
|
2
|
|
3
|
Locate the Selections of Resulting Entities section. Select the Resulting objects selection check box. By default the entrance slit will be located at the origin.
|
|
1
|
|
2
|
In the Settings window for Work Plane, type Pre Gamma Échelle Facet Tangent Plane in the Label text field.
|
|
3
|
Click to expand the Local Coordinate System section. Locate the Plane Definition section. From the Plane type list, choose Transformed.
|
|
4
|
|
5
|
|
6
|
In the Rotation angle text field, type 90[deg]. This plane is only required to allow the correct interpretation of the subsequent gamma_ech angle.
|
|
1
|
|
2
|
In the Settings window for Work Plane, type Post Gamma Échelle Facet Tangent Plane in the Label text field.
|
|
3
|
|
4
|
|
5
|
Find the Rotation subsection. In the Rotation angle text field, type gamma_ech. This is the "out of plane" angle to ensure that the "intermediate slit" (formed after the second reflection from the primary mirror) is displaced from the entrance slit.
|
|
1
|
|
2
|
|
3
|
|
4
|
|
5
|
|
6
|
|
1
|
|
2
|
|
3
|
|
4
|
|
5
|
|
6
|
In the Rotation angle text field, type 4*gamma_ech. The rotation adjustment ensures that the central wavelength will be imaged onto the centre of the image plane.
|
|
1
|
|
2
|
|
3
|
|
4
|
|
5
|
Find the Displacement subsection. In the zw text field, type Z_xdp. This displacement ensures that the white pupil is located inside the Petzval lens where it more nearly coincides with the stop.
|
|
6
|
|
7
|
|
1
|
|
2
|
|
3
|
|
4
|
|
5
|
|
6
|
|
1
|
|
2
|
|
3
|
|
4
|
Locate the Position and Orientation of Output section. Find the Displacement subsection. In the zw text field, type f_1.
|
|
1
|
|
2
|
|
3
|
|
4
|
Locate the Position and Orientation of Output section. Find the Displacement subsection. In the zw text field, type -f_2.
|
|
1
|
|
2
|
|
3
|
Locate the Position and Orientation of Output section. Find the Coordinate system to match subsection. From the Work plane list, choose Échelle Grating Normal Plane (wp3).
|
|
4
|
|
1
|
|
2
|
In the Settings window for Part Instance, type Cross Dispersion Grating Entrance in the Label text field.
|
|
3
|
|
4
|
Locate the Position and Orientation of Output section. Find the Coordinate system to match subsection. From the Work plane list, choose Cross Dispersion Plane (wp5).
|
|
5
|
Find the Rotation subsection. In the Rotation angle text field, type 90. This rotation ensures that the direction of cross dispersion is orthogonal to the échelle dispersion direction.
|
|
1
|
|
2
|
In the Settings window for Part Instance, type Cross Dispersion Grating Exit in the Label text field.
|
|
3
|
|
4
|
Locate the Position and Orientation of Output section. Find the Coordinate system to match subsection. From the Take work plane from list, choose Cross Dispersion Grating Entrance (pi4).
|
|
5
|
|
6
|
|
1
|
|
2
|
Browse to the model’s Application Libraries folder and double-click the file white_pupil_echelle_spectrograph_petzval_lens_geom_sequence.mph.
|
|
1
|
|
2
|
|
3
|
Find the Coordinate system to match subsection. From the Work plane list, choose Camera Plane (wp6).
|
|
4
|
|
1
|
|
2
|
Select the objects pi10, pi11, pi12, pi13, pi14, pi15, pi6, pi7, pi8, and pi9 only. These objects are the lenses and apertures that form the Petzval lens. It is also possible to use the Paste Selection button to manually enter the list of object tags.
|
|
3
|
|
4
|
|
5
|
|
1
|
|
2
|
|
1
|
In the Model Builder window, under Component 1 (comp1)>White Pupil Échelle Geometry Sequence click Stop (pi8).
|
|
2
|
|
1
|
|
2
|
|
4
|
|
5
|
|
1
|
|
2
|
|
1
|
|
2
|
In the Settings window for Selection, type Obstructions (Gratings and Mirrors) in the Label text field.
|
|
1
|
|
2
|
|
1
|
|
2
|
|
1
|
|
2
|
|
1
|
|
2
|
|
1
|
|
2
|
|
4
|
Locate the Boundary Selections section. In the table, select the Keep check box for Grating Surface.
|
|
1
|
|
2
|
|
4
|
Locate the Boundary Selections section. In the table, select the Keep check box for Grating Surface.
|
|
1
|
|
2
|
|
3
|
|
4
|
|
5
|
Click OK.
|