PDF

Anti-Reflective Coating with Multiple Layers
Introduction
An anti-reflective coating is a set of thin, transparent films applied to the surface of an optical device such as a lens to reduce reflection. This reduction of reflected light leads to an increase in the efficiency of the optical system and minimizes stray light, which is important in many imaging applications. Anti-reflective coatings can also be applied to the surfaces of eyeglasses to reduce glare and make the eyes of the wearer more visible.
The simplest example of an anti-reflective coating is a quarter-wavelength layer, a single dielectric film with thickness equal to one quarter of the wavelength of the incident light. This layer can reduce the reflection coefficient to zero if the refractive index of the film is equal to the geometric mean of the refractive indices of the air (n0) and substrate (nS). For air (1.0) and common glass substrate (1.5) this optimal refractive index would be sqrt((1.0)(1.5)) or approximately 1.22.
Typically no material exists with a refractive index that yields a reflection coefficient of exactly zero. Another drawback of the quarter-wavelength layer is that while it can prevent reflection of light at one wavelength, it reflects a substantial amount of radiation at any other nearby wavelength. The reflectance of the quarter-wavelength layer also depends heavily on the angle of incidence of the light.
An alternative is to use a coating that consists of multiple layers. Compared to single-layer coatings, a multilayer coating is more likely to reduce the reflection coefficient across a band of wavelengths and can be produced using a wider variety of real materials.
In this tutorial, the reflectance of two different multilayer coatings is compared over a wide spectral range: a quarter-quarter coating (two layers), and a quarter-half-quarter coating (three layers). The quarter-half-quarter coating is shown to have more consistently low reflectance across most of the visible spectrum.
Model Definition
Figure 1 shows the simple geometry used in this model. It consists of a box with an interior boundary separating the air and substrate domains. This boundary is also where the Thin Dielectric Film features are added.
The red arrow (activated in the Material Discontinuity feature) shows the sense in which the thin dielectric layers are stacked. The last Thin Dielectric Film in the Model Builder represents the topmost thin film in the model.
Figure 1: Geometry used to model multilayer anti-reflective coatings.
Simple anti-reflective coatings are designed to minimize the reflectance at a specified vacuum wavelength, λ0. More sophisticated coatings can minimize reflectance across a relatively large band of wavelengths by employing multiple thin films with different material properties.
In this tutorial, two different types of multilayer antireflective coating are investigated. The first is a quarter-quarter coating with two layers of different refractive index on the surface of a glass substrate. The name “quarter-quarter coating” comes from the fact that each layer has a thickness of λ0/(4n), where n is the refractive index of the layer.
Theoretically, a quarter-quarter coating can reduce the reflectance to zero at the specified wavelength; however, because real materials with ideal refractive indices are seldom available, zero reflectance is normally not achieved.
In this example, the substrate consists of glass (ns = 1.5) and the first thin dielectric layer is made of magnesium fluoride, MgF2 (n1 = 1.38). The following expression can be used to determine the optimal refractive index for the second layer, n2, so that the reflectance can be reduced to zero:
where the refractive index of the air, na, is taken to be 1.
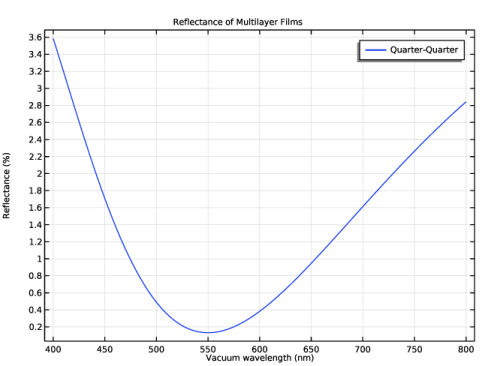
Using this expression the optimal value for n2 is 1.69. From Table 1, cerium fluoride, CeF3, has a refractive index close to this value, 1.63. Using this material a minimum reflectance of less that 1% can be achieved.
The reflectance as a function of vacuum wavelength is shown in Figure 2. A noticeable drawback of the two-layer coating is that the reflectance is only significantly reduced in a narrow band around a single wavelength.
Figure 2: Reflectance of a quarter-quarter coating.
The reflectance can be reduced over a wider range of wavelengths by using a dielectric film with three or more layers. An example of a three-layer coating is the quarter-half-quarter coating, in which a thin layer of thickness λ/2 is placed between the two quarter-wavelength layers.
Results and Discussion
Figure 3 compares the reflectance of the quarter-quarter and quarter-half-quarter films. Because the refractive indices of real materials are used, the reflectance of the quarter-quarter coating does not decrease to zero. The quarter-half-quarter film exhibits slightly greater reflectance at the center of the band, but the reflectance remains lower than 1% over a much wider spectral range.
Figure 3: Reflectance response for a quarter-quarter and quarter-half-quarter coating configurations.
Application Library path: Ray_Optics_Module/Prisms_and_Coatings/antireflective_coating_multilayer
Modeling Instructions
From the File menu, choose New.
New
In the New window, click  Model Wizard.
Model Wizard
1
In the Model Wizard window, click  2D.
2
In the Select Physics tree, select Optics>Ray Optics>Geometrical Optics (gop).
3
Click Add.
4
Click  Study.
5
In the Select Study tree, select Preset Studies for Selected Physics Interfaces>Ray Tracing.
6
Global Definitions
Parameters 1
1
In the Model Builder window, under Global Definitions click Parameters 1.
2
In the Settings window for Parameters, locate the Parameters section.
3
Geometry 1
Square 1 (sq1)
1
In the Geometry toolbar, click  Square.
2
In the Settings window for Square, click to expand the Layers section.
3
4
Click  Build All Objects.
Materials
Material 1 (mat1)
1
In the Model Builder window, under Component 1 (comp1) right-click Materials and choose Blank Material.
2
In the Settings window for Material, locate the Material Contents section.
3
Material 2 (mat2)
1
Right-click Materials and choose Blank Material.
2
3
In the Settings window for Material, locate the Material Contents section.
4
Geometrical Optics (gop)
1
In the Model Builder window, under Component 1 (comp1) click Geometrical Optics (gop).
2
In the Settings window for Geometrical Optics, locate the Intensity Computation section.
3
From the Intensity computation list, choose Compute intensity and power.
4
Locate the Ray Release and Propagation section. From the Wavelength distribution of released rays list, choose Polychromatic, specify vacuum wavelength.
5
In the Maximum number of secondary rays text field, type 0.
Set up the quarter-quarter anti-reflective coating using two Thin Dielectric Film features.
It is useful to display the boundary normal in the Graphics window since this indicates the order in which the thin films are arranged. The arrow points in the direction away from the substrate, so the first layer that appears in the Model Builder is adjacent to the substrate and the last layer that appears is adjacent to the air domain.
Material Discontinuity 1
1
In the Model Builder window, under Component 1 (comp1)>Geometrical Optics (gop) click Material Discontinuity 1.
2
In the Settings window for Material Discontinuity, locate the Advanced Settings section.
3
Select the Show boundary normal check box.
4
Locate the Coatings section. From the Thin dielectric films on boundary list, choose Add layers to surface.
5
Locate the Rays to Release section. From the Release reflected rays list, choose Never. It is still possible to analyze the reflectance of the coating based on the intensity of the transmitted rays, even if no reflected rays are actually released at the boundary.
Thin Dielectric Film 1
1
In the Physics toolbar, click  Attributes and choose Thin Dielectric Film.
The first layer (directly touching the glass substrate) is the CeF3 layer with a refractive index of 1.63. The thickness is set to be a quarter of the wavelength in this material.
2
In the Settings window for Thin Dielectric Film, locate the Film Properties section.
3
In the n text field, type n_CeF3.
4
In the t text field, type lam0/(4*n_CeF3).
Material Discontinuity 1
In the Model Builder window, click Material Discontinuity 1.
Thin Dielectric Film 2
1
In the Physics toolbar, click  Attributes and choose Thin Dielectric Film.
The second layer (on top of layer 1) is the MgF2 layer with a refractive index of 1.38. The thickness of this layer is also set to a quarter of the wavelength.
2
In the Settings window for Thin Dielectric Film, locate the Film Properties section.
3
In the n text field, type n_MgF2.
4
In the t text field, type lam0/(4*n_MgF2).
Next, set up the Release From Grid feature to release a number of rays of different wavelengths from 400 nm to 800 nm.
Release from Grid 1
1
In the Physics toolbar, click  Global and choose Release from Grid.
2
In the Settings window for Release from Grid, locate the Initial Coordinates section.
3
In the qx,0 text field, type 0.5.
4
In the qy,0 text field, type 1.
5
Locate the Ray Direction Vector section. Specify the L0 vector as
6
Locate the Vacuum Wavelength section. From the Distribution function list, choose List of values.
7
Click  Range.
8
In the Range dialog box, choose Number of values from the Entry method list.
9
In the Start text field, type 400[nm].
10
In the Stop text field, type 800[nm].
11
In the Number of values text field, type 100.
12
Click Replace.
Set up a Ray Tracing study step to compute the ray trajectories to a maximum optical path length of 1.1 m.
Study 1
Step 1: Ray Tracing
1
In the Model Builder window, under Study 1 click Step 1: Ray Tracing.
2
In the Settings window for Ray Tracing, locate the Study Settings section.
3
From the Time-step specification list, choose Specify maximum path length.
4
In the Lengths text field, type range(0,0.01,1.1).
5
In the Home toolbar, click  Compute.
Results
Reflectance
1
In the Home toolbar, click  Add Plot Group and choose 1D Plot Group.
2
In the Settings window for 1D Plot Group, type Reflectance in the Label text field.
3
Locate the Data section. From the Dataset list, choose Ray 1.
4
From the Time selection list, choose Last.
5
Click to expand the Title section. From the Title type list, choose Manual.
6
In the Title text area, type Reflectance of Multilayer Films.
7
Locate the Plot Settings section. Select the x-axis label check box.
8
9
Select the y-axis label check box.
10
Ray 1
1
In the Reflectance toolbar, click  More Plots and choose Ray.
Plot the percentage reflectance.
2
In the Settings window for Ray, locate the y-Axis Data section.
3
In the Expression text field, type 100*(gop.relg1.Q0-gop.Q)/gop.relg1.Q0.
4
Locate the x-Axis Data section. From the Parameter list, choose Expression.
5
In the Expression text field, type gop.lambda0.
6
From the Unit list, choose nm.
7
Click to expand the Legends section. Select the Show legends check box.
8
From the Legends list, choose Manual.
9
10
In the Reflectance toolbar, click  Plot. The plot should look like Figure 2.
Next, to simulate a quarter-half-quarter layer, add another Thin Dielectric Film feature. The material of the middle layer is chosen to be Zirconium Oxide, ZrO2, with refractive index 2.2. Set the thickness to half the specified wavelength.
Geometrical Optics (gop)
Material Discontinuity 1
In the Model Builder window, under Component 1 (comp1)>Geometrical Optics (gop) click Material Discontinuity 1.
Thin Dielectric Film 3
1
In the Physics toolbar, click  Attributes and choose Thin Dielectric Film.
This layer will sit between the other two thin layers so its node must be moved in the Model Builder.
2
Right-click Thin Dielectric Film 3 and choose Move Up.
3
In the Settings window for Thin Dielectric Film, locate the Film Properties section.
4
In the n text field, type n_ZrO2.
5
In the t text field, type lam0/(2*n_ZrO2).
Add another study so that the two films can be compared.
Add Study
1
In the Home toolbar, click  Add Study to open the Add Study window.
2
Go to the Add Study window.
3
Find the Studies subsection. In the Select Study tree, select Preset Studies for Selected Physics Interfaces>Ray Tracing.
4
Click Add Study in the window toolbar.
5
In the Home toolbar, click  Add Study to close the Add Study window.
Study 2
Step 1: Ray Tracing
1
In the Settings window for Ray Tracing, locate the Study Settings section.
2
From the Time-step specification list, choose Specify maximum path length.
3
In the Lengths text field, type range(0,0.01,1.1).
4
From the Stop condition list, choose No active rays remaining.
5
In the Home toolbar, click  Compute.
Results
Ray 2
1
In the Model Builder window, under Results>Reflectance right-click Ray 1 and choose Duplicate.
2
In the Settings window for Ray, locate the Data section.
3
From the Dataset list, choose Ray 2.
4
From the Time selection list, choose Last.
5
Locate the Legends section. In the table, enter the following settings:
6
In the Reflectance toolbar, click  Plot. Compare the result with Figure 3.