PDF

Thermal Plasma
Introduction
Low pressure discharges are characterized by the fact that the electron temperature is much higher than the neutral gas temperature. As the gas pressure increases, the number of collisions between the electrons and neutrals increases. At high enough pressures the electron temperature becomes equal to the gas temperature. At this point the plasma is in local thermodynamic equilibrium and a much simpler MHD model can be used to model the plasma.
This model simulates a plasma at medium pressure (2 torr), where the gas temperature cannot be assumed to be constant but the plasma is still not in local thermodynamic equilibrium. In Figure 1 the electron (blue) and gas (black) temperatures are plotted as a function of pressure. At low pressures the two temperatures are decoupled, but as the pressure increases the temperatures tend toward the same limit. There are no axes on the plot since the exact temperature and pressure depend strongly on the gas in question.
Molecular gases tend to heat more easily than atomic gases for to the following reasons:
Note: This application requires the Plasma Module and AC/DC Module.
Figure 1: Plot of electron (blue) and gas (black) temperature vs. pressure. At higher pressures the two temperatures become equal.
Model Definition
The electron density and mean electron energy are computed by solving a pair of drift-diffusion equations for the electron density and mean electron energy. Convection of electrons due to fluid motion is neglected. For detailed information on electron transport, see Theory for the Drift Diffusion Interface in the Plasma Module User’s Guide.
The electron source Re and the energy loss due to inelastic collisions Rε are defined later. The electron diffusivity, energy mobility, and energy diffusivity are computed from the electron mobility using:
The source coefficients in the above equations are determined by the plasma chemistry using rate coefficients. Suppose that there are M reactions that contribute to the growth or decay of electron density and P inelastic electron-neutral collisions. In general, P >> M. In the case of rate coefficients, the electron source term is given by:
where xj is the mole fraction of the target species for reaction j, kj is the rate coefficient for reaction j (SI unit: m3/s), and Nn is the total neutral number density (SI unit: 1/m3). The electron energy loss is obtained by summing the collisional energy loss over all reactions:
where Δεj is the energy loss from reaction j (SI unit: V). The rate coefficients can be computed from cross section data by the following integral:
where γ = (2q/me)1/2 (SI unit: C1/2/kg1/2), me is the electron mass (SI unit: kg), ε is energy (SI unit: V), σk is the collision cross section (SI unit: m2), and f is the electron energy distribution function. In this case, a Maxwellian EEDF is assumed.
For nonelectron species, the following equation is solved for the mass fraction of each species. For detailed information on the transport of the nonelectron species, see Theory for the Heavy Species Transport Interface in the Plasma Module User’s Guide.
The electrostatic field is computed using the following equation:
The space charge density ρ is automatically computed based on the plasma chemistry specified in the model using the formula:
For detailed information about electrostatics see Theory for the Electrostatics Interface in the Plasma Module User’s Guide.
plasma chemistry
Argon is one of the simplest mechanisms to implement at low pressures. The electronically excited states can be lumped into a single species which results in a chemical mechanism consisting of only 3 species and 7 reactions (electron impact cross-sections are obtained from Ref. 2):
Stepwise ionization (reaction 5) can play an important role in sustaining low pressure argon discharges. Excited argon atoms are consumed via superelastic collisions with electrons, quenching with neutral argon atoms, ionization or Penning ionization where two metastable argon atoms react to form a neutral argon atom, an argon ion and an electron. Reaction number 1, elastic collisions with electrons is primarily responsible for heating of the gas. In addition to volumetric reactions, the following surface reactions are implemented:
When a metastable argon atom makes contact with the wall, it reverts to the ground state argon atom with some probability (the sticking coefficient).
electrical excitation
The reactor geometry is simply a cylindrical glass tube with a 4 turn coil wrapped around it. Gas flows in from the bottom and exits out of the top. The gas is heated through elastic and inelastic collisions. The inelastic collisions are responsible for the bulk of the gas heating. A fixed power of 700 W is applied to the coil.
Figure 2: Schematic of the ICP reactor. Flow enters from the base and leaves out the top.
Results
Figure 3: Surface plot of electron density inside the column.
Figure 4: Plot of the electron temperature inside the plasma source.
Figure 5: Plot of the plasma potential inside the plasma source.
Figure 6: Plot of the velocity field.
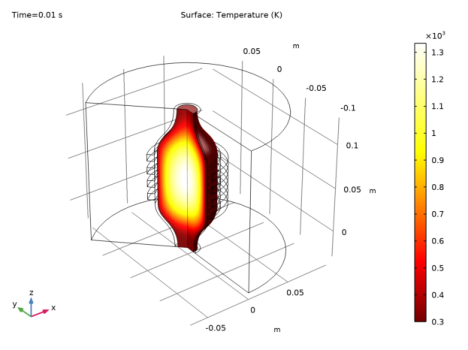
Figure 7: Revolved plot of the temperature inside the plasma source.
Figure 8: Plot of the mass fraction of ground state argon.
Figure 9: Plot of the mass fraction of electronically excited argon atoms.
Reference
1. M.A. Lieberman and A.J. Lichtenberg, Principles of Plasma Discharges and Materials Processing, John Wiley & Sons, 2005.
2. Phelps database, www.lxcat.net, retrieved 2017.
Application Library path: Plasma_Module/Inductively_Coupled_Plasmas/thermal_plasma
Modeling Instructions
From the File menu, choose New.
New
In the New window, click  Model Wizard.
Model Wizard
1
In the Model Wizard window, click  2D Axisymmetric.
2
In the Select Physics tree, select Plasma>Inductively Coupled Plasma.
3
Click Add.
4
In the Select Physics tree, select Fluid Flow>Single-Phase Flow>Laminar Flow (spf).
5
Click Add.
6
In the Select Physics tree, select Heat Transfer>Heat Transfer in Fluids (ht).
7
Click Add.
8
Click  Study.
9
In the Select Study tree, select Preset Studies for Selected Multiphysics>Frequency-Transient.
10
Geometry 1
1
Click the  Show More Options button in the Model Builder toolbar.
2
In the Show More Options dialog box, in the tree, select the check box for the node Physics>Advanced Physics Options.
3
4
Import 1 (imp1)
1
In the Home toolbar, click  Import.
2
In the Settings window for Import, locate the Import section.
3
Click Browse.
4
5
Click Import.
Global Definitions
Parameters 1
1
In the Model Builder window, under Global Definitions click Parameters 1.
2
In the Settings window for Parameters, locate the Parameters section.
3
Definitions
Plasma
1
In the Definitions toolbar, click  Explicit.
2
3
Right-click Explicit 1 and choose Rename.
4
In the Rename Explicit dialog box, type Plasma in the New label text field.
5
Walls
1
In the Definitions toolbar, click  Explicit.
2
In the Settings window for Explicit, locate the Input Entities section.
3
From the Geometric entity level list, choose Boundary.
4
5
Right-click Explicit 2 and choose Rename.
6
In the Rename Explicit dialog box, type Walls in the New label text field.
7
Outlet
1
In the Definitions toolbar, click  Explicit.
2
In the Settings window for Explicit, locate the Input Entities section.
3
From the Geometric entity level list, choose Boundary.
4
5
Right-click Explicit 3 and choose Rename.
6
In the Rename Explicit dialog box, type Outlet in the New label text field.
7
Coil Walls
1
In the Definitions toolbar, click  Explicit.
2
In the Settings window for Explicit, locate the Input Entities section.
3
From the Geometric entity level list, choose Boundary.
4
5
Right-click Explicit 4 and choose Rename.
6
In the Rename Explicit dialog box, type Coil Walls in the New label text field.
7
Start by importing the cross sections for argon and by activating the convection and thermodynamic property evaluation.
Plasma (plas)
1
In the Settings window for Plasma, locate the Domain Selection section.
2
From the Selection list, choose Plasma.
Cross Section Import 1
1
Right-click Component 1 (comp1)>Plasma (plas) and choose Global>Cross Section Import.
2
In the Settings window for Cross Section Import, locate the Cross Section Import section.
3
Click Browse.
4
5
Click Import.
6
In the Model Builder window, click Plasma (plas).
7
In the Settings window for Plasma, locate the Transport Settings section.
8
Find the Include subsection. Select the Convection check box.
9
Select the Calculate thermodynamic properties check box.
10
Locate the Plasma Properties section. Select the Use reduced electron transport properties check box.
Reaction 1
1
In the Physics toolbar, click  Domains and choose Reaction.
2
In the Settings window for Reaction, locate the Reaction Formula section.
3
In the Formula text field, type Ars+Ars=>e+Ar+Ar+.
4
Locate the Reaction Parameters section. In the kf text field, type 3.734E8.
Reaction 2
1
In the Physics toolbar, click  Domains and choose Reaction.
2
In the Settings window for Reaction, locate the Reaction Formula section.
3
In the Formula text field, type Ars+Ar=>Ar+Ar.
4
Locate the Reaction Parameters section. In the kf text field, type 1807.
Ground 1
1
In the Physics toolbar, click  Boundaries and choose Ground.
2
In the Settings window for Ground, locate the Boundary Selection section.
3
From the Selection list, choose Walls.
Surface Reaction 1
1
In the Physics toolbar, click  Boundaries and choose Surface Reaction.
2
In the Settings window for Surface Reaction, locate the Boundary Selection section.
3
From the Selection list, choose Walls.
4
Locate the Reaction Formula section. In the Formula text field, type Ar+=>Ar.
Surface Reaction 2
1
In the Physics toolbar, click  Boundaries and choose Surface Reaction.
2
In the Settings window for Surface Reaction, locate the Boundary Selection section.
3
From the Selection list, choose Walls.
4
Locate the Reaction Formula section. In the Formula text field, type Ars=>Ar.
Wall 1
1
In the Physics toolbar, click  Boundaries and choose Wall.
2
In the Settings window for Wall, locate the Boundary Selection section.
3
From the Selection list, choose Walls.
Species: Ars
In the Model Builder window, click Species: Ars.
Outflow 1
1
In the Physics toolbar, click  Attributes and choose Outflow.
2
In the Settings window for Outflow, locate the Boundary Selection section.
3
From the Selection list, choose Outlet.
Species: Ar+
In the Model Builder window, click Species: Ar+.
Outflow 1
1
In the Physics toolbar, click  Attributes and choose Outflow.
2
In the Settings window for Outflow, locate the Boundary Selection section.
3
From the Selection list, choose Outlet.
Species: Ar
1
In the Model Builder window, click Species: Ar.
2
In the Settings window for Species, locate the Species Formula section.
3
Select the From mass constraint check box.
4
Locate the General Parameters section. From the Preset species data list, choose Ar.
Species: Ars
1
In the Model Builder window, click Species: Ars.
2
In the Settings window for Species, locate the General Parameters section.
3
In the x0 text field, type 1E-4.
4
From the Preset species data list, choose Ar.
5
Click to expand the Species Thermodynamic Parameters section. In the Δh text field, type 11.5.
The thermodynamic properties for the electronically excited Argon atoms can be the same as for the ground state species plus the threshold energy for the electron impact reaction. In this case this corresponds to an energy of 11.5eV. This is added in the text field Additional enthalpy contribution.
Species: Ar+
1
In the Model Builder window, click Species: Ar+.
2
In the Settings window for Species, locate the Species Formula section.
3
Select the Initial value from electroneutrality constraint check box.
4
Locate the General Parameters section. From the Preset species data list, choose Ar.
5
Locate the Species Thermodynamic Parameters section. In the Δh text field, type 15.8.
The thermodynamic properties for the Argon ions can be the same as for the ground state species plus the threshold energy for ionization. In this case this corresponds to an energy of 15.8eV. This is added in the text field Additional enthalpy contribution.
You can set the gas temperature and pressure in the plasma model to the computed gas pressure and temperature from other physics interfaces. The velocity field is also set to the velocity field computed from the Laminar Flow interface.
Plasma Model 1
1
In the Model Builder window, click Plasma Model 1.
2
In the Settings window for Plasma Model, locate the Model Inputs section.
3
From the u list, choose Velocity field (spf).
4
From the T list, choose Temperature (ht).
5
From the pA list, choose Absolute pressure (spf).
6
Locate the Electron Density and Energy section. In the μeNn text field, type 4E24.
Initial Values 1
1
In the Model Builder window, click Initial Values 1.
2
In the Settings window for Initial Values, locate the Initial Values section.
3
In the ne,0 text field, type 1E15.
4
In the ε0 text field, type 3.
Magnetic Fields (mf)
In the Model Builder window, under Component 1 (comp1) click Magnetic Fields (mf).
Coil 1
1
In the Physics toolbar, click  Domains and choose Coil.
2
3
In the Settings window for Coil, locate the Coil section.
4
From the Coil excitation list, choose Power.
5
Select the Coil group check box.
6
In the Pcoil text field, type 700[W].
Laminar Flow (spf)
Since the density variation is not small, the flow cannot be regarded as incompressible. Therefore set the flow to be weakly compressible.
1
In the Model Builder window, under Component 1 (comp1) click Laminar Flow (spf).
2
In the Settings window for Laminar Flow, locate the Physical Model section.
3
From the Compressibility list, choose Compressible flow (Ma<0.3).
4
Click to expand the Consistent Stabilization section. Find the Navier-Stokes equations subsection. Clear the Crosswind diffusion check box.
Define the pressure reference level to be 1 torr.
5
Locate the Physical Model section. In the pref text field, type p0.
6
Locate the Domain Selection section. Click  Clear Selection.
7
8
Click to expand the Equation section. From the Equation form list, choose Stationary.
Fluid Properties 1
1
In the Model Builder window, under Component 1 (comp1)>Laminar Flow (spf) click Fluid Properties 1.
2
In the Settings window for Fluid Properties, locate the Fluid Properties section.
3
From the ρ list, choose Density (plas/pes1).
4
From the μ list, choose Dynamic viscosity (plas/pes1).
Inlet 1
1
In the Physics toolbar, click  Boundaries and choose Inlet.
2
3
In the Settings window for Inlet, locate the Boundary Condition section.
4
5
Locate the Mass Flow section. From the Mass flow type list, choose Standard flow rate (SCCM).
6
From the Mn list, choose Mean molar mass (plas/pes1).
7
In the Qsccm text field, type 100*tanh(1E5*t[1/s]).
Outlet 1
1
In the Physics toolbar, click  Boundaries and choose Outlet.
2
Heat Transfer in Fluids (ht)
1
In the Model Builder window, under Component 1 (comp1) click Heat Transfer in Fluids (ht).
2
In the Settings window for Heat Transfer in Fluids, locate the Domain Selection section.
3
Click  Clear Selection.
4
5
Click to expand the Equation section. From the Equation form list, choose Time dependent.
Fluid 1
1
In the Model Builder window, under Component 1 (comp1)>Heat Transfer in Fluids (ht) click Fluid 1.
2
In the Settings window for Fluid, locate the Heat Convection section.
3
From the u list, choose Velocity field (spf).
4
Locate the Heat Conduction, Fluid section. From the k list, choose Thermal conductivity (plas/pes1).
5
Locate the Thermodynamics, Fluid section. From the Fluid type list, choose Gas/Liquid.
6
From the ρ list, choose Density (plas/pes1).
7
From the Cp list, choose Heat capacity at constant pressure (plas/pes1).
8
From the γ list, choose User defined.
Initial Values 1
1
In the Model Builder window, click Initial Values 1.
2
In the Settings window for Initial Values, locate the Initial Values section.
3
In the T text field, type 300.
Heat Source 1
1
In the Physics toolbar, click  Domains and choose Heat Source.
2
3
In the Settings window for Heat Source, locate the Heat Source section.
4
From the Q0 list, choose Heat source for gas (plas/pes1).
Temperature 1
1
In the Physics toolbar, click  Boundaries and choose Temperature.
2
3
In the Settings window for Temperature, locate the Temperature section.
4
In the T0 text field, type 300.
Outflow 1
1
In the Physics toolbar, click  Boundaries and choose Outflow.
2
Materials
Dielectric
1
In the Model Builder window, under Component 1 (comp1) right-click Materials and choose Blank Material.
2
3
In the Settings window for Material, locate the Material Contents section.
4
5
Right-click Material 1 (mat1) and choose Rename.
6
In the Rename Material dialog box, type Dielectric in the New label text field.
7
Air
1
In the Model Builder window, right-click Materials and choose Blank Material.
2
3
In the Settings window for Material, locate the Material Contents section.
4
5
Right-click Material 2 (mat2) and choose Rename.
6
In the Rename Material dialog box, type Air in the New label text field.
7
Copper coil
1
In the Model Builder window, right-click Materials and choose Blank Material.
2
3
In the Settings window for Material, locate the Material Contents section.
4
5
Right-click Material 3 (mat3) and choose Rename.
6
In the Rename Material dialog box, type Copper coil in the New label text field.
7
A boundary layer mesh is used on the reactor walls so that the region of space charge separation between the ions and electrons can be resolved.
Mesh 1
1
In the Settings window for Mesh, locate the Physics-Controlled Mesh section.
2
From the Element size list, choose Extra fine.
Edge 1
1
In the Mesh toolbar, click  Edge.
2
Size 1
1
Right-click Edge 1 and choose Size.
2
In the Settings window for Size, locate the Element Size section.
3
From the Predefined list, choose Extremely fine.
4
Click to expand the Element Size Parameters section. Locate the Element Size section. Click the Custom button.
5
Locate the Element Size Parameters section. Select the Maximum element size check box.
6
Free Triangular 1
1
In the Mesh toolbar, click  Free Triangular.
2
In the Settings window for Free Triangular, locate the Domain Selection section.
3
From the Geometric entity level list, choose Domain.
4
Size 1
1
Right-click Free Triangular 1 and choose Size.
2
In the Settings window for Size, locate the Element Size section.
3
From the Predefined list, choose Extra fine.
Boundary Layers 1
1
In the Mesh toolbar, click  Boundary Layers.
2
In the Settings window for Boundary Layers, locate the Domain Selection section.
3
From the Geometric entity level list, choose Domain.
4
Boundary Layer Properties
1
In the Model Builder window, click Boundary Layer Properties.
2
In the Settings window for Boundary Layer Properties, locate the Boundary Selection section.
3
From the Selection list, choose Walls.
4
Locate the Boundary Layer Properties section. In the Number of boundary layers text field, type 5.
5
In the Boundary layer stretching factor text field, type 1.5.
Mapped 1
1
In the Mesh toolbar, click  Mapped.
2
In the Settings window for Mapped, locate the Domain Selection section.
3
From the Geometric entity level list, choose Domain.
4
Distribution 1
1
Right-click Mapped 1 and choose Distribution.
2
In the Settings window for Distribution, locate the Boundary Selection section.
3
From the Selection list, choose Coil Walls.
4
Locate the Distribution section. From the Distribution type list, choose Predefined.
5
In the Number of elements text field, type 35.
6
In the Element ratio text field, type 8.
7
From the Growth formula list, choose Geometric sequence.
8
Select the Symmetric distribution check box.
Free Triangular 2
1
In the Mesh toolbar, click  Free Triangular.
2
In the Settings window for Free Triangular, click  Build All.
Study 1
Step 1: Frequency-Transient
1
In the Model Builder window, under Study 1 click Step 1: Frequency-Transient.
2
In the Settings window for Frequency-Transient, locate the Study Settings section.
3
In the Output times text field, type 0.
4
Click  Range.
5
In the Range dialog box, choose Number of values from the Entry method list.
6
In the Start text field, type -8.
7
In the Stop text field, type -2.
8
In the Number of values text field, type 21.
9
From the Function to apply to all values list, choose exp10(x) – Exponential function (base 10).
10
Click Add.
11
In the Settings window for Frequency-Transient, locate the Study Settings section.
12
In the Frequency text field, type 13.56E6.
13
In the Home toolbar, click  Compute.
Results
Electron Density (plas)
Click the  Zoom Extents button in the Graphics toolbar.
Argon Mass Fraction
1
In the Home toolbar, click  Add Plot Group and choose 2D Plot Group.
2
In the Settings window for 2D Plot Group, type Argon Mass Fraction in the Label text field.
Surface 1
1
Right-click Argon Mass Fraction and choose Surface.
2
In the Settings window for Surface, click Replace Expression in the upper-right corner of the Expression section. From the menu, choose Component 1 (comp1)>Plasma>Mass fractions>plas.wAr - Mass fraction.
3
In the Argon Mass Fraction toolbar, click  Plot.
Excited Argon Mass Fraction
1
In the Home toolbar, click  Add Plot Group and choose 2D Plot Group.
2
In the Settings window for 2D Plot Group, type Excited Argon Mass Fraction in the Label text field.
Surface 1
1
Right-click Excited Argon Mass Fraction and choose Surface.
2
In the Settings window for Surface, click Replace Expression in the upper-right corner of the Expression section. From the menu, choose Component 1 (comp1)>Plasma>Mass fractions>plas.wArs - Mass fraction.
3
In the Excited Argon Mass Fraction toolbar, click  Plot.