PDF

3D Supersonic Flow in a Channel with a Bump
Introduction
This example models 3D supersonic flow, including the effect of shocks, in a straight channel with a small obstacle on one of the walls. As the flow hits the obstacle, shock waves are diffracted from the obstacle and the channel walls. The propagating shock waves form a pattern in the velocity profile and density distribution. The model makes use of the adaptive mesh refinement feature in COMSOL Multiphysics. This feature is important as the shock waves should be well resolved by the mesh, but predetermination of their position is very difficult. This example is based on a 2D case that has been widely used in earlier studies of inviscid compressible flow (Ref. 1).
Model Definition
The flow is compressible and inviscid, and the problem is governed by the compressible Euler equations without external forces or heat sources:
where ρ is the density, u the velocity vector, p the pressure, and ρE0 the total energy per unit volume. The perfect gas assumption is used to close the system of 5 variables:
where γ is the ratio of specific heats. The speed of sound, denoted c, is calculated as
The Mach number, denoted M, is defined as
The flow is subsonic if the velocity is below the speed of sound, 1, and supersonic if it exceeds it, 1. The inlet Mach number in this case is set to 1.4, which implies that the flow is supersonic and shock waves will appear when the flow hits the obstacle.
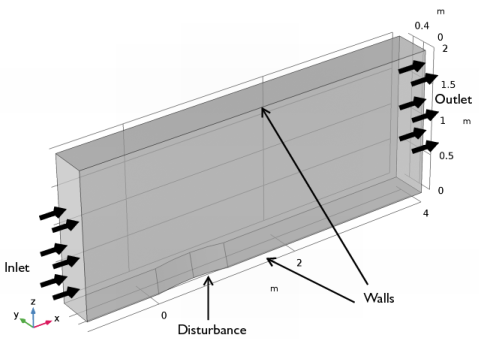
Figure 1 shows the geometry of the channel. The length of the channel is 5 m, the height 2 m and it has a thickness of 0.5 m. The bump is a circular arc with a chord of 1 m and a thickness of 4.2% of the chord, which forms an angle of 30° with respect to the inlet surface.
Figure 1: Geometry of the channel with a bump.
This example is solved using the High Mach Number Flow, Laminar interface in COMSOL Multiphysics. This interface solves the compressible Navier-Stokes equations, but the compressible Euler equations can be closely approximated by setting the dynamic viscosity and thermal conductivity to very small values. The adaptive mesh refinement feature is used to refine the mesh near the shocks.
Boundary Conditions
Inlet Condition
The flow at the inlet is supersonic with a flow speed corresponding to a Mach number of 1.4. The inlet flow condition is specified in terms of static properties, where the static pressure is defined as 1 atm and the static temperature is 273.15 K.
Outlet Condition
The flow at the outlet is supersonic, and no constraints are imposed. The outlet condition is modeled using an Outlet node with the Flow condition set to Supersonic.
Walls and Symmetry Conditions
The flow is inviscid and the walls must be modeled as slip walls:
A symmetry condition is imposed at either side of the channel.
Results and Discussion
The Mach number and pressure in the studied domain are depicted in Figure 2 and Figure 3. The shock formation starts at the position where the flow hits the obstacle. The leading-edge shock wave bounces off the top wall and collides with the trailing-edge shock wave. This qualitative and quantitative description of the diffraction of the shock waves is in very good agreement with the results published in literature regarding the 2D version of this specific case (Ref. 1), but with additional 3D effects.
Figure 2: Diffraction pattern in the Mach number arising from supersonic flow hitting a small obstacle in its path.
Figure 3: Contours of pressure showing the position of the shocks.
Another interesting plot, Figure 4, is the mesh obtained after refinement. It is clear that the adaptive mesh feature is able to resolve the zones of the domain where the gradients in Mach number are large.
Figure 4: Adapted mesh. The mesh resolves the shock waves more finely than the rest of the modeling domain.
Notes About the COMSOL Implementation
The adaptive mesh refinement feature is used to refine the mesh near the shocks. The L2 norm is set to compute the error estimate. The Maximum number of refinements is set to 2 with an Element growth rate of 1.7 (the number of elements increases by about 70% at every refinement). Depending on the amount of computer memory available, the maximum number of refinements could be decreased, or increased to improve the resolution of the shock waves.
The linear system of equations for the initial mesh can be solved with a direct solver. However, when the mesh is refined, the number of degrees of freedom of the problem increases and the problem becomes more expensive to solve. An iterative solver is a good option to reduce the computational resources needed to solve the problem.
Reference
1. J.F. Lynn, Multigrid Solution of the Euler Equations with Local Preconditioning, Dissertation, University of Michigan, 1995.
Application Library path: CFD_Module/High_Mach_Number_Flow/euler_bump_3d
Modeling Instructions
From the File menu, choose New.
New
In the New window, click Model Wizard.
Model Wizard
1
In the Model Wizard window, click 3D.
2
In the Select Physics tree, select Fluid Flow>High Mach Number Flow>High Mach Number Flow, Laminar (hmnf).
3
Click Add.
4
Click Study.
5
In the Select Study tree, select Preset Studies>Stationary.
6
Click Done.
Parameters
On the Home toolbar, click Parameters.
Global Definitions
Parameters
1
In the Settings window for Parameters, locate the Parameters section.
2
Geometry 1
First, build the rectangular channel.
Block 1 (blk1)
1
On the Geometry toolbar, click Block.
2
In the Settings window for Block, locate the Size and Shape section.
3
In the Width text field, type 5.
4
In the Depth text field, type 0.5.
5
In the Height text field, type 2.
6
Locate the Position section. In the x text field, type -1.
Now, build a cylinder that will be used to create the obstacle.
Work Plane 1 (wp1)
1
On the Geometry toolbar, click Work Plane.
2
In the Settings window for Work Plane, locate the Plane Definition section.
3
From the Plane list, choose xz-plane.
Plane Geometry
In the Model Builder window, under Component 1 (comp1)>Geometry 1>Work Plane 1 (wp1) click Plane Geometry.
Circle 1 (c1)
1
On the Work Plane toolbar, click Primitives and choose Circle.
2
In the Settings window for Circle, locate the Size and Shape section.
3
In the Radius text field, type (0.5^2/0.042+0.042)/2.
4
Locate the Position section. In the xw text field, type 0.5.
5
In the yw text field, type 0.042-(0.5^2/0.042+0.042)/2.
6
On the Work Plane toolbar, click Build All.
7
In the Model Builder window, click Geometry 1.
Extrude 1 (ext1)
1
On the Geometry toolbar, click Extrude.
2
In the Settings window for Extrude, locate the Distances section.
3
4
Click to expand the Displacements section. In the table, enter the following settings:
5
Click Build Selected.
Difference 1 (dif1)
1
On the Geometry toolbar, click Booleans and Partitions and choose Difference.
2
Select the object blk1 only (rectangular channel) in the Objects to add subsection.
3
In the Settings window for Difference, locate the Difference section.
4
Find the Objects to subtract subsection. Select the Active toggle button.
5
Select the object ext1 only (the cylinder)
6
Click Build All Objects.
7
Click the Zoom Extents button on the Graphics toolbar (see the figure below).
Definitions
1
In the Model Builder window, under Component 1 (comp1) right-click Definitions and choose View.
2
Expand the Definitions node.
Camera
Define a preferred view. The model MPH-file available in the Application Libraries contains different views used to obtain the figures shown in this documentation.
High Mach Number Flow, Laminar (hmnf)
This problem does not require Pseudo-Time stepping for stationary equation form. The convergence is faster if this option is deselected.
1
In the Model Builder window’s toolbar, click the Show button and select Advanced Physics Options in the menu.
2
In the Model Builder window, expand the Component 1 (comp1)>Definitions>View 3 node, then click Component 1 (comp1)>High Mach Number Flow, Laminar (hmnf).
3
In the Settings window for High Mach Number Flow, Laminar, click to expand the Advanced settings section.
4
Locate the Advanced Settings section. Find the Pseudo time stepping subsection. Clear the Use pseudo time stepping for stationary equation form check box.
Fluid 1
1
In the Model Builder window, under Component 1 (comp1)>High Mach Number Flow, Laminar (hmnf) click Fluid 1.
2
In the Settings window for Fluid, locate the Heat Conduction section.
3
From the k list, choose User defined. In the associated text field, type 1e-8.
4
Locate the Thermodynamics section. From the Rs list, choose User defined. In the associated text field, type Rs.
5
From the Specify Cp or γ list, choose Ratio of specific heats.
6
From the γ list, choose User defined. In the associated text field, type gamma.
7
Locate the Dynamic Viscosity section. From the μ list, choose User defined. In the associated text field, type 1e-8.
The dynamic viscosity and thermal conductivity are set to small values to mimic an inviscid and non-conducting fluid.
Wall 1
1
In the Model Builder window, under Component 1 (comp1)>High Mach Number Flow, Laminar (hmnf) click Wall 1.
2
In the Settings window for Wall, locate the Boundary Condition section.
3
From the Wall condition list, choose Slip.
Initial Values 1
1
In the Model Builder window, under Component 1 (comp1)>High Mach Number Flow, Laminar (hmnf) click Initial Values 1.
2
In the Settings window for Initial Values, locate the Initial Values section.
3
Specify the u vector as
4
In the p text field, type pin.
5
In the T text field, type Tin.
Symmetry 1
1
On the Physics toolbar, click Boundaries and choose Symmetry.
2
Inlet 1
1
On the Physics toolbar, click Boundaries and choose Inlet.
2
3
In the Settings window for Inlet, locate the Flow Condition section.
4
From the Flow condition list, choose Supersonic.
5
Locate the Flow Properties section. In the p0,stat text field, type pin.
6
In the T0,stat text field, type Tin.
7
In the Ma0 text field, type Min.
Outlet 1
1
On the Physics toolbar, click Boundaries and choose Outlet.
2
3
In the Settings window for Outlet, locate the Flow Condition section.
4
From the Flow condition list, choose Supersonic.
Mesh 1
1
In the Model Builder window, under Component 1 (comp1) click Mesh 1.
2
In the Settings window for Mesh, locate the Mesh Settings section.
3
From the Element size list, choose Normal.
4
Click Build All.
5
Click the Zoom Extents button on the Graphics toolbar.
Study 1
Step 1: Stationary
1
In the Settings window for Stationary, click to expand the Adaptation and error estimates section.
2
Locate the Adaptation and Error Estimates section. From the Adaptation and error estimates list, choose Adaptation and error estimates.
3
Find the Mesh refinement subsection. In the Maximum number of refinements text field, type 2.
Depending on the amount of computer memory available the Maximum number of refinements may be increased to improve the resolution of shock waves.
Solution 1 (sol1)
1
On the Study toolbar, click Show Default Solver.
2
In the Model Builder window, expand the Solution 1 (sol1) node.
The amount of computational resources needed to solve the problem after refining the mesh can be reduced by means of an iterative solver:
3
In the Model Builder window, expand the Study 1>Solver Configurations>Solution 1 (sol1)>Stationary Solver 1 node.
4
Right-click Study 1>Solver Configurations>Solution 1 (sol1)>Stationary Solver 1 and choose Iterative.
5
Right-click Study 1>Solver Configurations>Solution 1 (sol1)>Stationary Solver 1>Iterative 1 and choose Multigrid.
6
On the Study toolbar, click Compute.
Results
Slice
In the Model Builder window, expand the Velocity (hmnf) node.
Surface 1
1
Right-click Slice and choose Delete.
2
In the Model Builder window, under Results right-click Velocity (hmnf) and choose Surface.
3
On the Velocity (hmnf) toolbar, click Plot.
4
Click the Zoom Extents button on the Graphics toolbar.
Pressure (hmnf)
1
In the Model Builder window, under Results click Pressure (hmnf).
2
In the Settings window for 3D Plot Group, locate the Data section.
3
From the Data set list, choose Study 1/Level 2 Refined Solution 2 (sol2).
Surface
In the Model Builder window, expand the Pressure (hmnf) node.
Pressure (hmnf)
1
Right-click Surface and choose Delete.
2
On the Pressure (hmnf) toolbar, click Plot (see Figure 3).
Slice
In the Model Builder window, expand the Mach Number (hmnf) node.
Surface 1
1
Right-click Slice and choose Delete.
2
In the Model Builder window, under Results right-click Mach Number (hmnf) and choose Surface.
3
In the Settings window for Surface, locate the Expression section.
4
In the Expression text field, type hmnf.Ma.
5
On the Mach Number (hmnf) toolbar, click Plot (see Figure 2).